Table of Contents
Advertisement
Quick Links
Advertisement
Table of Contents

Related Manuals for CDA FW822


Summary of Contents for CDA FW822
- Page 1 FW822 Integrated fridge Installation, use and maintenance www.cda.eu...
-
Page 2: Table Of Contents
Contents: Important information Important notes Before first use Important notes on use of the fridge Storage Control panel Care and cleaning Defrosting the fridge Changing the light Troubleshooting Installation preparation Ventilation requirements Installation into the cabinet Mounting the fascia door Reversing the appliance door 20 Electrical information 23 Energy efficiency information... - Page 3 Appliance information: Please enter the details on the appliance rating plate below for reference, to assist CDA Customer Care in the event of a fault with your appliance and to register your appliance for guarantee purposes. Appliance Model...
-
Page 4: Important Information
This appliance has been manufactured to the strictest standards and complies with all applicable legislation, including Electrical safety (LVD) and Electromagnetic interference compatibility (EMC). Parts intended to come into contact with food conform to 1935/2004/EC. IMPORTANT INFORMATION FOR CORRECT DISPOSAL OF THE PRODUCT IN ACCORDANCE WITH EC DIRECTIVE 2012/19/EU. -
Page 5: Before First Use
Important • Never store inflammable or explosive items and strong corrosive acids or alkalis in the appliance. • This is a household appliance, which is produced in accordance with the national standard. It is intended for food storage only, not for storage of blood, medicine and biological products. - Page 6 The fridge may have an odour to it at first use. This will disappear as the appliance cools. Please note: The appliance will start on temperature setting 3 and work continuously until it comes down to the correct temperature. If the appliance is switched off, you should allow five minutes before switching it on again to prevent unnecessary damage to the compressor.
- Page 7 prevent the loss of moisture, keep food fresh and avoid unpleasant odours. • Sort foods prior to storing. Any foods to be used soon should be stored at the front of the shelf to prevent deterioration caused by the door being open for prolonged periods. •...
-
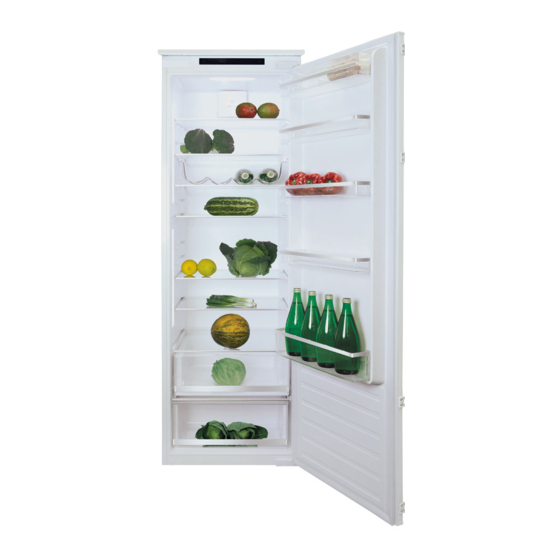
Page 8: Storage
As the cold air circulates within the fridge, the temperature can vary between the different sections. As such, foods should be stored in different sections according to type. Sections 6 and 7 are the coldest parts of the fridge. FW822 Butter, cheeses etc. Food in jars and bottles Drinks, e.g. milk Cooked food Yogurts, preserves etc. -
Page 9: Control Panel
Control panel Fig. 3 A. Refrigerator temperature adjustment sensor This button is used to adjust the temperature within the fridge. Press this sensor once to activate adjustment, and then as many times as necessary until the desired level is selected. The settings range from 1 to 6 with 1 being the warmest and 6 being the coldest. -
Page 10: Care And Cleaning
Care and cleaning Drain Plug Always disconnect the appliance from the power supply before any cleaning or maintenance. The fridge and crisper sections Drain hole should be cleaned using a solution of bicarbonate of soda and lukewarm water. Do not use abrasive products or detergents. -
Page 11: Defrosting The Fridge
13. Changing the light If the LED lighting fails in any way, it should only be replaced by CDA authorised service agents. In the event of light failure within your fridge please contact CDA Customer Care to arrange a service visit. -
Page 12: Troubleshooting
Troubleshooting If you have any problems with your appliance, you should check the troubleshooting prior to calling CDA Customer Care. If the appliance is not working, check: • That there is power to the appliance. • The house fuses are intact and the fuse in the plug has not blown. - Page 13 • Check the door seal for any kinks, debris or damage. If you notice any, and are unable to resolve the issue yourself, contact CDA Customer Care so that the seal can be replaced. •...
-
Page 14: Installation Preparation
Installation preparation 560-570 FW822 550 min. This appliance must never be installed close to heat sources, e.g. heating elements or cookers, nor in damp 1785- 1788 places. 1776 Seek the help of another individual, min. 30 or two, when installing this appliance. - Page 15 consumption, total system failure and may invalidate the warranty provided with the appliance. For products intended to be installed into a tall housing unit, the following requirements need to be met: Refrigerator The top of the cabinet needs to be outline An air intake vented into the room...
-
Page 16: Installation Into The Cabinet
be drawn over the compressor & heat exchange. A decorative grille is supplied with the appliance to finish this vent neatly. Alternatively the required air flow can be achieved by removal of a thin section of plinth (recommended 600mm x 10mm minimum). As a rule, the more air that can get in and out, the better and more efficient the operation of the product. -
Page 17: Mounting The Fascia Door
Secure the top of the appliance to the top of the cabinet through the metal trim screw holes marked ‘T’ in fig 10. Trim Fig. 10 Remove the white spacers from the base plates and secure the plates to the cabinet base using four of the supplied screws. Replace the spacers. - Page 18 Once complete, and if you are happy with the fit of the appliance in the cabinet, bend and snap the parts of the white spacers marked ‘S’ as shown by the dotted outline in fig. 13. Leave the rest of the spacer cover in place over the metal plates.
-
Page 19: Reversing The Appliance Door
Reversing the appliance door We recommend you seek the help of another individual to support the doors whilst performing this operation. Always wear adequate PPE (Personal Protective Equipment) for the task at hand. Prepare a surface with a soft, clean towel or similar where you can place the door during these steps. -
Page 20: Electrical Information
adequate. When completed, allow the seal and door to cool before touching them. Once done, the seal should remain in position. Electrical information Warning! This appliance must be earthed. Green and Yellow to Earth Brown to Liv e 13 Amp fuse Cord Clamp Blue to Neutral Fig. - Page 21 N.B. Ensure that the plug socket is situated in an easily accessible place after installation. E & O E. All instructions, dimensions and illustrations are provided for guidance only. CDA reserve the right to change specifications without prior notice.
- Page 22 NOTES:...
- Page 23 Attribute Symbol Value Units Model identification FW822 Category of the household refrigerating appliance Voltage / Frequency 220 - 240V / 50Hz Dimensions (W x D x H cm) 540 x 540 x 1776 Mass of the appliance Annual energy consumption kWh/year The energy consumption is based on standard test results for 24 hours.
- Page 24 For more information please contact: The Sales Department on 01949 862 010 or email sales@cda.eu Customer Care Department. The CDA Group Ltd, Harby Road, Langar, Nottinghamshire, NG13 9HY T: 01949 862 012 F: 01949 862 003 E: customer.care@cda.eu www.cda.eu...
Need help?
Do you have a question about the FW822 and is the answer not in the manual?
Questions and answers