Table of Contents
Advertisement
Quick Links
Quick Sheet for Operating the E-Sampler
Smoke Particulate Monitor and
Airsis Satellite Telemetry System
BEFORE GOING TO THE FIELD
Equipment List
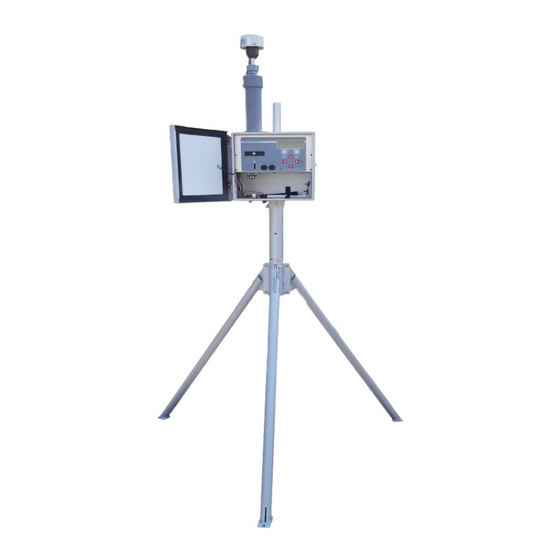
E-Sampler Smoke Particulate Monitor
Tripod
Weatherproof power supply/battery charger
Gel cell battery
PM
sharp cut cyclone
2.5
TSP inlet (weather cap)
Airsis telemetry system
o Power cord
o Serial communication cable
o Mounting hardware
Two-connection extension cord (if using line power)
Laptop (if downloading data)
Met One serial communication cable (if downloading data)
Miscellaneous tools.
Charging Batteries
Charge the batteries for at least 1 day before use.
E-Sampler –
o Connect the plug from the weatherproof power
supply/battery charger to the appropriate connector on
the bottom of the E-Sampler.
o Connect the power supply to line power. Charge the E-
Sampler power supply for at least 24 hours.
OR
Charge the gel cell battery with a plug-in charger for
o
12-volt gel cells.
Charge the telemetry system by plugging the power cord
from the system to line power.
SITING THE E-SAMPLER AND
TELEMETRY SYSTEM
The E-Sampler and its telemetry system should be placed in
an open area away from obstructions such as trees or
buildings, and away from external pollution sources (road
dust, industrial pollution, and so forth). The telemetry antenna
must have a clear view of the sky to transmit data.
SETUP IN THE FIELD
Remove the three pins from the tripod and unfold the legs
until they are fully extended. Replace the pins in the holes
in the leg flanges.
Attach the E-Sampler to the tripod by sliding the slot on the
back of the E-Sampler over the mounting tab on the tripod.
Attach the bottom of the E-Sampler to the tripod by sliding
the ¼-inch bolt through the bottom flange and through the
tripod. Hand tighten the nut on the bolt.
Attach the PM
sharp cut cyclone to the inlet of the E-
2.5
Sampler.
Attach the TSP inlet (weather cap) to the PM
cyclone.
Attach the power supply/battery charger to the tripod.
Attach the connector from the power supply to the bottom
of the E-Sampler.
Attach the telemetry system to the tripod, using the supplied
hardware.
Plug the communication cable from telemetry system to the
appropriate connector on the bottom of the E-Sampler.
Attach the power cord from the power supply and telemetry
system to the extension cord and plug in the extension cord
to line power.
OR if using the gel cell battery –
Inside the E-Sampler, remove the battery cover plate.
Connect the two-prong connector of the internal battery
cable to the E-Sampler circuit board.
Attach the RED (+) and BLACK (-) wires of the battery
cable to the battery terminals.
CHECKING SETTINGS ON THE E-SAMPLER
The MENU/SELECT, ESC, left, right, up, and down arrows
are used to traverse the screens on the E-Sampler. The blank
white buttons under the screen are used to save or exit
settings. Settings on the E-Sampler should have been set
already. The instrument stores these settings.
Verifying SETUP settings:
From the Main Screen:
08-JUL-2001 08:23:41
CONC:
UNIT OFF
FLOW:
0.0 LPM
TURN ON
Press the MENU/SELECT button.
OPERATE
>SETUP
CALIBRATE
ALARM LOG
Use the arrow buttons to move the cursor to SETUP. Press
MENU/SELECT.
>CLOCK
AVERAGE PERIOD
CONCENTRATION
SAMPLING MODE
ALARM CONTACT
RH HEATER CONTROL
ZERO MODE
SPAN MODE
BAUD RATE
STATION ID
ENGR UNITS
sharp cut
2.5
Advertisement
Table of Contents

Subscribe to Our Youtube Channel
Related Manuals for Met One Instruments E-Sampler


Summary of Contents for Met One Instruments E-Sampler
- Page 1 BAUD RATE in the leg flanges. STATION ID Attach the E-Sampler to the tripod by sliding the slot on the ENGR UNITS back of the E-Sampler over the mounting tab on the tripod. Attach the bottom of the E-Sampler to the tripod by sliding the ¼-inch bolt through the bottom flange and through the...
- Page 2 ENGR UNITS – Set to METRIC. STOPPING THE E-SAMPLER Press the ESC button twice to get to the main screen. To stop the E-Sampler, press the ESC button to turn the display back on. STARTING A RUN Press the white button under TURN OFF on the next two screens.
Need help?
Do you have a question about the E-Sampler and is the answer not in the manual?
Questions and answers