Table of Contents
Advertisement
Quick Links
Met One Instruments, Inc.
1600 NW Washington Blvd.
Grants Pass, OR 97526
Telephone: (541) 471-7111
Facsimile: (541) 471-7116
www.metone.com
BAM 1022 Particulate Monitor Operation Manual - ©
worldwide. No part of this publication may be reproduced, transmitted, transcribed, stored in a retrieval system, or translated into any
other language in any form without the written permission of Met One Instruments, Inc.
BAM 1022
P
ARTICULATE
O
PERATION
BAM 1022-9800 R
M
ONITOR
M
ANUAL
E
EV
Copyright 2012 Met One Instruments, Inc. All Rights Reserved
Advertisement
Table of Contents

Related Manuals for Met One Instruments BAM 1022


Summary of Contents for Met One Instruments BAM 1022
- Page 1 Copyright 2012 Met One Instruments, Inc. All Rights Reserved worldwide. No part of this publication may be reproduced, transmitted, transcribed, stored in a retrieval system, or translated into any other language in any form without the written permission of Met One Instruments, Inc.
- Page 2 Page 2 BAM 1022-9800 REV E...
-
Page 3: Table Of Contents
2 INSTALLATION & COMMISSIONING 2.1 Unpacking ........................ 11 2.2 Accessories ......................12 2.3 BAM 1022 Installation for FEM Monitoring Applications ........... 12 2.4 BAM 1022 Power and Electrical Connections ............17 3 USER INTERFACE 3.1 Main Operating Screen .................... 18 3.2 Menu Hierarchy and Navigation ................ - Page 4 7.5 Data Format & Example Reports ................61 8 THEORY OF OPERATION 9 ACCESSORIES and PARTS 9.1 Consumables, Replacement Parts, and Accessories ..........66 APPENDIX A: ACRONYMS AND ABBREVIATIONS APPENDIX B: CONFIGURING NETWORK IP ADDRESS Page 4 BAM 1022-9800 REV E...
-
Page 5: Introduction
This document is organized with the most important information toward the front of the manual, such as site selection, installation, setups, and field calibrations, which all BAM 1022 owners and operators should read and understand. Toward the back are sections that provide in-depth information on subjects such as theory, diagnostics, accessories, and alternate settings. -
Page 6: Technical Service
Technical Service This manual is structured by customer feedback to provide the required information for setup, operation, testing, maintaining, and troubleshooting your BAM 1022 mass monitor. Should you still require support after consulting your printed documentation, we encourage you to contact one of our expert Technical Service representatives during normal business hours of 7:00 a.m. -
Page 7: Bam: Beta Attenuation Monitor
NOTE: For proper performance, the BAM 1022 must be operated outdoors and should not be installed inside of a building, trailer, or other shelter. It must be allowed to run at ambient conditions. This is required for the BAM 1022 to operate as a U.S. EPA PM Class III Equivalent Method monitor. -
Page 8: Safety Statements
“Exempt Concentration Limit” as defined in USC 10 CFR Section 30.71 – Schedule B. The owner of the BAM 1022 is not required to obtain any license in the United States to own or operate the mass monitor. The owner of a BAM 1022 may elect to return the entire mass... -
Page 9: Bam 1022 Specifications
38.6 kg (85 lbs) fully assembled Power Supply 100 - 230 VAC; 50/60 Hz universal AC power Power Consumption Approximately 300 W (including BAM 1022, Inlet Heater, Pump, and Vent Fan) Approvals NRC, ISO-9001, ROHS, US-EPA (Specifications may be subject to change without notice.) -
Page 10: Epa Federal Equivalency Method Notifications
Designation Number: EQPM-1013-209 (PM2.5 with BGI/Mesa Labs VSCC™ or Tisch Cyclone) US-EPA designated methods using the BAM 1022 are modified from time to time in order to reflect hardware or software improvements. These modifications do not impact previously designated configurations of the BAM 1022 but may provide the end user with a product upgrade path that will allow the monitor to continue to be operated as a US-EPA designated method. -
Page 11: Installation & Commissioning
Unpack the mass monitor and accessories and compare them to the packing list to make sure all items are present. The BAM 1022 is shipped with a white plastic shim pinched under the nozzle of the mass monitor which prevents the moving parts of the nozzle assembly from being damaged in transit. -
Page 12: Accessories
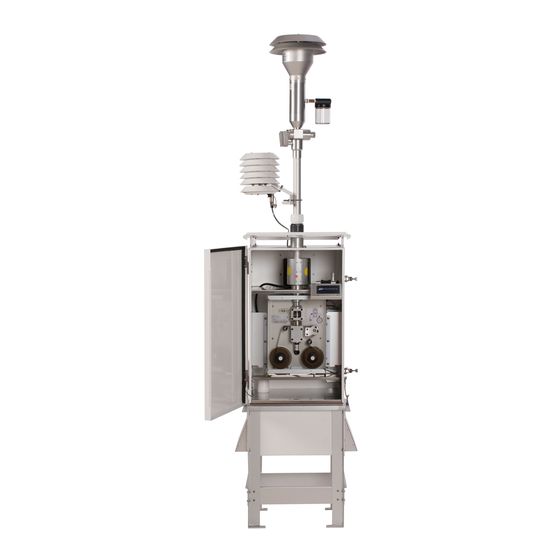
Accessories Every BAM 1022 requires the use of ancillary components. The items supplied with a standard BAM 1022 PM FEM monitoring system are as follows: Standard Components Part No. Size Selective Inlet BX-802 Very Sharp Cut Cyclone BX-808 Inlet Tube Heater... - Page 13 See pictures below. CAUTION: Do not lift the BAM 1022 monitor by the angled solar radiation shield mounted to the top of the enclosure. It is not designed to hold the weight of the full assembly and can easily be damaged if used to lift the monitor.
- Page 14 8. Locate the red cap covering the inlet tube receiver inside the BAM 1022 enclosure. It is found just to the left of the touchscreen display. Remove the large red cap and a smaller red insert will be revealed beneath it. Remove this cap as well.
- Page 15 12. Install the 597 probe on the inlet tube above the roof of the BAM 1022 enclosure using the U-bolt with the nuts and washers provided. Connect the silver connector of the cable to the silver connection on the bottom of the sensor. See pictures below.
- Page 16 18. Replace the cable access cover panel on the back of the enclosure and affix it in place with the four wing nut fasteners. Be sure the flange is on the bottom so that the power cable and the sensor cable will be pinned between the foam strips and held in place. Page 16 BAM 1022-9800 REV E...
-
Page 17: Bam 1022 Power And Electrical Connections
BAM 1022 Power and Electrical Connections The BAM 1022 should be powered by either a 110 VAC 50/60Hz or 220 VAC 50/60 Hz source. Before proceeding with electrical connections, review the following notifications: Ensure that the monitoring site mains power (voltage and frequency) is compatible with the version of BAM 1022 monitor and accessories that has been purchased. -
Page 18: User Interface
3 USER INTERFACE The BAM 1022 user interface is a touchscreen display used to control almost all of the features and functionality of the BAM 1022. It is mounted on a hinged bracket located inside the enclosure near the inlet tube in the upper right hand corner of the monitor. The center screw of the mounting bracket hinge adjusts the amount of force necessary to reposition the bracket. -
Page 19: Menu Hierarchy And Navigation
Menu Hierarchy and Navigation The BAM 1022 menu structure is outlined in the following table. Main Menu Sub Menu Options Overview Operate Start Sample Begin or resume monitoring (will indicate Stop Sample, if appropriate) See section 3.3 Load Filter Tape... - Page 20 Press the OK key to accept the changes or the Cancel key to return to the previous screen. The X key on the far right performs a backspace operation. Page 20 BAM 1022-9800 REV E...
-
Page 21: Operate Menu
BAM 1022. 3.3.1 Start Sample This screen allows users to both start and stop the BAM 1022 sampling process. Upon entering this screen, a warning will be displayed asking users if they would like to start or stop a sample, depending on the current state of the monitor. -
Page 22: Test Menu
3.4.2 Ambient Temperature This screen provides the options and indications needed to default, verify, and calibrate the ambient temperature sensor as part of the flow audit and calibration. See section 6.4 for detailed instructions. Page 22 BAM 1022-9800 REV E... - Page 23 Tap the down arrow key in the lower left corner of the display to scroll through the three screens shown above. Tapping the arrow on the last screen will return you to the first one. BAM 1022-9800 REV E Page 23...
- Page 24 Verify the actual output using a voltmeter at the appropriate channel terminals on the rear panel of the BAM 1022. If the output is not correct, use the up and down arrow keys to modify the Adjust field. When the FINE/COARSE selection is set to FINE, units will be incremented by one.
- Page 25 You’ll notice the Min Out and Max Out fields match the zero and full scale values for the selected output. Between them is the Set Out field, which will update with the expected output based on the concentration selected. Verify the output on the back of the BAM 1022 matches the Set Out value shown.
-
Page 26: Setup Menu
The Setup Menu grants access to the configuration of the majority of the operating parameters for the BAM 1022. It allows you to change offsets, clear the memory, set the date and time, and much more. Because of the changes able to be made, the Setup Menu is password protected. - Page 27 See section 7.4 for more details about serial communications. 3.5.6 Location You may enter a four-digit location ID for the BAM 1022. Press the green bordered value box and the numerical entry keypad will be displayed. Enter the new location ID value.
- Page 28 1, 5, 10, 15, and 30 minutes or 1 HR (for a one hour average). 3.5.8 Real Time Period The Real Time averaging period for the BAM 1022 is set here. Press the green bordered value box and a list of the settings available will be displayed.
- Page 29 Enter the new threshold value. 3.5.13 Tape Advance The BAM 1022 will advance the filter tape to a clean spot if the pressure drop across the tape gets too large. The threshold for this action can be set from 50 to 350 mmHg in one mmHg increments.
-
Page 30: Alarms Menu
3.5.14 Change Password Certain menus and options of the BAM 1022 are password protected. You may use any four digit password you would like and this is the screen you need to access to change it. Press the green bordered value box and the numerical entry keypad will be displayed. -
Page 31: Operation
4 OPERATION Initial Procedures Prior to turning on the BAM 1022, confirm that all equipment set up procedures, outlined in Section 2 of this manual, have been completed. The BAM 1022 power switch is located behind the rear panel near the bottom of the enclosure on the left hand side. - Page 32 3. Press the MOVE button again to take out any additional slack and verify the tape is loaded correctly. Notes: • One roll of filter tape will last approximately 8 weeks when the BAM 1022 is set up to operate as a U.S. EPA PM FEM.
-
Page 33: Warm-Up Period
Warm-up Period If the BAM 1022 has been switched off for more than a few moments, the mass monitor must warm up for at least one hour before accurate PM measurements can be obtained. This is because the beta detector must stabilize. Users are encouraged to disregard the first two hourly PM data sets after power is restored. -
Page 34: The Bam 1022 Measurement Cycle
Short Term Averaging The BAM 1022 always reports the hourly PM concentration at the top of the hour. Given that the measurement occurs in real time, hourly results may be supplemented with shorter term data. - Page 35 BAM 1022-9800 REV E Page 35...
-
Page 36: Maintenance, Alarms & Troubleshooting
6 Months Sec. 6.7 Replace the pump muffler 6 Months 6 Months Sec. 3.4.11 Test analog output voltage (if used) Rebuild AC pump As needed BX-126 Manual Empty PM inlet water jar As needed Page 36 BAM 1022-9800 REV E... -
Page 37: Basic Leak Check
Verify the nozzle is in the down position. If it is not, press the nozzle control button to lower it. The BAM 1022 is ready to begin the leak test. 3. Press grey pump control button in the lower left corner to turn on the pump begin drawing a vacuum on the sampling system. -
Page 38: Advanced Leak Checks
3. Press the nozzle control button to lower the nozzle on to the sealing tool. 4. Press pump control button to turn on the pump. Monitor the flow rate on the BAM 1022 display. Remember the flow will temporarily rise before it drops. - Page 39 3. Press the nozzle control button to lower the nozzle on to the sealing tool. 4. Press pump control button to turn on the pump. Monitor the flow rate on the BAM 1022 display. Remember the flow will temporarily rise before it drops.
-
Page 40: Flow Audit And Calibration
8. Remove the Nozzle Seal Tool. 9. Place a 3 inch long piece of filter tape directly below the nozzle and lower it again. 10. Press pump control button to turn on the pump. Monitor the flow rate on the BAM 1022 display. - Page 41 Use the following steps to verify and calibrate sensors associated with the BAM 1022 sample flow control system. 1. Make certain that the BAM 1022 has warmed up for at least 60 minutes prior to performing calibrations. Also, allow the calibration transfer standard (CTS) to equilibrate to ambient conditions for no less than 30 minutes.
- Page 42 16. If the BAM 1022 flow rate exceeds the criteria listed in the table above, press the grey DEFAULT button to remove any previous offsets for all three flow settings. If the flow rate now passes, skip the next step.
-
Page 43: Background Determination (Mass Offset)
Use the following steps to conduct a zero filter background test and set the mass offset. 1. Ensure that the BAM 1022 has been calibrated and that leaks are not present. 2. Go to the Operate menu and select Stop Sample to stop the current sample. - Page 44 (2σ). If the standard deviation is greater than 2.4 µg, the cause should be investigated. Contact your local Met One Instruments representative for assistance. Page 44 BAM 1022-9800 REV E...
-
Page 45: Nozzle, Vane & Pinch Roller Cleaning
4. If debris falls through or is found beneath the vane, carefully clean the cavity with a blast of compressed air. 5. Re-install the BAM 1022 filter tape per section 4.2 and perform a leak check as instructed in section 6.2. -
Page 46: Internal Nozzle Cleaning
4. Gently slide the canned air tube down the inlet receiver on top of the BAM 1022. Supply multiple short blasts of air, while moving the canned air tube from side to side to blow on all surfaces inside the inlet. -
Page 47: Span Mass Audit
This screen, located in the Test menu, is used to verify the performance of the BAM 1022 beta attenuation system. A zero and span foil (included in the BAM 1022 accessory kit) will be required to complete this procedure. When this screen is accessed, the nozzle will be raised and you will be instructed to enter the zero calibration foil. - Page 48 Press the X button in the upper right corner to exit the audit. The nozzle will be raised you will be instructed to remove the span foil. Remove the foil and the display will automatically return to the Test menu. Page 48 BAM 1022-9800 REV E...
-
Page 49: Filter Sensor Testing
3. Verify the BAM 1022 reading matches the standard within +/- 1 deg C. a. If the sensors do not match within specification, press the green bordered Standard value field and enter the value reported by the standard. - Page 50 6. Place the pressure standard as close as possible to the nozzle opening. Allow at least ten minutes for the standard to equilibrate with the filter sensor. 7. Verify the BAM 1022 reading matches the standard within +/- 5 mmHg. a. If the sensors do not match within specification, press the green bordered Standard value field and enter the value reported by the standard.
-
Page 51: Basic Problems & Solutions
The following table contains information on some of the more common problems that may be encountered, and some steps to identify and remedy the problems. Met One Instruments welcomes customer suggestions for new items to include in this section of future manual revisions. - Page 52 After several years the battery may need to be replaced if the clock resets when the mass monitor is powered off. • It is normal for the clock to drift as much as 2 minutes per month. Page 52 BAM 1022-9800 REV E...
-
Page 53: Alarms
A list of alarms is detailed below. An alarm is indicated and logged at the time it occurs. The resolution time is not recorded. See section 3.5 for an explanation of viewing alarms through the BAM 1022 panel display. Code... -
Page 54: Hardware Failure Screen
The sensor outside range alarm event occurs when one of the sensors listed in the table below is reading outside of its designated limit. Each sensor, along with its limits, is shown in the following table. The Stop column indicates whether or not the error will cause the BAM 1022 to stop sampling. Sensor Minimum Maximum... -
Page 55: Alarm Relay
6.14 Alarm Relay There is one alarm relay on the BAM 1022 to indicate to an external device that an alarm has occurred. It is a normally open (NO) contact that closes whenever there is a pending alarm. The short sample and tape advance alarms do not affect the alarm relay. See section 3.4.14 for testing details. -
Page 56: Data Collection And Communications
7 DATA COLLECTION AND COMMUNICATIONS The BAM 1022 is capable of relaying information to and from external devices using analog outputs, digital inputs and outputs, RS-232 serial communications, USB serial, Ethernet and USB flash drive. Analog & Digital I/O Terminal connections on the rear panel of the BAM 1022 are available for communicating with data acquisitions system by means of analog and digital inputs and outputs. -
Page 57: Clock Sync
Transfer Data to USB Flash Drive The BAM 1022 can copy data files directly to a user-supplied USB flash drive. This drive must be installed in the USB port located behind the front door, in the upper left corner of the tape transport. -
Page 58: Serial Communications
Terminal Mode 7.4.1.1 The BAM 1022 must be placed in Terminal Mode to use the Terminal Mode command set. From any command prompt (such as the terminal window in the Comet software), send three <cr> carriage returns (“Enter” key on a standard keyboard) through the serial port. The instrument will respond with an asterisk ( * ) indicating that it is in Terminal Mode. - Page 59 Get Met One serial number Get/Set sample time (data log period) – $ Get/Set timestamp mode – $ Get/Set Operation state report – $ Get/Set user password – $ BKGD Get/Set background offset – $ BAM 1022-9800 REV E Page 59...
- Page 60 0.4 – 1.0 Span audit verification 0.780 SPAN 0 – 50 Inlet heater FT set point (C) FTSP 50 – 350 Tape advance pressure (mmHg) 250.0 TPRES Unlock User commands Get mass monitor serial number Page 60 BAM 1022-9800 REV E...
- Page 61 Samples of the more common reports and file downloads are shown in the following sections. 7.5.1 Settings Report Issue the 1-command to output the Settings report. BAM 1022 Settings Report 2014-06-02 17:12:04 Firmware, 81650, R1.0.0 CPLD, 81699, R0.1.0 Serial Number, A99999...
- Page 62 When the data file is full the oldest data event record is over written. The table below shows the file duration for the D VERAGE ERIODS ERIOD ONTHS EARS 41.1 82.1 123.2 246.4 492.8 16.4 Page 62 BAM 1022-9800 REV E...
- Page 63 2014-05-14 17:02:30,NOZZLE FAILURE,FOIL INSERT 2014-05-14 17:02:30,DIGITAL LINK DOWN 2014-05-14 17:02:30,POWER OUTAGE 2014-05-14 17:02:30,MAINTENANCE The Alarm file can store 200 events. When the Alarm file is full the oldest alarm event record is over written. BAM 1022-9800 REV E Page 63...
-
Page 64: Theory Of Operation
The “k” factor is determined experimentally during the factory calibration process by comparing the mass output of the BAM 1022 under test with the mass output of a transfer standard beta gauge that has been calibrated against gravimetrically traceable standard s. - Page 65 For the BAM 1022, the rate at which mass accumulates onto the filter tape during the measurement cycle determines the minimum usable time resolution of the device. BAM 1022-9800 REV E Page 65...
- Page 66 Zero Filter Calibration Kit, with valve BX-302 Same as BX-305 but with 0.2 micron filter Volumetric Flow Calibration Kit (BGI deltaCal™) Flow, Temp, and Pressure Reference Standards BX-307 Met One recommended flow audit meter Page 66 BAM 1022-9800 REV E...
- Page 67 Inlet Heater, 110 VAC BX-841 Inlet Heater, 220 VAC BX-842 Insulation Sleeve for Inlet Heater 9123-2 Meteorological Sensors Combination Ambient Temperature and Barometric Pressure Sensor Standard Accessory Digital Signal Cable, 597 Sensor to BAM 1022 81977 BAM 1022-9800 REV E Page 67...
- Page 68 Grounding Cable 9528 Allen Wrench 5/64 99300 6” Applicator, Wooden, Cotton Tip, Pack of 10 995217 Mass Foil Set (includes zero and span tools) 80307 Rubber Nozzle Seal Tool 7440 Pipe Seal Assembly 8119 Page 68 BAM 1022-9800 REV E...
- Page 69 Particulate Matter ≤ 2.5 μm QA/QC Quality Assurance/Quality Control Quality Assurance Quality Control Actual Flow Rate Relative Humidity Sharp Cut Cyclone Standard Operating Procedure Standard Reference Material TEMP Temperature Total Suspended Particulate VSCC Very Sharp Cut Cyclone BAM 1022-9800 REV E Page 69...
- Page 70 To establish Ethernet communications on a local network, a static IP address must be assigned to the BAM 1022. Users should contact their local IT support staff to obtain a static IP address and any additional assistance needed to complete the following procedure.
- Page 71 9. Set the baud rate to 38400. 10. Press the Set button to change the IP address of the BAM 1022. 11. Click the X button to close the window. 12. On the Drivers CD menu (see Figure B-1), click the Ethernet Drivers button. The Choose Destination screen will appear as shown in Figure B-3.
- Page 72 16. Double click the VirtualSErialPorts.exe file. The VirtualSerialPorts window (Figure B-5) should appear. Figure B-5 Virtual Serial Ports Configuration 17. Click the New button. 18. Enter the IP address previously recorded in step 7. Page 72 BAM 1022-9800 REV E...
- Page 73 20. Select a Com Port from the drop down window. This will be the Com port used by the PC for communicating to the BAM 1022. The settings should look similar to Figure B-6. Figure B-6 Virtual Serial Ports Configuration (continued) 21.
- Page 74 Figure B-8 The NetBurner Setup Page 25. In the upper right hand corner, click on the link labeled “Serial” to configure the serial settings for the adapter. The NetBurner Serial configuration screen should be displayed (see Figure B-9). Page 74 BAM 1022-9800 REV E...
- Page 75 This completes the virtual com port drivers. Note that this instrument will always be accessed by the Com Port selected in step 20. Click the close button on the browser and the VirtualSerialPort program window. BAM 1022-9800 REV E Page 75...
Need help?
Do you have a question about the BAM 1022 and is the answer not in the manual?
Questions and answers
There has been a regular flow issues wIth our BAM1022. can you help us resolve this flow issues
To resolve flow issues with the Met One Instruments BAM 1022, follow these steps:
1. Check for Air Pump Wear – If the airflow does not regulate at 16.7 lpm, the air pump may be losing vacuum capacity. Perform a flow calibration to confirm.
2. Inspect for Leaks – Check for leaks at the nozzle, as leaks can cause low inlet flow despite the correct sensor reading. Clean the nozzle and vane.
3. Replace the Pump Muffler – The gray plastic pump muffler clogs after several months, reducing vacuum capacity. Replace it every six months.
4. Examine the Inlet and PM Heads – Ensure there are no obstructions in the inlet or PM heads that could restrict airflow.
5. Perform Leak Checks – If leaks persist after cleaning, verify that the nozzle is not sticking. Conduct a basic leak check and, if necessary, follow the Advanced Leak Check procedures in section 6.3 of the manual.
Following these steps should help resolve flow regulation issues.
This answer is automatically generated
@Mr. Anderson all of these has been done except the change of the pump muffler but same problem continue to persistent. Please can I get a picture of the pump muffler
We have a platform where real time air quality data is being accessed. How can we get to put that of the bam via API please
The BAM 1022 can be integrated with a real-time air quality data platform via API by using its Ethernet communication capability. To do this:
1. Assign a static IP address to the BAM 1022 as described in the manual.
2. Set the baud rate to 38400 and Ethernet Flow Control to RTS/CTS in the Serial Port menu.
3. Connect the BAM 1022 to the local network using a CAT5 Ethernet cable.
4. Use appropriate software to access the data through the assigned IP address.
Once connected, data can be retrieved and forwarded to an API for real-time monitoring.
This answer is automatically generated