Table of Contents
Advertisement
Advertisement
Table of Contents

Related Manuals for Manfrotto MVG300XM


Summary of Contents for Manfrotto MVG300XM
- Page 1 INSTRUCTIONS MVG300XM...
-
Page 2: Table Of Contents
Catalogue 1. Product overview ……………………………………………………………… 2 2. Getting started …………………………………………………………………… 5 2.1 Charging ………………………………………………………………………………… 5 2.2 Installing the tripod …………………………………………………………………… 5 2.3 Installing the handle(Remote control) ……………………………………………… 6 2.4 Installing the versatile handle ……………………………………………………… 6 2.5 Motor lock ……………………………………………………………………………… 6 3. - Page 3 MVG300XM features function buttons and an LCD touch screen, which can switch the Gimbal working mode, control rotation and allow parameter setting with one hand. The camera shutter cable supplied can be used to control photography, video recording and electronic follow focus directly on the Gimbal.
-
Page 4: Product Overview
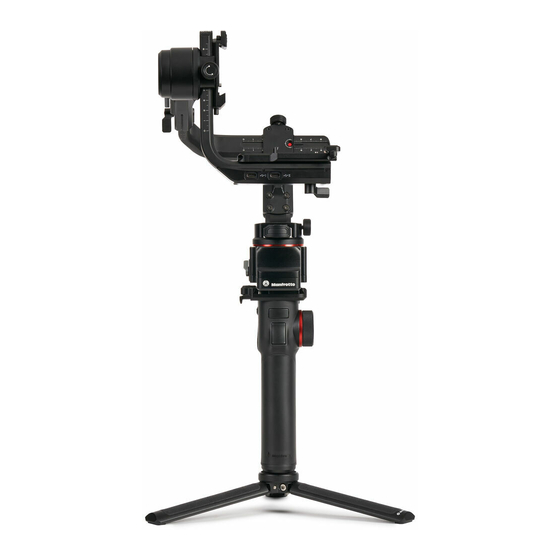
Please read the manual carefully before using. TIPS (1) Install the camera before you power on the gimbal. (2) Gimbal and handle must be set to power off before connecting or disconnecting them. (3) When the battery is low, please charge the gimbal. (4) In case of prolonged periods of disuse, power off the gimbal. - Page 5 Fixed plate safety lock Tilt axis Vertical mounting plate Slider knob Cross extension arm Anti-drop column Cross arm knob Higher block Roll axis Quick Release plate Lens holder Lens holder Quick release plate screw safety lock Anti-drop column Vertical arm fixed screw Versatile handle Pan axis Versatile handle knob...
- Page 6 Accessories USB 2.0 to Type-C Type-C to Micro(A03) Type-C to Mini (B02) Type-C to Type-C (C02) ×1 ×1 ×1 ×1 Type-C to TRS2.5 (T02) Type-C to Multi Type-C to 2.5mm Panasonic shutter cable (DC2.5mm) ×1 Sony shutter cable ×1 ×1 Versatile handle Tripod Quick release plate...
-
Page 7: Getting Started
2. Getting started 2.1 Charging Be sure to fully charge the gimbal before the first use. If the battery is very low, we suggest you charge it straight away. Charging with USB �.� to Type-C supports fast charging. The charging ports can be charged simultaneously. Gimbal and handle For handle charging when connected. -
Page 8: Installing The Handle(Remote Control)
2.3 Installing the handle (remote control) Slide the metal contact part at the bottom of the gimbal part toward the handle and tighten the handle safety lock after sliding it into the corresponding groove. When unloading the handle, unlock the safety lock, release the anti-detachment column, and slowly push out the gimbal. -
Page 9: Installing The Camera
Lock Unlock Figure 2.5-1 Figure 2.5-2 Balanced lock Stored lock 3. Installing the camera Before Installing the camera, make sure it is ready for shooting (Install the camera lens, remove the lens cap, ensure the memory card and battery are inserted in the camera, and the battery is fully charged), complete all the steps mentioned in chapter “2. -
Page 10: Installing The Lens Holder (Optional)
3.2 Installing the lens holder (optional) Install the lens holder on the quick release plate as needed, the lens holder rubber mount must be directly under the lens. It is recommended to use the lens holder when using a long or heavy lens. - Page 11 Removal: unlock quick release plate safety lock ① , remove the quick release plate while pressing anti-drop column ② . Vertical Installation Unlock quick release plate safety lock ① located on the vertical mounting plate, push the plate with the camera mounted into slot ② , lock safety lock ③ once the camera is approximately balanced.
-
Page 12: Gimbal Balancing
Horizontal configuration Vertical configuration 4. Gimbal balancing Before balancing the gimbal, please lock it at balanced lock status, then unlock each axis position lock in stages. TIPS (1) The lens cap should be removed from the camera and the memory card inserted to complete all the connections. -
Page 13: Balancing The Tilt Axis
4.1 Balancing the tilt axis 4.1.1 Adjusting the sliding arm ① Unlock the tilt axis, turn the camera lens upwards. ② Unscrew the sliding arm screw. ③ Slide the vertical arm to balance it until the camera remains in place at any angle: balancing successful. -
Page 14: Balancing The Roll Axis
4.2 Balancing the roll axis ① Unlock the roll axis motor lock. ② Unscrew the cross arm screw. ③ Move the cross arm to the balancing position. ④ Tighten the cross arm screw. Use the red memory dot to mark the balancing position 4.3 Balancing the pan axis ①... -
Page 15: Power On/Off & Wake Up
Use the red memory dot to >15° mark the balancing position 5. Power ON/OFF & Wake up 5.1 Power ON/ OFF Be sure to unlock the position lock before using the gimbal. Long press the power button to power on/off. On the first use, connect the gimbal to the handle then power it on. -
Page 16: Lock & Unlock
5.2 Lock & Unlock Lock the screen: single tap any power button to lock the touch screen. Unlock the screen: single tap any power button again to unlock it. Motor power Follow speed Motor power Follow speed Screen locked.Press Power Screen unlock button to unlock Scenario... -
Page 17: Other Function Introduction
⑤ Recentre Three axes return to default position. ① PF ② PTF ③ FPV ④ Lock ⑤ Recentre 6.2 Other function introduction Gyro mode (refer to chapter 8.2) When the gimbal and handle are successfully paired and separated press and hold the M button to enter gyro mode, the handle can simulate the joystick to control the tilt and pan angle. -
Page 18: Connecting The App
Connect Manfrotto Gimbal 300XM App (1) Power on the Gimbal. (2) On a smartphone, enable Bluetooth and open the Manfrotto Gimbal 300XM App, click the top of the home page to connect to the gimbal. Once the connection is successful, the gimbal can be controlled via the App, including remote direction, switching mode, setting motor power/camera parameters/follow speed, and setting other functions and parameters, updating the firmware and so forth. - Page 19 [1] Gimbal control operation interface Displays the currently connected product name; click to enter the gimbal operation interface: you can simulate the joystick, switch on the gimbal follow mode, manually adjust the roll angle, etc. When not connected, you will be prompted to connect to the gimbal. [2] Switch the connected device Refresh the connected device or switch to connect to other compatible devices.
-
Page 20: Operation
[13] Firmware update Firmware upgrades to the device. [14] Horizontal Angle Settings Move the slider to adjust the roll axis angle, i.e. the current horizontal angle. [15] Recenter Click to return the 3 axes to their default positions. [16] Simulated joystick The simulated joystick controls the tilt, roll angle of the gimbal. - Page 21 8.1.3 Joystick Camera lens up Move to left Move to right Camera lens left Camera lens right Down Camera lens down 8.1.4 Mode button (M button) Single tap: PF mode/Lock mode (Switch in turn) Double tap: PTF mode Triple tap: FPV mode Press and hold*: Gyro mode (Release to exit) *Handle and gimbal are separate 8.1.5 Shutter button*...
- Page 22 8.1.6 Trigger button Double tap: Recentre Triple tap: Enter/Exit selfie mode (Pan axis 180° turn) Press and hold: Enter PTF mode* (Release to exit) *You can customize the function via the APP 8.1.7 Knob function switching button Long press: switch the multifunction knob control options between electronic follow focus and movement of the 3 axes.
- Page 23 Knob settings: Slide up to select the "Knob settings" option. Here, you can set knob damping/speed/ smoothness. Electronic follow focus Damp Speed Tilt Roll Smooth Knob settings Sound 8.1.9 Fast follow button Press and hold: Enter fast follow mode (Release to exit) 8.1.10 A/B button The A/B button can record the Mark point: once recorded, the motion...
-
Page 24: Remote Control
A/B button settings: Slide from right to left, select the "A/B settings" option to set the time for the gimbal to return to point A/B. Return to mark A/B(Gimbal) Gimbal settings Return to mark A/B(Gimbal) A/B settings More 8.2 Remote control The handle is a remote control. - Page 25 (4)Use the remote control handle: wireless remote control the gimbal (within 20 meters) The handle when detached from the gimbal can be used in combination with the Manfrotto GimBoom (MVGBF-CF not included) using the short quick release plate. Mount the short quick release plate screw in the short release plate.
- Page 26 Connect the gimbal to the top of the GimBoom using the 3/8 screw. Note: To remove the handle from the short release plate, unlock the safety lock, release the anti-detachment column, and slowly push out the handle. Gyro mode When the gimbal and handle are successfully paired and separated, press and hold M button to enter the gyro mode, the handle can simulate the joystick to control the tilt and pan angle, release the M button to exit.
-
Page 27: Usb Ports
8.3 USB ports With the camera shutter control interface, and two expansion interfaces, you can connect your camera and other future expansion devices. ① Camera control port ② Extension port 1 ③ Extension port 2 - 25 -... -
Page 28: Touch Screen Introduction
8.4 Touch screen introduction Motor power Follow speed Scenario [1] Handle battery level Shows the current battery level of the handle. [2] Motor power settings Use auto tune to adjust the motor power automatically or adjust motor power for each axis manually. [3] Follow mode settings Select gimbal follow mode [4] Gimbal battery level... -
Page 29: Function Operation
8.5 Function operation 8.5.1 Motor power settings If the camera is used for the first time or replaced, please adjust motor power adaptation after power on. Select the "Motor power" option, select "Auto tune", or adjust the motor power for each axis. Motor power adaptation Auto tune Motor power... - Page 30 8.5.3 Follow mode settings Select the option in the lower right corner. Select one of these follow modes. Motor power Follow speed Lock Scenario PF: Pan follow: only the pan axis follows the movement of user's hand PTF: Pan and tilt follow: both the pan and tilt axes follow the movement of user's hand, but the roll axis does not.
- Page 31 8.5.5 Inception mode settings Select the "Scenario" - "Inception Mode" option. The tilt axis turn 90° counterclockwise, at this time, the camera lens is up, after setting the rotation speed, select the rotation direction and number of circles, then press the top left return button to exit.
- Page 32 8.5.8 Selfie mode settings Select the "Scenario" - "Selfie mode" option. Take a selfie by turning the pan axis 180° counterclockwise, with the camera lens facing at you. Click the button to exit the mode. Panorama Portrait mode Selfie mode Exit selfie mode Disable selfie Slide from right to left, select the "Gimbal settings"...
- Page 33 Smoothness Smoothness Horiz 0° Vert 0° Horiz 0° Vert 0° Preview Preview Start shooting Start shooting The screen shows shooting progress. If you need to stop while shooting, click "Stop shooting". After shooting, click "Confirm and return" to exit. Shooting progress Shoot progress ��...
- Page 34 8.5.11 Manual lock Slide from right to left, select the "Gimbal settings" -"Manual Lock" option, to set the manual lock direction. Manually move the camera to the desired position and hold for a second. New tilt and/or pan positions are saved automatically. Joystick settings Disable selfie Gimbal settings...
- Page 35 8.5.13 More settings Slide from right to left, select the "More" option to set silent/ remote control settings/ language/ restore the default settings/ version information. Gimbal 1.0.0 Gimbal settings Silent Motor 1.0.0 A/B settings Remote control settings Remote 1.0.0 Language Knob 1.0.0 More...
-
Page 36: Firmware Update
8.6 Firmware update Update the firmware via the Manfrotto Gimbal 300XM App. After connecting the gimbal, click the top of the home page to operate the device, select the icon in the upper left corner, select the "Firmware update" option, follow the prompts to upgrade the firmware. -
Page 37: Disclaimer
Waterproof and splash-proof product DO NOT contact sea water or other corrosive liquid. 3. DO NOT disassembly the gimbal except is detachable available. It need send to Manfrotto after- sales or authorized service center to fix it if you accidently disassembly and cause abnormal work. - Page 38 Disclaimer The information contained in this document is subject to change without notice. Vitec Imaging Solutions makes no warranty and shall not be liable for any errors on information contained in this document. Any changes or modifications not expressly approved by Vitec Imaging Solutions could void the user's authority to operate this equipment.
- Page 39 Copyright © 2021 Vitec Imaging Solutions Spa Via Valsugana, 100 - 36022 Cassola (VI) Italy GB_V1 - 10/21...
Need help?
Do you have a question about the MVG300XM and is the answer not in the manual?
Questions and answers