Manfrotto MVG460 Instructions Manual
Hide thumbs
Also See for MVG460:
- Instructions manual (61 pages) ,
- Instructions manual (61 pages) ,
- Instructions manual (14 pages)
Table of Contents
Advertisement
Advertisement
Table of Contents

Related Manuals for Manfrotto MVG460


Summary of Contents for Manfrotto MVG460
- Page 1 INSTRUCTIONS MVG460 & MVG460FFR...
-
Page 2: Table Of Contents
2.5 Versatile Arm Installation ............9 2.6 Camera Installation ..............10 2.7 Gimbal Balancing ..............11 2.8 Power ON/OFF .................13 2.9 Download the Manfrotto Gimbal app........13 3. Connecting App ............14 4. Funcion Operation ............15 4.1 Function / Modes Introduction ..........15 4.2 Button Operation Introduction ..........16... - Page 3 MVG460 is designed with function buttons and LCD touch screen, which can switch the Gimbal working mode, control the rotation and parameters setting with one hand. The camera shutter cable as equipped can be used to directly control the photography, video recording and follow focus on Gimbal.
-
Page 4: Product Overview
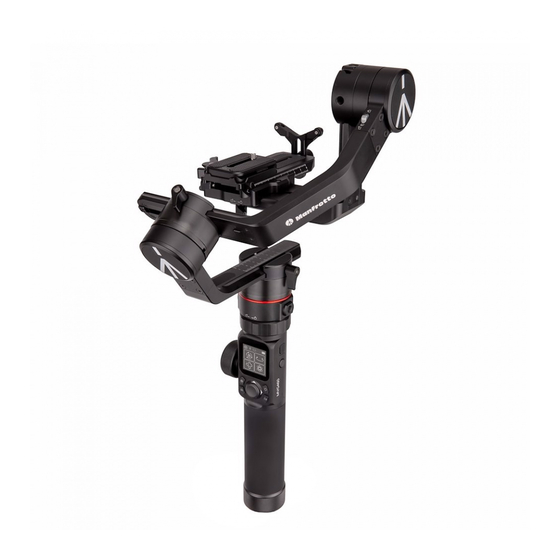
1. Product Overview Overview Professional 3-axis gimbal designed for DSLR and mirrorless cameras, designed with Sliding function buttons and LCD touch screen. lock s 1/4 inch Thread Hole Sliding Anti-drop column Tilt axis Touch Screen Quick release Secondary quick Camera mode plate release plate Bluetooth... - Page 5 Secondary quick release plate safety lock Cross arm Sliding arm Cross arm lock screw lock screw Sliding arm Anti-drop colum of quick Screw release plate Lens supporting frame Roll axis Quick release plate Roll axis positioning lock safety lock Vertical arm Pan axis Versatile arm Pan axis...
- Page 6 Accessories Camera Control Cable Micro USB Cable Panasonic Lumix USB 2.0 to Micro Shutter Cable 18650 Li-ion Battery Versatile Arm USB 2.0 to Mini Tripod Charger USB 3.0 to Micro 3.0 Multifunctional Bracket USB 2.0 to Type C Pro kit accessories Extension Rod Follow Focus (FF) Gimbal Remote Controller (MVGRC)
-
Page 7: Start To Use
2. Start to use ⚠ Read the detailed manual before using this products. TIPS (1) Please install the camera before powering on the Gimbal. (2) When the battery is low, please charge the Gimbal. (3) When not in use, turn off the Gimbal and then remove the batteries. (4) For quick start, utilising MVG640 basic features follow the steps below. -
Page 8: Handle Installation
2.3 Handle Installation Align the handle positioning screw with the corresponding positioning holes under the pan axis machine and then tighten the fixing ring. ⚠ The four positioning screws must be aligned with the corresponding positioning holes and then tighten the fixing ring. Tight Alignment A. -
Page 9: Versatile Arm Installation
1. Install versatile arm as picture shown, tighten the screws at left and right side after aligning it's thread hole with Gimbal handle's one. 2. Tighten Hyperlink remote control (comes with standard version of MVG460) to the versatile arm tail. Or you can also tighten tripod at it's tail directly for an op- tion. -
Page 10: Camera Installation
After installation, you can use versatile arm for low angle shots. ⚠ Make sure the battery and memory 2.6 Camera Installation card are loaded before installation. (1) Install the quick release plate to (2) Fix the secondary quick release the fixed plate and take out the sec- plate to the bottom of the camera. -
Page 11: Gimbal Balancing
2.7 Gimbal Balancing ⚠ Before balancing the Gimbal, lock the Gimbal to the balance lock state at first, unlock each axis positioning lock in stages during the balancing process. TIPS (1) Before balancing the Gimbal, the lens cover should be removed from the camera and the memory card needs to be inserted to the camera to complete all the connections to ensure that the camera is ready for shooting. - Page 12 (2) a. Place the camera lens vertically upwards, determine the camera's center of gravity. b. Unlock the quick release plate safety lock ①, balance the camera position. ① c. Tighten the quick release plate safety lock and tilt the camera up or down, if it stays stable, it means balanced.
-
Page 13: Power On/Off
2.8 Power ON/OFF ⚠ Before powering on the Gimbal, need to Power unlock all the axis positioning lock. button Long press the power button, release it when the display shows 2.9 Download the Manfrotto Gimbal app. Download Manfrotto Gimbal app. -
Page 14: Connecting App
3. Connecting App (1) Turn on the mobile phone Bluetooth and start the Gimbal. (2) Open the App, and connect to MVG460 according to the App prompts. After the connection is successful, you can control MVG460 on the App. Detailed Manual Download the detailed user manual from official website manfrotto.com... -
Page 15: Funcion Operation
4. Funcion Operation 4.1 Function / Modes Introduction ① Panning Mode (Default mode) The roll and tilt direction are fixed, and the smartphone moves according to the left-right movements of the user’s hand. ② Follow Mode The roll direction is fixed, and the smartphone moves according to the left-right movements, up-down movements of the user’s hand. -
Page 16: Button Operation Introduction
⑥ Manual Lock Slide the tilt axis to one position for shooting. ⑦ Auto-rotation Auto-rotation mode is design for cooperating time laps shooting with camera, can set up route and time. ⑧ Inception Mode Click the “360 rotation” option to enter inception mode, can set up rotation speed and direction. - Page 17 4.2.3 Capturing Button Single click — Focus, click again to take a photo within 3 seconds Long press — Burst Mode Manual Single click the camera button to focus and single tap again within capturing 3 seconds to take photos. When there is no operation within 3 sec- onds after clicking for focus, the focus state shall be cleared.
- Page 18 4.2.5 Joystick Upward (1) Camera lens upward (2) Select the option above Move to left Move to right (1) Camera lens move to left (1) Camera lens move to right (2) Select the option on the (2) Select the option on the left right Downward...
- Page 19 4.2.8 Multifunction Knob Rotate — Control the current axial rotation / follow focus and zoom Long time press — Switch between the follow focus & zoom options and the axi- al options Single — Switch adjustment option...
-
Page 20: Usb Ports
4.3 USB Ports Fixed plate has USB port, connect to Camera to control shooting/recording, or focusing on some Cameras. UART1 / UART2 port can use for connecting Auto Focus Camera Control USB port can use USB 2.0 to Type C / USB 2.0 to Mini / USB 3.0 to Micro 3.0/ Panasonic Lumix Shutter Cable use 3.5mm jack to connect. -
Page 21: Touch Screen
4.4 Touch Screen Screen interface Display Display Mode/Status Mode/Status icon icon Bluetooth is connected Panning mode Bluetooth is not connected Follow mode Battery Level All follow mode Camera connected Lock mode Camera is not connected Tilt Axis Enabled Multifunctional knob Roll Axis Enabled control enabled Multifunctional knob... -
Page 22: Modes Setting
Switch screens First screen Home Page Second screen Third screen Payload se tting Inception Mode Shooting Mode Motion Timelaps e Knob Setting Portrait Se ttings Common gesture operations of touch screen Slide to left — Switch screen to the left Slide to right —... - Page 23 4.5.2 Inception Mode Setup Click the "360 rotation" option to enter inception mode, hold the Gimbal horizon- tally, and set the rotation speed/direction on screen. After choosing setting it will start automatically. Slide to righ t 4.5.3 Portrait Shooting Mode Hold the Gimbal horizontally, click the "Portrait"...
-
Page 24: Auto-Rotation Mode
Auto-rotation Mode Parameter Setting Method 1: Enter the Manfrotto Gimbal App to set the Motion-timelapse mode parameters. Enter the parameter setting interface to select the Motion-timelapse mode for setting. The maximum interval time is 59 seconds, while maximum staying time for long exposure photograhy is 58 seconds. - Page 25 Operate with joystick to set up time setting parameter on touch screen. Photos: PA N TIL T INVL DWELL Minimum time Maximum time Display icon Mode/Status setting setting PAN (T1) Pan axis rotation time period 00:00:00 07:59:59 TILT (T2) Tilting axis rotation time period 00:00:00 07:59:59 INVL (t)
-
Page 26: Gimbal Initialization
(3) Set rotation end position (4) Start auto rotation movements Rotate the panning axis or tilting axis The Gimbal automatically returns to to the end position and stay for half the start position, the tilting axis and a second, and click OK option on the panning axis start to rotate to the screen again to record the end posi- end position according to the set pa-... -
Page 27: Manual Lock
5. How to connect Camera with Wi-Fi Connect Camera with Wi-Fi (1) Power on the Gimbal. (2) Turn on Bluetooth and Manfrotto Gimbal App, APP automatically connects to Gimbal with the strongest signal of Bluetooth. The Bluetooth icon on display will be lighted after successfully connected. - Page 28 Remote Control MVG��� Connect camera w o r d . Waiting for 5~10 seconds, After the connection is successful, the camera interface will display corre- sponding tips and changes.(Canon camera is need- ed to tap “confirm”), And automatically return to the main shooting interface, the camera icon on Gim- bal’s touching screen light up at same time, connec-...
-
Page 29: Accessories Introduction
6. Accessories Introduction 6.1 Accessories 6.1.1 Extension rod and tripod 6.1.2 Multifunctional bracket... -
Page 30: Accessories For Pro Kit
(2) Click on remote setting button to enter menu options. Choose "BLE scan" and connect to corresponding Gimbal. (3) After successful connection, can use control buttons of the remote to control MVG460, or use motion sensing to control MVG460 pan/tilt movement. Please operate on remote MVG460... - Page 31 Manfrotto has made and may make available. Manfrotto accepts no liability for damage, injury or any legal responsibility in- curred directly or indirectly from the use of product.
- Page 32 3. DO NOT disassembly the Gimbal except is detachable available. It need send to Manfrotto after-sales or authorized service center to fix it if you accidently dis- assembly and cause abnormal work. The relevant costs are borne by user.
- Page 33 15 minutes, and then see a doctor immediately. (11) Please use official batteries are provided by Manfrotto. If you need re- place the battery, please purchase at Manfrotto official website or authorized dealer.
- Page 34 Copyright © 2020 Vitec Imaging Solutions Spa 07/20 Via Valsugana, 100 36022 Cassola (VI) Italy...
Need help?
Do you have a question about the MVG460 and is the answer not in the manual?
Questions and answers