Table of Contents
Advertisement
Available languages
Available languages
Quick Links
Item # 1000000000
Model # 56517141
Use and Care GUIde
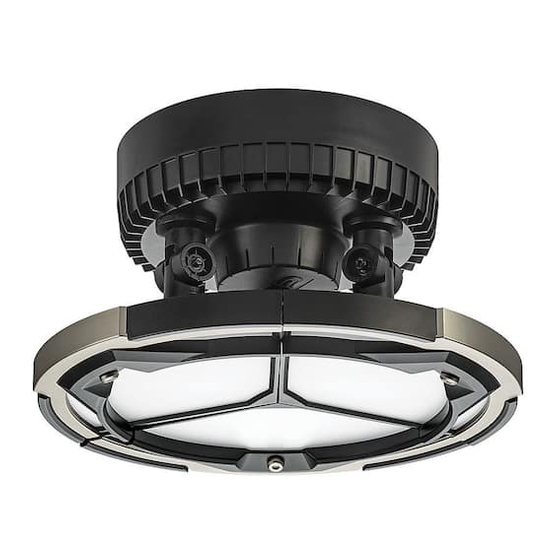
10In heavy dUty adjUstable flUshMoUnt
Questions, problems, missing parts? Before returning to the store,
call Commercial Electric Customer Service
8 a.m. – 7 p.m., EST, Monday - Friday
9 a.m. - 6 p.m., EST, Saturday
1-877-527-0313
HomeDepot.Com
tHANK YoU
We appreciate the trust and confidence you have placed in Commercial Electric through the purchase of this LED light. We strive to continually
create quality products designed to enhance your home. Visit us online to see our full line of products available for your home improvement
needs. Thank you for choosing Commercial Electric!
Advertisement
Chapters
Table of Contents

Related Manuals for Commercial Electric 56517141


Summary of Contents for Commercial Electric 56517141
- Page 1 YoU We appreciate the trust and confidence you have placed in Commercial Electric through the purchase of this LED light. We strive to continually create quality products designed to enhance your home. Visit us online to see our full line of products available for your home improvement...
-
Page 2: Table Of Contents
table of Contents table of Contents ........2 Hardware Included . -
Page 3: Pre-Installation
Pre-Installation plANNING INStAllAtIoN Read all instructions before installation. Before starting installation of this fixture or removal of a previous fixture, disconnect the power by turning off the circuit breaker or by removing the fuse at the fuse box. This fixture can be installed two ways: 1) onto a keyless lamp holder, or 2) onto an electrical outlet box. Both installation options are described in this manual. -
Page 4: Installation
Installation to a Keyless lamp holder Preparing lamp holder for Attaching the fixture to the keyless installation lamp holder □ Remove existing bulb. □ Screw the threaded base on the fixture body (A) clockwise into the keyless lamp holder (not included). -
Page 5: Installation To An Electrical Outlet Box
Installation to an electrical outlet box WarnInG: RISK OF ELECTRIC SHOCK. Ensure the electricity to the wires you are working on is shut off. Either remove the fuse or turn off the circuit breaker before removing the existing light fixture or installing the new one. Attaching the mounting screws Making the electrical connections to the electrical outlet box... -
Page 6: Adjusting The Light Angel
Installation to an electrical outlet box (continued) Attaching the fixture body to the SpeedMount socket □ Screw the threaded base on the fixture body (A) clockwise into the SpeedMount socket (CC). □ Restore power at the electrical panel. □ Turn on the light switch to activate the fixture. adjusting the light angel □... -
Page 7: Care And Cleaning
Care and Cleaning CaUtIon: Before attempting to clean the fixture, disconnect the power to the fixture by turning the breaker off or removing the fuse from the fuse box. □ Clean the fixture with a soft, dry cloth. □ Do not use cleaners with chemicals, solvents, or harsh abrasives. □... - Page 8 Questions, problems, missing parts? Before returning to the store, call Commercial Electric Customer Service 8 a.m. – 7 p.m., EST, Monday - Friday 9 a.m. - 6 p.m., EST, Saturday 1-877-527-0313 HomeDepot.C0m Retain this manual for future use.
- Page 9 HomeDepot.Com GRACIAS Apreciamos la confianza que ha puesto en Commercial Electric a través de la compra de esta luz LED. Nos esforzamos por crear constantemente productos diseñados para realzar su hogar. Visítenos en línea para ver nuestra gama completa de productos disponibles para sus necesidades al momento de hacer mejoras en su hogar.
-
Page 10: Contenido
Contenido Contenido ........10 Materiales incluidos . -
Page 11: Previo A La Instalación
Previo a la Instalación plANIFICACÍoN De lA INStAlACIóN Leer todas las instrucciones antes de proceder al armado. Antes de comenzar la instalación de este aparato o desinstalar un aparato, desconectar el suministro eléctrico apagando el cortacircuitos o extrayendo el fusible de la caja de fusibles. Este aparato puede instalarse de dos formas: 1) en un portalámparas sin llave, o 2) en una caja eléctrica. -
Page 12: Instalación En Un Portalámparas Sin Iiave
Instalación en un portalámparas sin llave Preparación del portalámparas Colocar el aparato en un para la instalación portalámparas sin llave □ Retire la bombilla existente. □ Atornille la base roscada del cuerpo de lámpara (A) en el sentido horario en el portalámparas sin llave (no incluido). -
Page 13: Instalación En Una Caja Eléctrica
Instalación en una caja eléctrica advertenCIa: RIESGO DE DESCARGA ELÉCTRICA. Asegúrese de cortar el suministro eléctrico en los cables con los que trabajará. Extraiga los fusibles o apague el cortacircuitos antes de quitar el aparato de iluminación existente o instalar uno nuevo. Fijar los tornillos de montaje a Hacer las conexiones eléctricas la caja eléctrica... -
Page 14: Instalación
Instalación en una caja eléctrica (continuación) Colocar el cuerpo de lámpara al portalámparas SpeedMount □ Atornille la base roscada del cuerpo de lámpara (A) en el sentido horario en el portalámparas SpeedMount (CC). □ Restaure la alimentación de la caja eléctrica. □... -
Page 15: Solucíon De Problemas
solución de problemas advertenCIa: Antes de realizar cualquier trabajo en el aparato, desconecte la electricidad que la alimenta. Los problemas menores pueden arreglarse sin ayuda de un electricista. problema posible causa medida correctiva La lámpara no enciende. El suministro eléctrico está cortado. Asegúrese de que el suministro eléctrico esté... - Page 16 ¿Preguntas, problemas, piezas faltantes? Antes de devolver el producto a la tienda, llame al Centro de Atención al Cliente de Commercial Electric en el horario de 8 a.m. – 7 p.m., Hora del Este de EE.UU., de lunes a viernes.
Need help?
Do you have a question about the 56517141 and is the answer not in the manual?
Questions and answers