Table of Contents
Advertisement
Quick Links
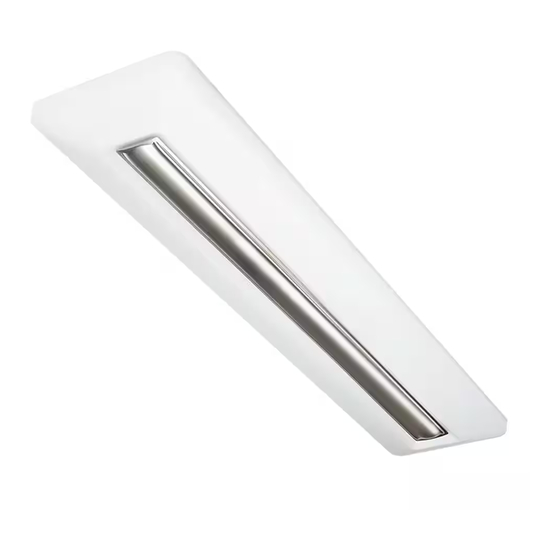
4fT. x 10IN. LOW PROfILE fLUshMOUNT WITh NIGhTLIGhT
Package contents
Part
Description
A
Fixture Body
HarDware IncluDeD
Part
Description
AA
Mounting Screw
BB
Wire Connector
CC
Drywall Anchor
DD
Pins
EE
Location Paper
FF
Trim Cap
NOTE: Keep your receipt and these instructions for proof of purchase.
WARNING: RISK OF ELECTRIC SHOCK. Ensure the electricity to the wires you are working on is shut off. Either remove the
fuse or turn off the circuit breaker before removing an existing light fixture or installing the new one.
If you are unfamiliar with electrical installations, we recommend you contact a qualified electrician to do the installation.
InstallatIon
NOTE: Select a suitable location that can support the weight of the fixture. Determine the method for mounting the fixture
before drilling, based on the type of ceiling.
NOTE: Two people are recommended for the installation of this light fixture.
1. Hook the leftmost end of the trim cap with your left
finger, and remove the trim cap by push the middle
part of the trim cap with your right hand to the left.
2. Using pins (DD) to fix the location paper (EE) on
the installation surface where you desired, mark
the 2 holes position by pencil. Remove the paper,
drill 2 holes using Φ6mm driller, insert the drywall
anchors (CC).
NOTE: do not need drill hole on wooden surface.
3. Connect the hot and neutral (black and white)
wires from the J-box to the same color wires from
the fixture base (A).Connect the green wire from
the J-box to the grounding wire from fixture base
(A). Cover the wire connections using the wire
connectors (BB). Make sure to fasten them well.
4. Insert the mounting screws (AA), please be noted
that do not screw in them whole at begin. And make
the mounting screw (AA) head cross the wide holes
on the two sides of fixture plate (A), and slide the
base towards the narrow hole, and fasten these
screws (AA) well.
UsE ANd CARE GUIdE
Quantity
1
Quantity
2
3
2
6
1
1
AA
BB
1
CC
AA
BB
1
Item # 1000000000
Model # 56701111
CC
EE
2
Trim cap
EE
DD
CC
A
AA
A
DD
FF
A
Advertisement
Table of Contents

Subscribe to Our Youtube Channel
Related Manuals for Commercial Electric 56701111


Summary of Contents for Commercial Electric 56701111
- Page 1 Item # 1000000000 Model # 56701111 UsE ANd CARE GUIdE 4fT. x 10IN. LOW PROfILE fLUshMOUNT WITh NIGhTLIGhT Package contents Part Description Quantity Fixture Body HarDware IncluDeD Part Description Quantity Mounting Screw Wire Connector Drywall Anchor Pins Location Paper Trim Cap NOTE: Keep your receipt and these instructions for proof of purchase.
- Page 2 5. Carefully align the buckle on the trim cap with the notch on the fixture, press the trim cap to the bottom and push it right to the end to lock the trim cap. Power on. NOTICE: Before lock the trim cap, select CCT as well. Pull the lamp color temperature toggle switch to the desired color temperature gear (as shown below, 3000 K left 4000 K right 5000 K).
- Page 3 care anD cleanIng CAUTION: Before attempting to clean the tube and luminaire/light fixture, disconnect the power to the fixture by turning the breaker off or removing the fuse from the fuse box. Clean with a soft, dry cloth. Do not use cleaners with chemicals, solvents, or harsh abrasives.
- Page 4 Contact the Customer Service Team at 1-877-527-0313 or visit www.HomeDepot.com. Questions, problems, missing parts? Before returning to the store, call Commercial Electric Customer Service 8 a.m. - 7 p.m., EST, Monday - Friday 9 a.m. - 6 p.m., EST, Saturday 1-877-527-0313 HoMeDePot.coM...
Need help?
Do you have a question about the 56701111 and is the answer not in the manual?
Questions and answers