Advertisement
Available languages
Available languages
Quick Links
4000 mAh Solar Charger
Art.no 38-5357
Model OY380-9
Please read the entire instruction manual before using the product and
then save it for future reference. We reserve the right for any errors in
text or images and any necessary changes made to technical data.
If you have any questions regarding technical problems please
contact our Customer Services.
Safety
• Never attempt to open or dismantle the solar charger.
• Never subject the solar charger to knocks or blows.
• Do not let children play with the solar charger.
• The solar charger is splashproof but should never be immersed in
water or any other liquid.
• Do not leave the solar charger in the sun in a confined space
such as a car, doing so could lead to the maximum operating
temperature (45 ºC) being exceeded.
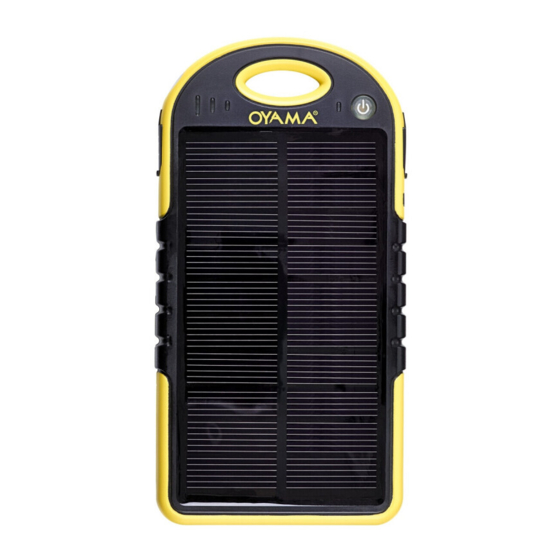
Buttons and functions
3
4
5
2
6
1
Front
1. Solar panel for charging the solar charger's built-in battery
2. USB port for charging electronic devices
3. LED indicator which shows the solar charger's battery charge status
4. LED indicator which shows the solar charger's efficiency
5. [
] On/off
6. USB port for charging electronic devices
Back
7. USB cable for charging the solar charger's built-in battery
GREAT BRITAIN • customer service tel: 08545 300 9799 e-mail: customerservice@clasohlson.co.uk internet: www.clasohlson.com/uk
Operating instructions
Charging the solar charger via the solar panel
• Place the solar charger in the sun.
• The green LED indicator shines strongly or weakly depending on
how efficiently the solar charger is being charged.
• When the solar charger is fully charged the LED indicator goes off.
• In optimum conditions it takes 15 hours to fully charge the solar charger.
Charging the solar charger from an external power source
• Connect the solar charger's built-in USB cable to a computer,
mains USB charger or 12 V car USB charger.
• The green LED indicator comes on to indicate that the solar charger
is being charged.
• When the solar charger is fully charged the LED indicator goes off.
• An external power source takes 5–7 hours to fully charge
the solar charger.
Charging an external device via the solar charger
Note: The included USB/Micro-USB cable is specially designed for
charging Android phones and is not suitable for data transference.
• Check that the solar charger is adequately charged by pressing
[
]. The battery charge status is indicated by the LEDs:
-
All lit - fully charged
-
Two lit - half capacity
-
One lit - solar charger needs charging
• The solar charger, can, if at least at half capacity, fully charge
a standard mobile phone.
• The solar charger needs to be fully charged if you wish to utilize
7
both USB ports and charge two devices simultaneously.
Note: When the solar charger is in use and its battery charge level is
very low, the solar charger will automatically shut off in order to protect
its battery from a deep discharge. When the solar charger begins to
recharge, it takes 3 minutes before it can output any charging current.
Apple products and other products with their own charger cables
• Use the device's charger cable by connecting it between the device
and the solar charger.
• Press [
] to start charging.
• Disconnect the charger cable form the solar charger to finish charging.
• It takes about 90 minutes to fully charge a standard phone.
• The solar charger shuts off automatically as soon the device being
charged is disconnected.
Android phones
• Use the included USB/Micro-USB cable by connecting it between
the Android phone and the solar charger.
• Press [
] to start charging.
• Disconnect the charger cable form the solar charger to finish charging.
• It takes about 90 minutes to fully charge a standard phone.
• The solar charger shuts off automatically as soon the device being
charged is disconnected.
LED torch light
Hold in [
] for about 2 seconds to switch the torch on and off.
Care and maintenance
• Clean the product using a lightly moistened cloth. Only use mild
cleaning agents, never solvents or corrosive chemicals.
• Keep the surface of the solar panel clean for optimum performance.
Troubleshooting guide
The external
• Is the solar charger's built-in battery charged?
device is not
• Have you pressed [
] to start the charging
being charged.
process?
• Is the cable you are using in good condition
and correctly connected to both the external
device and the solar charger?
The solar
The prevailing light conditions are not adequate to
charger's built-
charge the battery. Wait until the light conditions
in battery is not
are better or connect the solar charger to another
being charged.
USB charger using the built-in charger cable on
the back of the solar charger.
Disposal
This product should be disposed of in accordance with local regulations.
If you are unsure how to proceed, contact your local authority.
Specifications
Battery
4000 mAh lithium-polymer
Solar panel
5 V 320 mA max (optimum conditions)
Input voltage
5V DC/800 mA
5 V, 2 × 1 A
Output voltage
Operating temperature
0–45 °C
Size
138 × 84 × 13 mm
Weight
162 g
Advertisement

Related Manuals for Clas Ohlson OY380-9


Summary of Contents for Clas Ohlson OY380-9
- Page 1 • Use the included USB/Micro-USB cable by connecting it between Charging the solar charger via the solar panel the Android phone and the solar charger. Art.no 38-5357 Model OY380-9 • Place the solar charger in the sun. • Press [ ] to start charging. • The green LED indicator shines strongly or weakly depending on • Disconnect the charger cable form the solar charger to finish charging.
- Page 2 • Använd den medföljande USB/Micro-USB-kabeln och anslut den till Laddning av solcellsladdaren via solpanelen din Android-telefon och till solcellsladdaren. Art.nr 38-5357 Modell OY380-9 • Lägg solpanelen i solen. • Tryck [ ] för att påbörja laddningen. • Den gröna LED-indikatorn lyser starkt eller svagt beroende på hur • Koppla bort laddkabeln från solcellsladdaren för att avsluta...
- Page 3 Android-telefoner • Bruk den medfølgende USB-/Micro-USB-kabelen, koble den til Lading av solcelleladeren via solpanelet Android-telefonen og deretter til solcelleladeren. Art.nr. 38-5357 Modell OY380-9 • Plasser solpanelet i solen. • Trykk inn [ ] slik at ladingen starter. • Den grønne LED-indikatoren lyser sterkt eller svakt avhengig av • For å avslutte ladingen kobles ladekabelen fra solcelleladeren.
- Page 4 Käyttö Android-puhelimet • Liitä pakkauksen mukana tuleva USB/Mikro-USB-kaapeli Aurinkokennolaturin lataaminen aurinkopaneelin kautta Tuotenro 38-5357 Malli OY380-9 Android-puhelimeen ja aurinkokennolaturiin. • Aseta aurinkopaneeli aurinkoon. • Aloita lataus painamalla painiketta [ • Vihreä LED-merkkivalo palaa voimakkaasti tai heikosti riippuen • Lopeta lataaminen irrottamalla latauskaapeli aurinkokennolaturista.
-
Page 5: Betrieb
• Das Android-Telefon mit dem mitgelieferten USB/Micro-USB-Kabel Laden des Solarladegeräts über das Solarmodul an das Solarladegerät anschließen. Art.Nr. 38-5357 Modell OY380-9 • Durch Drücken von [ ] den Ladevorgang starten. • Das Solarmodul in die Sonne legen. • Zum Beenden des Ladevorgangs das Ladekabel vom Vor Inbetriebnahme die komplette Bedienungsanleitung durchlesen...
Need help?
Do you have a question about the OY380-9 and is the answer not in the manual?
Questions and answers