Table of Contents
Advertisement
Quick Links
Advertisement
Table of Contents

Related Manuals for Gigaset GS180


Summary of Contents for Gigaset GS180
- Page 1 GS180 You can also find the user guide online on your smartphone...
-
Page 2: Table Of Contents
Gigaset GS180 ........ -
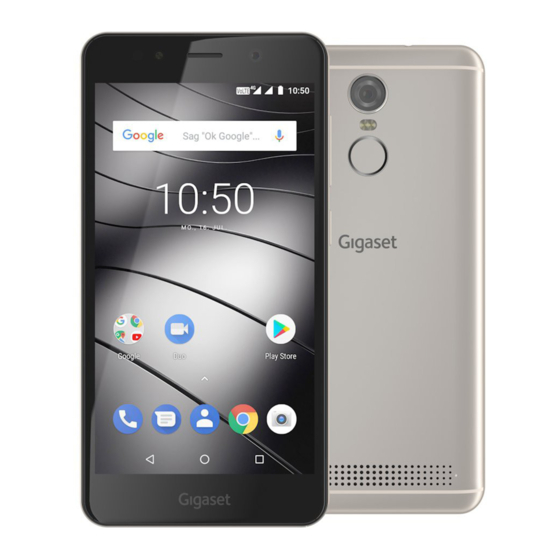
Page 3: Overview
Overview Gigaset GS180 Light / proximity sensor Rear camera Headset connector (3.5 mm jack) Flash / torch Flash Fingerprint sensor Receiver Speaker Front camera Volume button (top: +, bottom: –) On/Off key Touch screen Microphone Micro-USB socket... -
Page 4: Start Screen
Start screen Notifications and Status bar Icons show the arrival of notifications and various states ( p. 89) Access to notifications ( p. 20) Access to quick settings ( p. 16) Area for apps and widgets They can be placed anywhere ( p. -
Page 5: Illustration In The User Guide
Illustration in the user guide Icons Warnings, the non-adherence to which can result in damage to devices or personal injury. Important information regarding function and appropriate handling or functions that could generate costs. Prerequisite for carrying out the following action. Additional helpful information. -
Page 6: Safety Precautions
General information • For your own safety, only use original, approved accessories from Gigaset for your mobile phone. Using incompatible accessories can damage the mobile phone and entail hazardous situations. Original acces- sories can be purchased from Gigaset Customer Service (see Customer service United Kingdom and Ireland p. - Page 7 • Only charge the device indoors. Whilst the phone is charging, do not use the phone for calls or dial any numbers. • The socket must be easily accessible during the charging process. • Electrical storms pose a risk of electric shocks. •...
- Page 8 Do not use the device if the display is cracked or shattered. Fragments of glass or plastic can injure hands and face. • In the event of malfunction of your mobile phone, battery or accessories, please contact a Gigaset Service Centre for an inspection. Other important information •...
-
Page 9: Getting Started
Insert a MicroSD card into the SD slot and push it backwards. The device detects SD cards with a storage capacity of 32 GB. Higher capacity cards (to 128 GB) can be used if formatted on the Gigaset GS180 (not from a PC). - Page 10 Inserting the battery ¤ Insert the battery into the device with the connector contacts facing forwards Insert the battery downwards into the battery compartment. Removing the battery: ¤ To change the battery, place your fingernail into the recess on the right of the battery compartment and pull the battery up.
- Page 11 Wizard for configuring the device When you switch on your phone for the first time, you are automatically guided through the most important configuration steps. < Back: Check and change as required settings already configured. Next > Apply the setting on the screen and jump to the next screen. Skip Configure the setting later.
- Page 12 Setting up protection for the phone Protect your smartphone from unauthorised use. Fingerprint ¤ Add fingerprint Next . . . A wizard opens to guide you through the necessary steps. Additional information p. 29 PIN, pattern or password ¤ Configure PIN, pattern or password Next Select Pattern | PIN | Password Next...
-
Page 13: Using The Device
Using the device Getting to know your device Switching the device on and off Switching on ¤ Press and hold the On/Off button Unlock the display if required (if a display lock is set up to protect against unauthorised starting) . . . The device is started Display lock: p. - Page 14 Using the touchscreen Movements and gestures for using the touchscreen: Tapping ¤ Briefly touch the screen with your finger Examples: Start an app, and select function or setting: tap the element Enter text: Tap a text field . . . A keypad is shown Touching and holding ¤...
- Page 15 Start screen A start screen is displayed when you switch on or unlock the device, and no app is open.. You can create several start screens and configure them as you wish - to be able to quickly access favourite apps and content p.
- Page 16 Quick settings The quick settings enable you to access frequently used settings from all user situations, such as screen lighting, WLAN, Bluetooth and similar settings. Opening the quick settings ¤ From the Status bar, swipe down . . . The most important quick settings are displayed ¤...
- Page 17 Adding text ¤ Entering letters and symbols: Tap a key ¤ Entering uppercase letters: Tap the shift key ( ¤ Enabling/disabling Caps Lock: Double tap the shift key ( ¤ Showing umlauts: Touch and hold the key Whilst text is being entered, suggestions from the keypad dictionary are shown above the keypad.
-
Page 18: Configuring The Start Screens
Configuring the start screens You can create several start screens and configure them as you wish - to be able to quickly access favourite apps and content. Tailoring the Favourites bar At the bottom of every start screen is the Favourites bar, from which you are able to quickly access the apps you use most frequently. - Page 19 Adding a widget to a start screen Widgets are components that are specifically intended to be displayed on a start screen, e.g. a clock, a calendar extract for the current day, an important entry from the contact list or a direct dial.
-
Page 20: Notifications
Removing a start screen ¤ Remove all apps and widgets from a start screen (by deleting them or moving them to another start screen) . . . When the last app or widget has been removed, the start screen is deleted Browse smartphone and Internet You can add the Google search widget to the start screen so you can search on your smartphone... - Page 21 Deleting and resetting notifications Deleting a notification: ¤ Swipe the notification to the left or right Deleting all notifications on the Notifications screen: ¤ Scroll down to the end of the notifications Clear all Resetting a notification on the lock screen or at the top of the screen to read it later: ¤...
- Page 22 Settings for notifications Changing the default notification sound ¤ Settings Sound Advanced Default notification sound Select notification sound No notification sound: Select None (first entry in the list) • If you do not wish to be disturbed, you can mute your device. No notification sound is then played.
- Page 23 Notifications on the lock screen The following settings are available for the lock screen: • Don't show notifications at all • Show all notification content • Hide sensitive notification content You can configure these settings differently for individual apps or use them as default settings for all apps.
-
Page 24: Apps
Apps The apps available on the device are stored in the App menu. The device is supplied with a number of default apps. Additional apps from your mobile operator are installed as soon as you insert a SIM card. You can download and install more apps, or disable and uninstall existing apps. You can place frequently used apps directly on a start screen ( p. - Page 25 Installing/uninstalling apps Installing new apps Downloading apps from Google Play: ¤ Play Store . . . The Google Play Store is opened Look for the app you want Open the app screen Install Uninstalling or disabling apps You can delete apps you no longer need from the device. You can uninstall apps you have downloaded.
- Page 26 Preinstalled default Google apps The smartphone makes available many of the default apps from Google, including: Search Browse Internet and search smartphone Chrome Browser for surfing on the Internet Gmail Receive, write and send emails Maps Look for and find out about places in all corners of the globe YouTube Play YouTube videos and playlists Drive...
- Page 27 Using two apps at the same time Split screen mode enables you to display two apps next to or above each other on the screen, and to work with both apps in parallel. Both apps support the function. Starting Split screen mode Selecting the first app ¤...
- Page 28 Protection from harmful apps Downloading apps from sources other than Google Play If you want to download apps from sources other than Google Play, you must permit it explicitly. You can find this function in the settings for the app that allows the download, e. g. browser or mail program.
-
Page 29: Downloads
This option might not work for all apps because developers are able to disable this function to prevent their apps being subjected to verification. Downloads You can download files from websites onto your device. Downloaded files are stored mainly in the Downloads app. - Page 30 Setting up the fingerprint ¤ Settings Security & location Fingerprint . . . A wizard opens which guides you through the necessary steps Next When a display lock is set up: Enter the pattern, PIN or password If a display lock is not yet set up: Set up screen lock ( p.
-
Page 31: Do Not Disturb
“Do not disturb” The “Do not disturb” function mutes the device. It does not ring or vibrate. It prevents for example the phone ringing at night and during meetings, and all interruptions apart from a wake-up call. You can choose between three modes: Total silence (total silence) No ringtones, no vibrating, no audible signalling of wake-up calls or notifications, no sound for music, videos, games or other media. -
Page 32: Additional Functions
Specifying important interruptions Specify events which are to be signalled acoustically in the Priority only mode. ¤ From the Status bar, swipe down . . . The quick settings are displayed Do not disturb More settings Priority only allows Enable/disable events for Alarms, Reminders, Events and Repeat callers with the switch Messages and calls are not signalled acoustically by default (setting None). - Page 33 Creating screenshots Take a screenshot of the smartphone as an image, and edit, share and send it. Taking a screenshot ¤ Open the screen for which you want to create a screenshot. ¤ Press and hold the On/Off button Screenshot ¤...
- Page 34 Sending files between a computer and the smartphone Use a USB cable to send photos, music, ringtones and other files between a computer and the smartphone. A computer detects the device connected via USB. It is linked in as a drive. Connecting the USB cable ¤...
- Page 35 Adding, enabling and disabling printers ¤ Settings Connected devices Printing Adding the print service: ¤ Add service Select the print service Install Enabling/disabling the print service: ¤ Select the print service Enable/disable it with the On/Off switch...
- Page 36 Sending the screen content to another device (streaming) Send the image and sound of your smartphone to a TV device. The TV device is fitted with a streaming unit (such as Chromecast) and accessible via WLAN. Starting transmission ¤ Start video on the smartphone ¤...
-
Page 37: Communication
Communication Making calls To make calls, use the Phone app. It is in the Favourites bar on the start screen by default p. 18). Making a call ¤ Phone . . . Entering the number ¤ . . . The dialpad is shown Type in the phone number Whilst a number is being entered, contacts with a potential matching phone number are displayed. - Page 38 Rejecting a call ¤ Display lock enabled: Touch the white circle and swipe down ¤ No display lock: Tap Decline Rejecting a call and sending an SMS to the caller ¤ Touch the message icon and drag it up to the right across the screen Select a predefined quick response or write your own message OK .
- Page 39 Merging two calls into a conference call One call active, one call on hold. ¤ . . . The calls are merged Ending a conference call: . . . The participants' phone numbers are displayed ¤ next to a phone number . . . The connection to this participant will be ended ¤...
- Page 40 Editing quick SMS responses If you do not want to accept a call, you can send a predefined SMS instead ( p. 38). Editing automatically sent SMS text: ¤ Phone Settings Quick responses . . . Four predefined messages are listed Tap a reply Edit the reply...
- Page 41 Call log The call log shows all outgoing, accepted and missed calls. Showing the call log ¤ Phone . . . The calls are listed with phone number, place and date. Arrow icons show the types of calls: Missed call Accepted call Outgoing call Showing call details...
-
Page 42: Contacts
Contacts You can use the app Contacts to enter and organise all information on your contacts, e. g. different numbers, address, mail address and much more. Other apps, such as the Phone app, access the information and make it available where it is needed. Using contacts Viewing contacts ¤... - Page 43 Grouping contacts You can group contacts under a common label into groups. You can then, for example, send a group notification or a group email to the members of a label. Different labels are predefined, such as Family and Friends. ¤...
- Page 44 Adding contacts If you have set up a Google account, you can also set up and manage your contacts from your computer. The contacts are automatically synchronised with the smartphone. Creating a contact ¤ Contacts Enter name, phone numbers and other details for the contact Save Importing/exporting contacts...
- Page 45 Diverting calls from a contact to the mailbox ¤ Contacts Select a contact Route to voicemail Deleting contacts ¤ Contacts Select a contact Delete Deleting more than one contact at the same time: ¤ Touch and hold the contacts you wish to delete one after the other Delete Adding contacts for direct dialling on the start screen ¤...
-
Page 46: Messages (Sms/Mms)
Messages (SMS/MMS) To send and receive messages, use the Messages app. It is in the Favourites bar on the start screen by default ( p. 18). Instead of Messages, use another app as the default app for interchanging messages. At least one other SMS app is installed. ¤... - Page 47 Writing an MMS Multimedia messages (MMS) can contain text, images, voice messages, camera pictures or videos, preconfigured stickers (animated symbols) and information about a location. ¤ When writing a message, tap to the left of the text field Select the required attachment(s) .
- Page 48 Responding to received messages When a new message arrives, the Message LED flashes, you receive a notification and the icon is shown in the Notifications bar. ¤ Tap the notification . . . The message opens ¤ Messages . . . The list of conversations is displayed Tap the conversation with the new message ¤...
- Page 49 Managing conversation ¤ Messages . . . The list of conversations is displayed Touch and hold one or more conversations . . . All conversations selected are denoted by . An options bar is shown at the top Select the required option . . . Deleting conversions ¤...
-
Page 50: Settings
Settings Device Language Change the language for the displays. ¤ Settings System Languages & input Languages . . . All available languages are displayed in a list. The language being used at the moment is at the very top. Make available other languages: ¤... - Page 51 Font size Change the display size of text. ¤ Settings Display Advanced Font size Select one of the four levels for font size using the slider bar Display orientation Set what the screen content does when you rotate the device. ¤...
- Page 52 Adding new ringtones Ringtone apps: Download and install ringtone apps from the Google Play Store Transferring a music file (MP3) from a computer: ¤ Use the USB cable provided to connect the device to a computer p. 34 ¤ Transfer the music file (MP3) to the folder Ringtones Setting rules for automatic muting Automatically mute the smartphone at certain times (”Do not disturb").
- Page 53 Setting keypad tones You are using the standard Android keypad. ¤ Settings System Languages & input Virtual keyboard Gboard Preferences Enter settings for keypad tones under Keypress Enabling/disabling other tones Set whether tones are sounded or the device vibrates when the dialpad is used - for every touch when the display lock is enabled.
- Page 54 Using Power Save mode Save power until the device can be charged again. Some of the device’s functions are limited in Power Save mode: • Google Maps Navigation cannot be used. • The vibration function, location services and most background data are restricted. •...
- Page 55 Tap an entry Device storage management with SD card The device detects SD cards with a storage capacity of 32 GB. Higher capacity cards (to 128 GB) can be used if formatted on the Gigaset GS180 (not from a PC). ¤ Settings Storage .
- Page 56 Accessibility features For those with disabilities, there are a number of useful settings for adapting the usage of the smartphone to personal needs. ¤ Settings Accessibility Enable/disable or set up the required function For example: Text-to-speech output Configure comprehensive settings for speech output. Font size Use a larger font for text on the display.
-
Page 57: Security
Security Display lock The display lock protects the device from unauthorised use. When you switch the device on or enable the display, you are prompted to unlock the device. The display lock becomes active after a defined time after the device has switched to idle mode. A pattern, PIN or password is used as the display lock. - Page 58 Enabling the display lock when switching on and off ¤ Enable/disable the switch next to Power button instantly locks The settings for Automatically lock and Power button instantly locks can be cancelled with Smart Lock. Entering a lock screen message Enter the text to be displayed when the screen lock is enabled, such as your name and address, or an emergency message.
- Page 59 SIM card lock The SIM card lock prevents unauthorised use of the device. For every locked SIM card, the PIN must be entered when the device is started. The PIN lock is enabled when the device is purchased. The PIN is available from your mobile network operator.
- Page 60 Enabling/disabling permissions for apps on the smartphone ¤ Settings Apps & notifications . . . All installed apps are listed Setting the permissions for an app: ¤ Select the app for which you want to change the permissions Permissions . . . All meaningful permissions for the app are displayed Grant/deny the required permissions with the switch...
- Page 61 Device administrators Device administrators are apps authorised to create a connection to your smartphone and to exchange data, for synchronisation for example. You can authorise this by setting up an account hosted by a business service, such as for an email, calendar or business app. ¤...
- Page 62 Managing certificates ¤ Settings Security & location Encryption & credentials Trusted creden- tials The installed certificates are displayed. System: Contains all certificates issued by a certification authority (CA) that are permanently installed in the write-protected memory of your phone. User: Contains all CA certificates you have installed yourself, when installing a client certificate for example.
-
Page 63: Accounts And Location Detection
Accounts and location detection Accounts Use one or more accounts to use personal information such as contacts, pictures and mailbox on multiple devices. An account enables synchronisation of the information and makes it available to all registered devices. Account types Google account You need a Google account for Google services such as Gmail™, Google+™... - Page 64 Synchronising You can specify how apps synchronise messages, emails and other current data in your Google account. Google apps are automatically synchronised with the Google account as standard. You can enable and disable automatic synchronisation for individual Google apps. Apps which are not from Google cannot be synchronised using a Google account. Look in the respective settings menu for these apps for a synchronisation option.
- Page 65 Changing location mode Different sources for location detection of the device are used depending on mode. • High accuracy GPS, WLAN, Bluetooth or mobile networks are used to determine the location of your device as accurately as possible. • Battery saving The device determines its location using sources which require little power, such as WLAN and mobile networks.
-
Page 66: Apps
Apps Detailed information on working with apps p. 24 Default app If you have several apps with identical functions, you can select which app is used as standard for an action. For example, if you have downloaded from Google Play a different calendar or another app for making calls, you can make these the default apps. - Page 67 App notifications Specify the procedure for app notifications ( p. 22) Permissions Apps and system resources the app is permitted to access ( p. 60) Storage Internal storage used by the app. Freeing up storage: Tap Storage Clear data Freeing up temporary app memory: Tap Storage Clear cache Data usage...
-
Page 68: Network Connections
Network connections The smartphone can establish connections to mobile networks, WLANs and other devices via Bluetooth. Mobile networks To make and receive calls with the smartphone over a mobile network, you require a SIM card from the relevant mobile network operator. Refer to your mobile contract for which services are available, and which terms and conditions apply. - Page 69 Using two SIM cards ¤ Settings Network & Internet SIM cards . . . Detected SIM cards in slots 1 and 2 are displayed Enabling and disabling a SIM card: Enable/disable the switch Showing information: ¤ Tap an entry . . . The name of the SIM card, the colour used for the card, the mobile network operator and the phone number are displayed.
- Page 70 Establishing a connection to a WLAN ¤ From the Status bar, swipe down using two fingers . . . The quick settings are displayed the arrow under the WLAN icon ¤ Settings Network & Internet Wi-Fi . . . All WLANs within range are displayed. Networks protected by a password have a lock icon next to the entry.
- Page 71 Connection configuration Align the network settings to the requirements of the WLAN to be used to establish a connection. ¤ Settings Network & Internet Wi-Fi Touch and hold the network name Modify network Tap the down arrow next to Advanced options . . . Proxy If a connection to a WLAN is established over a proxy: Tap Proxy...
- Page 72 Data usage The data usage is the amount of data uploaded or downloaded by the device over a certain period over the mobile data connection or WLAN. Most tariffs include a restriction of data volume. So as not to incur any additional costs, you can check the data usage of the device and limit it as required.
- Page 73 Setting a warning for data usage Set a value for data volume usage at which you want to receive a warning. ¤ Settings Network & Internet Data usage Tap the bar Change the value ¤ Mobile data usage Data warning Change the value .
- Page 74 Other ways to reduce data usage Disabling automatic synchronisation When automatic synchronisation is enabled, the data of apps is updated automatically (such as contacts and appointments). Disabling automatic synchronisation: p. 64 Disabling roaming If the network of your mobile network operator is not available, roaming enables the device to use the networks of other operators.
- Page 75 Changing name: Enter the name of the device Ending a pairing: Forget Changing the Bluetooth name of the smartphone The smartphone can be seen by other Bluetooth devices under name Gigaset GS180. You can change this name. ¤ Settings Connected devices...
- Page 76 Virtual Private Networks (VPN) A Virtual Private Network (VPN) enables you to connect the smartphone to your private or a company network. When you are out and about and have access to a WLAN, use the VPN connection to surf free of eavesdroppers, to make free calls over your landline number, and to access your mailbox or data in the company network.
- Page 77 Enabling/disabling “always-on” VPN With some VPNs, the device remains always connected when the VPN connection is not active. This is a sensible option when moving between insecure public WLANs. Enabling “always-on” VPN: ¤ When registering with a VPN, select option Save account information ¤...
- Page 78 Connecting a device to the WLAN hotspot Showing the network name and password on the smartphone: ¤ Settings Network & Internet Hotspot & tethering Wi-Fi hotspot Set up Wi-Fi hotspot Tap Show password . . . The network name and password are displayed Connecting to the hotspot on the other device: ¤...
-
Page 79: System
System Date and time ¤ Settings System Date & time . . . Automatic setting The date and time are set automatically using a time server: ¤ Activate Automatic date & time Disable it and set the date and time manually Manual setting ¤... - Page 80 Software updates Checking the Android version ¤ Settings System Phone info . . . The current version is displayed under Android version Downloading Android updates You will be informed when a new Android system update is available for your device. Updates use up power and entail high data volumes.
- Page 81 Backing up and restoring the system Backing up data and settings Use the Android Backup Service to backup data linked to one or more Google accounts. If you have to swap your device or delete data, you can restore the data from every Google account backed up beforehand.
- Page 82 Resetting the device to the default settings You can remove all personal data when you pass on the device to another person. When resetting the device to the default settings, the internal storage is cleared, downloaded apps, music, photos, etc. are removed and registration to the Google account is cancelled.
-
Page 83: Appendix
Please have your proof of purchase ready when calling. Please note that if the Gigaset product is not sold by authorised dealers in the national territory the product may not be fully compatible with the national telephone network. It is clearly specified on the box near the CE mark for which country/countries the equipment has been developed. -
Page 84: Customer Service & Assistance
- - - - - - - - - - - - - - - - - (Preço de uma ligação local) - - - - - - - - - - - - - - - - - - - - - - (01800 999 GIGASET) - Page 85 In the case of new devices and their components exhibiting defects resulting from manufacturing and/or material faults within 24 months of purchase, Gigaset Communications shall, at its own option and free of charge, either replace the device with another device reflecting the current state of the art, or repair the said device.
-
Page 86: Manufacturer's Advice
Country-specific requirements have been taken into consideration. Hereby, Gigaset Communications GmbH declares that the radio equipment type Gigaset GS180 is in compli- ance with Directive 2014/53/EU. The full text of the EU declaration of conformity is available at the following internet address: www.gigaset.com/docs. - Page 87 Waste and environmental protection Correct disposal of this product (Directive for electric and electronic equipment (WEEE)) (Applicable in countries with waste separation systems) This label on the product, accessory or in documentation indicates that the product and its electronic accessories (such as charger, headphones and USB cable) may not be disposed of in household waste. To avert potential environmental harm and health risks from unmanaged waste disposal, recycle responsibly with the aim of encouraging sustainable reuse of raw materials.
- Page 88 Technical data General specifications Frequency Bands maximum power 1900 MHz 29.5 dBm 1800 MHz 29.5 dBm 850 MHz 33 dBm 900 MHz 33 dBm 22 dBm 22 dBm 23.5 dBm 23.5 dBm 23.5 dBm 23.5 dBm 23.5 dBm WLAN 11B:18 dBm 11G:14 dBm 11N:14 dBm 8 dBm...
-
Page 89: Icons
Icons Status bar and quick settings Battery charge status / battery is charging WLAN connection enabled. The receive quality is shown on four levels. WLAN connection disabled. Bluetooth enabled / disabled Mobile connection enabled. The receive quality is shown on four levels. Mobile connection disabled / no SIM card inserted VPN connection active Data connection enabled / disabled... - Page 90 Notifications App authorisation management Missed call New text message New email New SD card detected Screenshot created USB cable connected / USB tethering enabled WLAN hotspot activated Multiple tethering connections activated (USB and/or WLAN) Data downloaded / data uploaded Turbo download enabled Update for Google available / Google apps updated .
-
Page 91: Index
Index Numerics ............4G LTE Battery . - Page 92 ........... . . Lock remotely .
- Page 93 ........Set up with wizard Lock screen message .
- Page 94 ....Pattern Send email to contact ......
- Page 95 ... . . Setting from Volume button ......Volume button .
- Page 96 Issued by Gigaset Communications GmbH Frankenstr. 2a, D-46395 Bocholt © Gigaset Communications GmbH 2018 Subject to availability. All rights reserved. Rights of modification reserved. www.gigaset.com Google, Android, Google Play and other brands are trademarks of Google Inc.
Need help?
Do you have a question about the GS180 and is the answer not in the manual?
Questions and answers