Table of Contents
Advertisement
Quick Links
Last updated : 2014.02.04
Model : LVTX-STD-V1.0, Product Code : LVSTD-0901-000
PORSCHE CAYENNE 09
(PCM3.0)
Specification & Installation
SUNE TECHNOLOGY
CO.,LTD
No.9,Lane 606,Anping Rd,Tainan
City 70849,TAIWAN TEL:+88662292246 FAX:
+88662288104
Http://www.sune-tech.com
Shop http://www.carnavi-tech.com
SKYPE:sune_tech or hsin_han99
Your best partner for better driving
Advertisement
Table of Contents

Related Manuals for Car Solutions LVTX-STD-V1.0


Summary of Contents for Car Solutions LVTX-STD-V1.0
- Page 1 Last updated : 2014.02.04 Model : LVTX-STD-V1.0, Product Code : LVSTD-0901-000 PORSCHE CAYENNE 09 (PCM3.0) Specification & Installation SUNE TECHNOLOGY CO.,LTD No.9,Lane 606,Anping Rd,Tainan City 70849,TAIWAN TEL:+88662292246 FAX: +88662288104 Http://www.sune-tech.com Shop http://www.carnavi-tech.com SKYPE:sune_tech or hsin_han99 Your best partner for better driving...
-
Page 2: Table Of Contents
Contents 1. Before installation 1.1 Main specification 1.2 Features 1.3 System diagram 1.4 Components 1.5 Exterior 2. Setup 2.1 DIP switch 2.2 Factory mode 2.3 OSD (on screen display) 2.4 FMTX Setting 2.5 Parking Guide Line 3. Installation 3.1 Installation diagram 3.2 Cautions on installation 3.3 Installation 4. -
Page 3: Main Specification
1.1 Main specification 1. Input Spec. (MULTI VIDEO INTERFACE) -. 3 x A/V Input (External video source). -. 1 x CVBS(REAR CAMERA) Input. (Rear camera source) -. 1 x Analog RGB Input (Navigation System output) -. 1 x LCD Input (Car system Input) -. -
Page 4: Features
1.2 Features -Improved quality -Auto detection for NTSC, PAL signals -AV source switching by original button -FMTX Module Built in. -Possible to control displayed external NAVI, AV image... -
Page 5: System Diagram
1.3 System diagram Switch for source toggle Keypad OEM Mavi Button (Can Intrface) NAVIGATION Input (Analog RGB) DISPLAY Car Installation OEM LCD A/V 1 VIDEO MUX A/V 2 VIDEO CIRCUIT A/V 3 CVBS (Rear camera) Car Screen Input POWER FMTX A/V OUT (CAR MAIN BOARD) CIRCUIT... -
Page 6: Components
1.4 Components Extension cable * 2ea Sub board * 1ea (HTOUCH0001) FPC cable * 1ea (QCPASS0041) (HTOUCH0003) (FPCABL0002) FFC cable * 2ea TOUCH cable * 1ea Button cable * 1ea (FFCABL0006) (HTOUCH0002) (FPCABL0003) POWER cable (10P) * 1ea (HPOWER0005) LVDS cable * 1ea IR cable (8P) * 1ea Ground cable * 1ea (HLVDSC0006) -
Page 7: Exterior
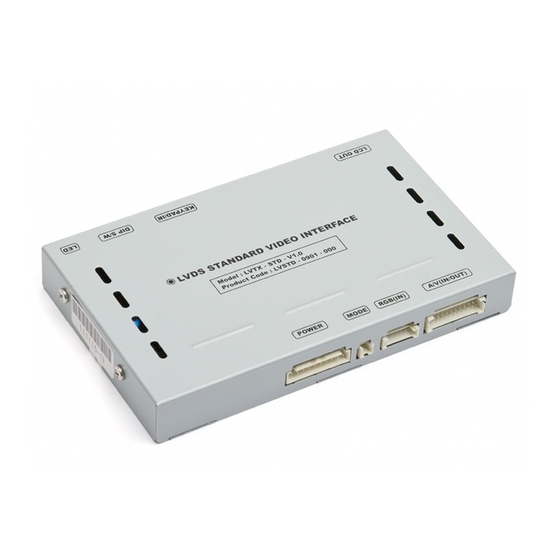
1.5 Exterior ⑦ ⑧ ⑤ ⑥ Dimension Horizontal length 155mm Vertical length 93mm Height 20mm ① POWER ② MODE ③ RGB IN ④ AV IN/OUT ⑤ LED ⑥ DIP S/W ⑦ KEYPAD/IR ⑧ LCD OUT ① ② ③ ④... -
Page 8: Dip Switch
2.1 DIP switch #PIN Function DIP S/W selection ※DIP S/W Use Example ON : Skipping RGB Mode RGB INPUT MUTE OFF : RGB Display -. Use Input Mode : A/V2, A/V3 ON : Skipping A/V 1 -. Use original Navigation A/V 1 MUTE OFF : A/V1 Display ▷... -
Page 9: Factory Mode
2.2 Factory mode · Factory Mode ① Press ‘UP(▲)’ button of supplied key pad for 2 sec. ② Press ▲ → ▼ → ▲ →MENU buttons in order. IMAGE PARK UTIL - H_POSITION : Horizontal movement - PARK ENABLE : Setup of rear view - FMTX ENABLE : FMTX setting of the OSD window parking guide line... -
Page 10: Osd (On Screen Display)
2.3 OSD (on screen display) IMAGE - BRIGHTNESS - CONTRAST - SATURATION - HUE - SHARPNESS USER IMAGE : To choose a option among 4 prepared color shade. Analog RGB Mode Video Mode - LANGUAGE : Choosing OSD language while using Touch OSD (English, Chinese only) - TRANS : Transparency control of the OSD background... -
Page 11: Fmtx Setting
2.4 FMTX Setting Factory Default : FMTX USE – ON, FREQENCY – 88.2MHz -Activate the Factory Mode operated with pressing ▲ → ▼ → ▲ → MENU buttons on the keypad in sequence. -Set “FM-TX USE” to “ON” as shown left. (Default -ON) Control the frequency by “▲”, “▼”... -
Page 12: Parking Guide Line
2.5 Parking guide line Factory Default -Types:0, H_Pos:50, V_Pos:120 ① Register the value needed on the “PARK SETUP” with pressing “OK” button on the Remote control in the PARK section as shown left. Then, you can control distance between 2 parallel lines. ②... -
Page 13: Installation Diagram
3.1 Installation diagram Button Cable DIP S/W KEYPAD LCD OUT Head Unit LVDS VIDEO INTERFACE Board cable Monitor POWER MODE RGB(IN) A/V(IN/OUT) ※ Please make sure that the installation AV3-SEL should be carefully conducted to avoid from AV2-SEL the damage of a monitor by ESD(Electrostatic AV1-SEL NAVI SEL discharge) and misalignment while... -
Page 14: Cautions On Installation
3.2 Cautions on Installation Ignition key should be taken off before starting installation, interface power connection must be the last step in installation. Power cable should be separated when connecting interface. Should be no any electronic devices or magnetic pole around installation place. ... -
Page 15: Installation
3.3 Installation 1. Cut the original FFC cable Trim edges of the original FFC cable which is connected between head unit board and monitor as shown left. (This is to connect the offered Button cable, be sure not to damage PIN on the cable. - Page 16 3.3 Installation 3. Connect the button cable to Sub-Board & Remove the original FPC cable Connect the wire from the Button cable to the sub-board as shown left. Remove the original FPC cable, connect the offered T-shaped FPC cable to Head unit and the offered Sub-board as shown left.
- Page 17 3.3 Installation 4. Connect Cayenne Board to Sub-Board Put LCD cable into Head unit, connect sub-board and interface board.
-
Page 18: Troubleshooting
4. Troubleshooting Q. I can not switch A/V sources. A. Check IR or Ground cable connection. Check LED lamps in the interface, if it is not on, check power cable. Q. All I got on the screen is black. A. Check second LED lamp of the interface is on, if not, check A/V sources connected are working well. (Second lamp indicates AV sources connected works well.) Check interface connection has been done well.
Need help?
Do you have a question about the LVTX-STD-V1.0 and is the answer not in the manual?
Questions and answers