Table of Contents
Advertisement
Quick Links
Advertisement
Table of Contents

Subscribe to Our Youtube Channel
Related Manuals for Pure Fun 9412TS


Summary of Contents for Pure Fun 9412TS
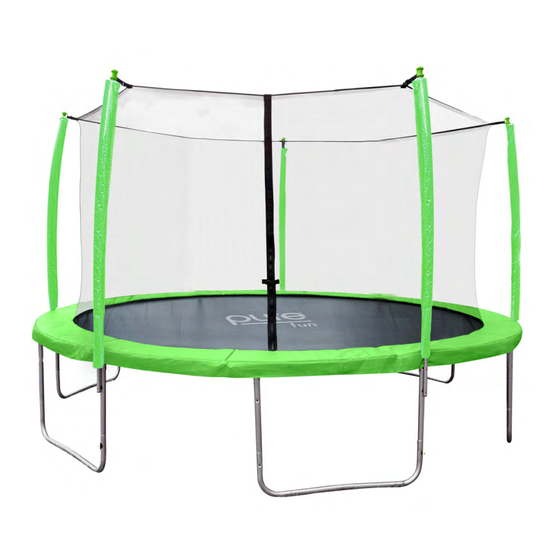
- Page 1 SUPA-BOUNCE 12FT TRAMPOLINE SET MODEL# 9412TS - TRAMPOLINE PRODUCT MANUAL - VERSION 4.21.01 FOR AGES: WEIGHT LIMIT: TOOLS NEEDED: ADULT(S) NEEDED: 145 Kgs CUSTOMER SERVICE GQBrands.com • CustomerService@GQBrands.com • 1-866-498-5269 • 4401 Samuell Blvd, Ste 150, Mesquite, TX 75149...
-
Page 2: Customer Service Information
Most up to date TRAMPOLINE SET manuals, warnings and product information can be found at: https://www.globalqualitybrands.com/warnings MODEL# 9412TS To register you product please visit: If you have an issue with your item, do not return. Please report www.globalqualitybrands.com/product-registration or... - Page 3 PROPOSITION 65 THIS PRODUCT CAN POSSIBLY EXPOSE YOU TO CHEMICALS INCLUDING Dl(2-ETHYLHEXYL) PHTHALATE (DEHP). WHICH IS KNOWN TO THE STATE OF CALIFORNIA TO CAUSE CANCER AND BIRTH DEFECTS OR OTHER REPRODUCTIVE HARM. FOR MORE INFORMATION GO TO WWW.P65WARNINGS.CA.GOV. Model# 9412TS...
-
Page 4: Warning Labels
MAX WEIGHT Do not allow more than one Do not attemp or allow person on the trampoline. Use by MODEL# 9412TS Global Quality Brands - PureFun.net more than on person at the same somersaults. Landing on the head 4401 Samuell Blvd, Ste 150 Mesquite, TX 75149... - Page 5 • Injury may result from hitting the frame or trampoline enclosure. falling through the springs while jumping. Always stay in the center of the jump mat while jumping. Do not use the trampoline without the frame pad securely in place fully covering the frame and springs. Model# 9412TS...
-
Page 6: Product Safety Information
You can purchase an • As your trampoline mat is raised off the ground, ANCHOR KIT for your trampoline from Pure Fun, by there is the risk of falling when entering or exiting the visiting us on the web at: www.PureFun.Net trampoline. -
Page 7: Basic Trampoline Skills
Keep your chin forward on your chest as you land. Land on the bed on your hands and knees. Kick forward and up with your legs to return to an Push with your hands and come back up to an erect erect position. position. Model# 9412TS... - Page 8 BASIC TRAMPOLINE SKILLS Seat Drop Front Drop Land in a sitting position with your legs parallel to the Start from a low bounce and land on the bed in a bed. prone position. Place your hands on the bed beside your hips. Keep your head up and your arms extended forward Push with your hands to return to an erect position.
- Page 9 Ensure adequate overhead clearance. A minimum of 24ft. (7.3m) from ground level, away from wires, trees and othe possible hazards. Ensure a clear space of 8.2ft (2.5m) around sides, away from walls, fences, structures, roads and other hard surfaces and play areas. WHAT YOU WILL NEED: Phillips-head screwdriver Gloves Safety glasses Mallet Model# 9412TS...
-
Page 10: Trampoline Parts List
TRAMPOLINE PARTS LIST Part # Description Part# Description Leg Extension Jump Mat Curved Top Rail U Shaped Leg T-Section with Bolt Spring Frame Pad M6x45mm Bolt Wrench Spring Tool (4a) M6 x 45mm GQBrands.com CustomerService@GQBrands.com 1-866-498-5269... - Page 11 Insert the M6x45mm bolt (4) into the top of the T-section (3) to secure both top rails using the wrench tool (Part 9). Tighten securely. Repeat step 3 and step 4 until you have formed a complete circle as shown to the left. Model# 9412TS...
- Page 12 TRAMPOLINE ASSEMBLY INSTRUCTIONS STEP 5: Gather all Leg Extensions (Part 5) and U- Shaped Legs (Part 6). You will be attaching 2 leg extensions (5) to each U- Shaped Leg. NOTE: The Leg Extension will have 3 openings. The 2 openings closest to each other, will go on the top and connect to the T- Section at the top of the trampoline.
- Page 13 TRAMPOLINE ASSEMBLY INSTRUCTIONS Repeat step 8 until you have attached 5 of the top T-Sections which will look like figure shown. Figure C Model# 9412TS...
- Page 14 TRAMPOLINE ASSEMBLY INSTRUCTIONS STEP 9: Place the Jumping Mat (Part 1) in the middle of the frame and unfold it completely. NOTE: Make sure the stitching of the Jumping mat is facing the floor In order to avoid ripping and to distribute tension when attaching springs to the frame, follow the numbered order shown.
- Page 15 Frame Pad must cover the Top Rails completely to avoid injury. NOTE: Make sure the connecting straps are facing down towards the Top Rails in order to secure the Frame Pad to them in Step 9. MODEL# 9412TS - TRAMPOLINE...
- Page 16 TRAMPOLINE ASSEMBLY INSTRUCTIONS STEP 11: Find all the bottom connecting straps of the trampoline frame pad and secure them by tying them in a knot around to the top rail to avoid moving or shuffling when jumping on the trampoline as shown below.
-
Page 17: Enclosure Parts List
ENCLOSURE PARTS LIST Part # Description Part# Description Straight Enclosure Pole Washer Curved Enclosure Pole Enclosure Pole Cap Black String Enclosure Net M6x75mm Bolt Spacer Lime Pole Cover M6x75mm Bolt MODEL# 9412TS - ENCLOSURE... - Page 18 ENCLOSURE ASSEMBLY INSTRUCTIONS STEP 1: Gather all Curved Enclosure Poles (Part 2) and Enclosure Pole Caps (Part 3). IMPORTANT: Do not attach the Enclosure Pole Caps to the Straight Enclosure Poles. If an Enclosure Pole Cap has been accidentally installed on a straight pole it cannot be removed.
- Page 19 ENCLOSURE ASSEMBLY INSTRUCTIONS STEP 3: Slide the Lime Pole Cover (Part 10) over the foam of the connected enclosure poles as shown. Repeat this on all 5 poles before moving to next step. MODEL# 9412TS - ENCLOSURE...
- Page 20 ENCLOSURE ASSEMBLY INSTRUCTIONS STEP 4: A. With the help of another adult, hold the completed enclosure pole by aligning both square holes to begin installation. NOTE: Curved Enclosure Pole must face towards the center of the trampoline. B. Once aligned, attach the completed enclosure pole to the trampoline leg.
- Page 21 ENCLOSURE ASSEMBLY INSTRUCTIONS M6x75mm Bolt Spacer Washer MODEL# 9412TS - ENCLOSURE...
- Page 22 ENCLOSURE ASSEMBLY INSTRUCTIONS STEP 5: Place the Enclosure Net (Part 9) on top of the trampoline. Align the straps to the corresponding Enclosure Poles so they are as near to each other as possible when lifted. NOTE: Make sure that zipper and buckle snap are facing the outside of the trampoline.
-
Page 23: Frequently Asked Questions
Thank You Coupon! As a way of saying thank you for purchasing one of our products, here is a 10% OFF coupon for your next purchase at www.PureFun.net Use Code: GQBRANDS10 at Checkout MODEL# 9412TS...
Need help?
Do you have a question about the 9412TS and is the answer not in the manual?
Questions and answers