Advertisement
Quick Links
FOR AGES:
WEIGHT LIMIT:
3-7
CUSTOMER SERVICE
GQBrands.com • CustomerService@GQBrands.com • 1-866-498-5269 • 4401 Samuell Blvd, Ste 150, Mesquite, TX 75149
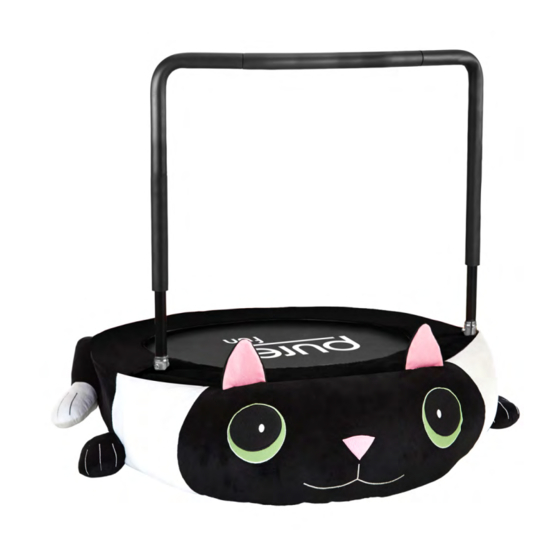
36-INCH KITTY CAT KIDS
TRAMPOLINE WITH HANDRAIL
MODEL# 9027KT
PRODUCT MANUAL - VERSION 1.21.01
TO BUILD:
75
Lbs
34 Kgs
TOOLS NEEDED:
1
N/A
X
PAT E N T P E N D I N G *
Advertisement

Related Manuals for Pure Fun 9027KT


Summary of Contents for Pure Fun 9027KT
- Page 1 36-INCH KITTY CAT KIDS TRAMPOLINE WITH HANDRAIL MODEL# 9027KT PRODUCT MANUAL - VERSION 1.21.01 FOR AGES: WEIGHT LIMIT: TO BUILD: TOOLS NEEDED: 34 Kgs CUSTOMER SERVICE GQBrands.com • CustomerService@GQBrands.com • 1-866-498-5269 • 4401 Samuell Blvd, Ste 150, Mesquite, TX 75149...
-
Page 2: Customer Service Information
CUSTOMER SERVICE INFORMATION Thank you for purchasing: 36-INCH KITTY CAT KIDS TRAMPOLINE WITH HANDRAIL MODEL# 9027KT To register you product please visit: If you have an issue with your item, do not return. www.globalqualitybrands.com/product-registration Please report items that are damaged or missing parts... - Page 3 Although the springs, • DO NOT wear glasses or helmets when pad, foam and mat are made to take a lot using the trampoline. 9027KT...
-
Page 4: Parts List
PARTS LIST Frame Pad Fold Mat and Frame Side Handrail Center Handrail Plush Face Front Back 6- Safety Hook Leg Cap Frame Cap Springs GQBrands.com CustomerService@GQBrands.com 1-866-498-5269... - Page 5 Frame (1) and unfold to make half a circle in shape. STEP 2 Parts: Part 6 (x2) - Safety Hook Once the Frame has been folded, remove the clasp from The Safety Hook and push the Hooks out of the Frame 9027KT...
- Page 6 ASSEMBLY INSTRUCTIONS STEP 3 Apply weight to one side of the Jump Mat and unfold to complete the circle. NOTE: Make sure to keep applying pressure to the Frame to avoid tension to close the frame. Failure to do so can cause injury. STEP 4 Once the Mat is Completely unfolded and the Jump Mat is Stretched out properly, place...
- Page 7 4 Assembled Legs. You will have 2 legs that do not need Leg Caps until Step 7. Twist the Legs into the 6 exposed screws in the Frame. Do not install Do not install Leg Cap Leg Cap 9027KT...
- Page 8 ASSEMBLY INSTRUCTIONS STEP 7 Flip the Trampoline over so that the legs are facing the floor. Slide a Side Handle Rail (4) on each of the Legs without Leg Caps and secure with the remainder of the Leg Caps. Make sure that both Side Hand Rails Are facing each other.
- Page 9 Place the Frame Pad (2) on top of the Trampoline so that the soft texture is facing upwards. Align the front Loop in the exposed area of the Frame Pad to the front Leg and Handrail of the Trampoline. 9027KT...
- Page 10 ASSEMBLY INSTRUCTIONS STEP 10 Pull the Loop on front of the Frame Pad and stretch it until it is hooked to the Leg STEP 11 Attach the Plush Pillow (3) to the exposed Velcro straps on the Frame pad. Align both Velcro straps to their respective sides with the face of the Plush facing outward.
- Page 11 There are 3 String Locations. In the Back of the Frame Pad, Left Hand Rail, and Right Hand Rail. Tie all Strings to the closest/respective legs to ensure the Frame Pad is snug to the Frame and won’t move while in use 9027KT...
-
Page 12: Frequently Asked Questions
FREQUENTLY ASKED QUESTIONS • Question: “One of my trampoline legs has • Question: “I had a part missing from my • Question: “How do I remove the black box” or “something was damaged during caps on the frame of the trampoline?” broken”...
Need help?
Do you have a question about the 9027KT and is the answer not in the manual?
Questions and answers