Advertisement
Quick Links
FOR AGES:
WEIGHT LIMIT:
13+
CUSTOMER SERVICE
GQBrands.com • CustomerService@GQBrands.com • 1-866-498-5269 • 4401 Samuell Blvd, Ste 150, Mesquite, TX 75149
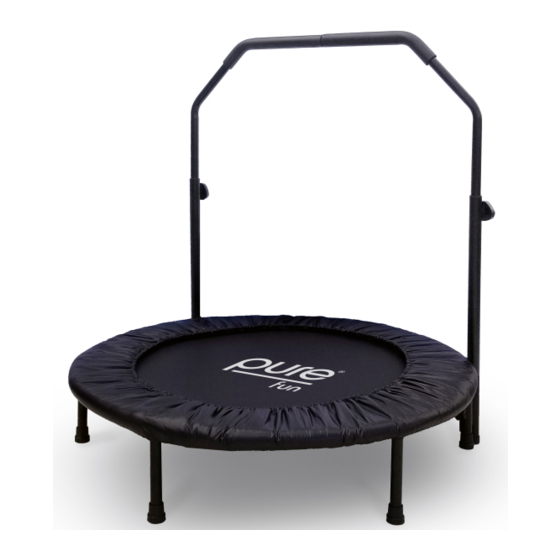
40-INCH BUNGEE EXERCISE TRAMPOLINE
W/ HANDRAIL - BLACK
MODEL# 9005BTH
PRODUCT MANUAL - VERSION 1.21.01
TO BUILD:
220
Lbs
100 Kgs
TOOLS NEEDED:
1
X
Advertisement

Subscribe to Our Youtube Channel
Related Manuals for Pure Fun 9005BTH


Summary of Contents for Pure Fun 9005BTH
- Page 1 40-INCH BUNGEE EXERCISE TRAMPOLINE W/ HANDRAIL - BLACK MODEL# 9005BTH PRODUCT MANUAL - VERSION 1.21.01 FOR AGES: WEIGHT LIMIT: TO BUILD: TOOLS NEEDED: 100 Kgs CUSTOMER SERVICE GQBrands.com • CustomerService@GQBrands.com • 1-866-498-5269 • 4401 Samuell Blvd, Ste 150, Mesquite, TX 75149...
-
Page 2: Customer Service Information
CUSTOMER SERVICE INFORMATION Thank you for purchasing: 40-INCH BUNGEE EXERCISE TRAMPOLINE W/ HANDRAIL - BLACK MODEL# 9005BTH If you have an issue with your item, do not return. Please To register you product please visit: report items that are damaged or missing parts to the www.globalqualitybrands.com/product-registration... - Page 3 • ALWAYS make sure to store your trampoline safely, where it will not present a tripping or obstacle hazard. • Dispose of all packaging materials safely and per local ordinance. 9005BTH...
-
Page 4: Parts List
PARTS LIST Jump Mat and Frame Safety Hook Frame Pad 5- Large Pin Lock Knob 6- Small Lock Knob Left Side Rail Base Right Side Rail Base Left Side Handrail Right Side Handrail GQBrands.com CustomerService@GQBrands.com 1-866-498-5269... - Page 5 ASSEMBLY INSTRUCTIONS STEP 1: Parts: Part 1 (x1) - Jump Mat and Frame Locate the middle of the Jump Mat and Frame (1) and unfold to make half a circle in shape. STEP 2: Unfold again to create the complete Frame in a complete circle, with the mat properly stretched out.
- Page 6 ASSEMBLY INSTRUCTIONS STEP 3: Parts: Part 2 (x2) -Safety Hook Locate both hinges at opposite sides from each other in the Jump Mat and Frame. Insert the Safety Hook (2) bolt through the small openings of the hinges, and secure it once it shows through the other side with the Hook attached in its head.
- Page 7 ASSEMBLY INSTRUCTIONS STEP 5: Parts: Part 4 (x6) - Leg Screw on all Legs (4) into their respective places on the frame. You will have 6 total legs once complete. Flip the frame over and your trampoline is ready for use if you do not want to utilize the handrail.
- Page 8 ASSEMBLY INSTRUCTIONS STEP 7: 6- Small Lock Knob Parts: Part 6 (x2) - Small Lock Knob Locate the 2 openings at the bottom of the Rail Bases, and tighten the Knob Screws (6). This will secure the handrail from moving during jumping. STEP 8: Parts: Part 9 (x1) - Left Side Handrail...
- Page 9 ASSEMBLY INSTRUCTIONS STEP 9: Push down on the push pin and slide until the push pin locks into place as shown.
- Page 10 Select the height you prefer by aligning the holes. Insert each Large Pin Lock Knob (5) into the hole and tighten. To adjust the height, loosen the Adjustable Knob and move handrail up or down, then tighten Pin Lock knob. 9005BTH...
- Page 11 ASSEMBLY INSTRUCTIONS 9005BTH...
-
Page 12: Frequently Asked Questions
FREQUENTLY ASKED QUESTIONS Question: “One of my trampoline Question: “I had a part missing from legs has broken” or “The trampoline my box” or “something was padding or mat is damaged, how do damaged during assembly, can you I replace it?” send it to me?”...
Need help?
Do you have a question about the 9005BTH and is the answer not in the manual?
Questions and answers