Table of Contents
Advertisement
Quick Links
FOR AGES:
4+
WEIGHT LIMIT:
120
Lbs
54 Kgs
ADULT(S) NEEDED:
TOOLS NEEDED:
WARNING/ADVERTENCIA
• Do not allow more than one person on this
product at any time.
• Please read all the instructions before using
this product.
• Consult a physician before beginning any
exercise program or strenuous activity.
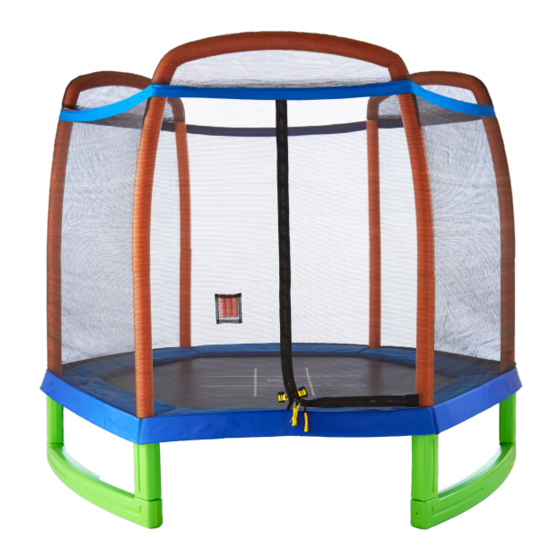
7 FT KIDS TRAMPOLINE SET + TIC-TAC-TOE
MODEL# 9011TS
PRODUCT MANUAL - VERSION 03.16.02
• The contents of this package are not suitable
for children under 3 years of age. Contains
small parts which may cause choking.
• Adult supervision is required while in use.
• ADULT ASSEMBLY REQUIRED.
CUSTOMER SERVICE
GQBrands.com
CustomerService@GQBrands.com
1-866-498-5269
4009 Distribution Dr, Suite 240
Garland, TX 75041
Advertisement
Table of Contents

Related Manuals for Pure Fun 9011TS


Summary of Contents for Pure Fun 9011TS
- Page 1 7 FT KIDS TRAMPOLINE SET + TIC-TAC-TOE MODEL# 9011TS PRODUCT MANUAL - VERSION 03.16.02 FOR AGES: WEIGHT LIMIT: 54 Kgs ADULT(S) NEEDED: TOOLS NEEDED: WARNING/ADVERTENCIA CUSTOMER SERVICE GQBrands.com • Do not allow more than one person on this • The contents of this package are not suitable product at any time.
-
Page 2: Customer Service Information
CUSTOMER SERVICE INFORMATION Thank you for purchasing: 7FT KIDS TRAMPOLINE SET + TIC-TAC-TOE MODEL# 9011TS At Global Quality Brands®, we want all of our customers to be To order these parts, or if you have any other questions or concerns completely satisfied with their purchase. -
Page 3: Limited Warranty
TO USE. ALL MERCHANDISE IS SOLD ON THIS CONDITION, WHICH NO products are not covered by the product warranty. No other warranty REPRESENTATIVE OF GQ BRANDS® CAN WAIVE OR CHANGE. beyond that specifically set forth above is authorized by GQBrands®. MODEL# 9011TS... -
Page 4: Important Message
WARNINGS IMPORTANT MESSAGE WARNING - PLEASE READ ADULT ASSEMBLY REQUIRED CHOKING HAZARD - Small Parts NOT for children under 3 years of age. WARNING: While every attempt is made to ensure the highest degree of protection in all equipment, we cannot guarantee freedom from injury. The user assumes all risks of injury due to use. - Page 5 These may cause a strangulation is NOT intended for use in commercial or physical hazard. applications and/or use in public areas such as schools, parks, nurseries, day • This Trampoline is NOT for adult or schools, day cares, etc. adolescent use. MODEL# 9011TS...
-
Page 6: Assembly Warnings
ASSEMBLY WARNINGS • Please visit GQBrands.com for any important product information • IMPORTANT: USE GLOVES TO PROTECT AGAINST PINCH POINTS updates and/or additional safety warnings before assembling or using DURING ASSEMBLY. this product. • Enclosed are the current specifications and product features available •... - Page 7 #18 Self-locking Screw x 6pcs #21 Self-Locking Screw (6 Pieces) #19 Cap Nut x 6pcs ECT-88-3A-25.4 #20 Cap Nut (6 Pieces) Curve Frame Tube with F Horizontal Tube with Foam Description Quantity EN-88-3A MODEL# 9011TS EHT-88-3A-25.4 Horizontal Tube with Fo...
- Page 8 ASSEMBLY INSTRUCTIONS STEP 1: Step 1 Connect Plastic Flat Plate (Part #12) to the bottom of Vertical Leg Extension (Part #4) and twist the plate until firmly attached. Finish attaching the plastic plates to the remainder of the Vertical Legs Extensions. STEP 2: Insert all Vertical Leg Extensions to Plastic Horizontal Leg Base (Part #6) to circular...
- Page 9 The six holes at the corner of the Trampoline Mat, stitched with Triangle-Rings and Safety Pad (#1) should be inserted to the Lower Frame tube Foam (with one hole, take out foam before insert Safety Pad, and put it back after Safety Pad) (#11) as shown in FIGURE 6. MODEL# 9011TS FIGURE 6...
- Page 10 STEP 8 ASSEMBLY INSTRUCTIONS Attach the R-Hooked Galvanized Spring (#8) with “ R” Hook end to the Triangle-Ring on the mat as shown below. HINT: Holding the spring at 45 degree in relation to the mat surface will be much easier to install into Triangle -Ring. Hold the spring loading tool underhand and pull spring hook towards the point “ZERO”...
- Page 11 Top Rail (#2) FIGURE EP 17 Step 16 the zipper of Enclosure Netting (#14) at the door which should be located on top of the support assembly as shown in URE 18. Then secure the door with hook. MODEL# 9011TS...
-
Page 12: Frequently Asked Questions
FREQUENTLY ASKED QUESTIONS • Question: “The foam padding or mat is • Question: “I had a part missing from damaged, what should I do?” my box” or “something was damaged in shipping, can you send it to me?” Answer: If you are still within your warranty period (90 Days from initial Answer: If it has been 30 days or less purchase) you should contact customer...
Need help?
Do you have a question about the 9011TS and is the answer not in the manual?
Questions and answers