Table of Contents
Advertisement
Advertisement
Table of Contents

Related Manuals for Starrett IQ


Summary of Contents for Starrett IQ
- Page 1 Electronic Dial Indicator Instructions 2nd Generation...
-
Page 2: Table Of Contents
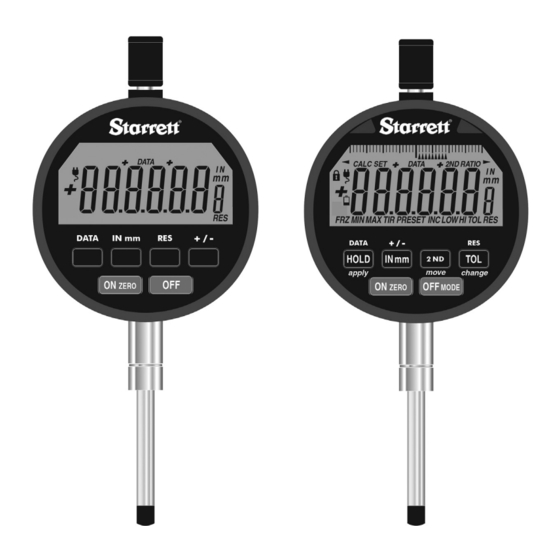
Table of Contents Electronic Dial Indicator IQ (2nd Generation) Features & Icons Functions Electronic Dial Indicator AD (2nd Generation) Features & Icons Primary Button Functions 2nd Button Functions 9-10 3rd Button Functions Additional Instructions & Information Single Indicator Software CALC Software Dimensions Specifications &... - Page 3 Electronic Dial Indicator 2nd Generation Send Measurement Inch Millimeter Resolution Battery Warning Cable Connection Travel Positive Travel Negative • Absolute Sensor – Never lose position (even • Rotating Bezel 270 degrees when replacing batteries) • + / - Travel Direction Button •...
-
Page 4: Functions
BUTTON FUNCTIONS ON Zero Powers indicator ON. Zeros / clears reading ON ZERO a. To Power Indicator On: Press & Release b. To Clear / Zero Display: Press & Release ON ZERO when LCD is On. (Zero on Release of Button) Powers indicator off a. -
Page 5: Features & Icons
Electronic Dial Indicator 2nd Generation • Absolute Sensor – Never lose position (even • Rotating Bezel 270 degrees when replacing batteries) • TOL (Tolerance) Program HI / LOW Values • Long Battery Life – Approximate Hours: • Red (No G0) & Green (Go) LEDs for TOL (Tolerance) Casual Daily Use +10,000 Hours;... - Page 6 AD Icons & Program Functions Analog Display CALC Formula or Table Measurement Go / No Go LEDs SET Programming or Setup (Green & Red) - + Travel Positive + - Travel Negative DATA Send or Store Measurement 2ND Secondary Button Functions Lock Functions &...
-
Page 7: Primary Button Functions
Primary BUTTON FUNCTIONS Press & Release ❍ Press & Hold ● ON Zero Powers indicator ON. Zeros / clears reading ON ZERO a. To Power Indicator On: Press & Release ON ZERO b. To Clear / Zero Display: Press & Release when LCD is On. - Page 8 Primary BUTTON FUNCTIONS Press & Release ❍ Press & Hold ● Toggles TOL (Tolerances) On & Off. a. To Toggle TOL On/Off: Press & Release . If no tolerances are programmed, a large tol will be displayed & both the LOW & HI icons will flash.
-
Page 9: 2Nd Button Functions
2nd BUTTON FUNCTIONS Press & Release ❍ Press & Hold ● DATA Send Data through cable, wireless radio module, or store readings in indicator. a. To Send Data or Store Readings: 1) Press and Release DATA (HOLD). 2) Press & Release Cable: If cable is connected, the data will be sent through the data output cable. - Page 10 MODE (INC, PRESET, TIR) Press & Release ❍ Press & Hold ● PRESET Change MODE from INC, PRESET, & TIR OFF MODE a. To Change Indicator MODE: Press & Hold The LCD ICONs will change from INC to PRESET to TIR. Release button when PRESET flashes on the LCD.
-
Page 11: 3Rd Button Functions
3rd BUTTON FUNCTIONS Press & Release ❍ Press & Hold ● Analog Display Allows for ticks or graduation scale view at top of LCD Graduation distance matches the selected resolution of the numeric display a. To Disable / Enable Analog Display 1. -
Page 12: Single Indicator Software
OVERVIEW Single Indicator Software Single Gage Software (includes USB cable) * Easy to Read Display on PC * Manual Log Data – Single Mouse Click * Auto Log Data – Timed Logging * View Data Log Readings – Data Saved as a CSV File * Program Gage from PC –... -
Page 13: Calc Software
CALC Software... -
Page 14: Dimensions
Dimensions & Useful Tips/Precautions FINGER LIFT LUG BACK TRAVEL / 'A' DIM. (OPTIONAL DUST CAP) (OPTIONAL FLAT BACK) 1.00" 5.07" .28 FLAT BACK .600" 4.67" BATTERY TRAY .250" 4.32" (2X #CR2450) .150" 4.22" 1.75 2.50 1.93 BEZEL ROTATION 270 CW .373 CABLE OUTPUT... -
Page 15: Specifications & Error Codes
Specifications Measurement range ..250” / 6mm 1.00” / 25 mm 600” / 15mm Max error (.000050” / .0001” / .002mm .0001” / .002mm .0001” / .002mm .001mm Resolution) Max error (.0001” / .0002” / .004mm .0002” / .004mm .0002” / .004mm .002mm Resolution) Repeatability .000050”... -
Page 16: Compliance
Compliance CE & ROHS The product components have been tested and meet the compliance requirements to the current EU RoHS directives. The indicators have also passed the CE requirements, including EMI and ESD and fulfill the requirements of the CE directive and can bear the CE symbol. REACH Registration, Evaluation, Authorization and Restriction of Chemicals (REACH), controls the list of Substances of Very High Concern (SVHC). -
Page 17: Data Outputs
DATA Outputs Data I/O Connector The indicator has an 8 pin data I/O connector with several supported communication protocols. These communication protocols can be accessed using a dedicated cable or through custom wiring using the Pigtail cable. Serial ASCII Command Protocol (USB/RS232/UART) The gage supports several "serial"... - Page 18 DATA Outputs Digimatic (MTI) Protocol The gage supports the Digimatic (MTI) protocol, also commonly referred to as SPC. Digimatic is a 3 wire (REQ, DATA, CLK) communication protocol that operates at TTL levels and sends gage measurements in a 13 digit (52 bit) packet format.
- Page 19 Notes...
- Page 20 Notes...
Need help?
Do you have a question about the IQ and is the answer not in the manual?
Questions and answers