Table of Contents
Advertisement
Quick Links
Advertisement
Table of Contents

Related Manuals for Hillstone A200 Series


Summary of Contents for Hillstone A200 Series
- Page 1 Hillstone A200 Series Hardware Reference Guide...
- Page 2 Hillstone Networks This document is prohibited for any commercial purpose. About This Manual This document is an installation guide for Hillstone devices to help you install the Hillstone device properly. For more information, refer to the documentation site: https://docs.hillstonenet.com.cn To provide feedback on the documentation, please write to us at: TechDocs@hillstonenet.com...
-
Page 3: Table Of Contents
Contents Contents ............................3 Preface ............................6 About This Manual ........................ 6 Document Conventions ......................6 Chapter 1 Introduction ......................6 Overview ..........................6 Hardware Overview ....................... 7 Front Panel .......................... 7 Back Panel ........................... 7 LED Indicators ........................7 System Parameters ......................... - Page 4 Verifying the Parts Received ....................15 Installation Devices/Tools/Cables ................... 16 Chapter 3 Installation ......................16 Installing the Device on a Workbench ................16 Connecting Cables ....................... 17 Connecting the Console Cable ..................17 Connecting the Ethernet Cable ..................18 Connecting the Ethernet Copper Cable ..............18 Connecting the Ethernet Fiber Cable ................
- Page 5 EU Conformity Statement ....................27...
-
Page 6: Preface
Preface About This Manual Thanks for choosing the network security products from Hillstone Networks. This document is an installation manual for the Hillstone A200Series device to help you install the device properly. This manual includes the following chapters: Introduction ... -
Page 7: Hardware Overview
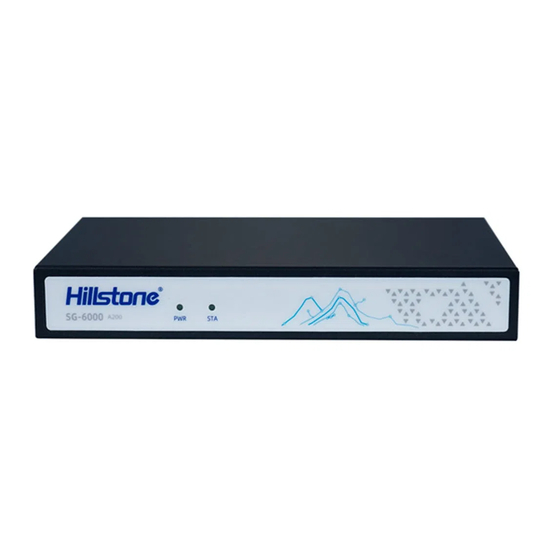
Hardware Overview The size of A200 series equipment of is 180 * 110 * 28mm, which belongs to Shanshi Netcom desktop equipment and is used on the workbench. Front Panel The front panel of A200 consists of several LED indicators (1 Power LED, 1 Status LED). -
Page 8: System Parameters
Table: Front Panel LED Descriptions Color/Status Description Green/Always on The device power is running normally. The device is powered off. Green/Blinking The system is running normally. The system has not been booted/is booting/has failed to boot. WLAN Green/Always on The device has detected a built-in WLAN module present. -
Page 9: Ports
CON port The A200 series equipment of Shanshi Netcom provides a configuration port (con port) that conforms to RS-232C asynchronous serial specification. Through this configuration port, the user can configure the device by himself. The properties and description of the configuration port are shown in the following table.Table: Console Port Attributes... -
Page 10: Usb Port
Attribute Description Port Standard RS-232C Baud Rate 115200 bit/s Services Connect the CON port to the serial port of a PC and run a terminal emulation program on the PC to configure the device Transmission Medium Console cable USB Port The A200-Series device provides up to 1 USB 2.0 host ports. - Page 11 Table: SFP Port Attributes Attribute Description Connector Frame Format Ethernet_II Ethernet_SNAP Negotiation SFP optical module 1000Mbps Mode SFP copper module 10/100/1000Mbps autosensing (some only supports 1000Mbps) Full/half-duplex The SFP port supports the following two types of modules: SFP optical module ...
- Page 12 Optical Module Notes: The original Hillstone optical module should not be used together with optical modules from other manufacturers, otherwise some errors may occur. If an SFP copper module is applied to an SFP port, you should use a crossover or straight-through cable (i.e.
-
Page 13: Clr Button
STA and ALM LEDs turn solid red. After the LEDs turn off, the device will restart again. Power Supply Table: Power Supplies of All Product Models Model Single/Dual AC/DC Power Supply Type A200 series Single External power adapter Power Supply Modules A200 uses a pluggable AC power adapter. A200 AC Power Supply Module:... -
Page 14: Chapter 2 Installation Preparations
Chapter 2 Installation Preparations Introduction This chapter introduces the preparations before installing the Hillstone A200-Series device, including the installation site environment requirements. This chapter includes the following sections: Installation site environment requirements Installation Site Environment Requirements The A200-Series device is designed for indoor use. To ensure the normal operation and to prolong the service lifetime, the installation site must meet the requirements below. -
Page 15: Emi Prevention
When you receive the product, a packing list is included inside the accessory box. Verify the parts and items you received against the packing list. If any part is missing, contact a customer service representative. Hillstone provides different expansion modules and power supply modules in separate individual packages according to your order. -
Page 16: Installation Devices/Tools/Cables
Installation Devices/Tools/Cables The SG-6000A-Series device is shipped with a power cable and a console cable, and you should have the following items before the installation: Terminal: Configuration terminal (e.g. an ordinary PC). Tools: Cross screwdriver and ESD wrist strap/antistatic gloves. ... -
Page 17: Connecting Cables
Do not place any heavy object on the top of the chassis. Connecting Cables The cable connection of A200 series equipment includes configuration cable connection, Ethernet cable connection and power cable connection.. Connecting the Console Cable The A200-Series device provides an RS-232C asynchronous serial console (CON) port, through which you can configure the device. -
Page 18: Connecting The Ethernet Cable
Connect the console cable. Connect the RJ-45 end of the console cable to the device's Console port (labeled CON), and then connect the DB-9 end to the console terminal. Connecting the Ethernet Cable The A200-Series device provides gigabit Ethernet ports, SFP ports. The gigabit Ethernet port can be connected by a straight-through cable (also called standard cable) or crossover cable. -
Page 19: Connecting A Power Adapter
Connecting a Power Adapter For some models, you need to connect the device to the external AC power supply by using the power adapter to power the device: To connect a power adapter, take the following steps: 1. Insert the DC output plug of the power adapter into the DC power interface on the back panel of the device. -
Page 21: Chapter 4 Boot And Configuration
Chapter 4 Boot and Configuration Introduction This chapter describes how to perform initial system boot and basic configuration of the Hillstone A200-Series device, using a PC as the console terminal. Establishing a Configuration Environment The A200-Series device supports both local and remote configuration. Administrators can use the following configuration methods. -
Page 22: Webui
Switch on the power supply, and the device performs self-test and initializes the configuration automatically. If the booting succeeds, the system will display the command line prompt "login". Enter the default administrator name and password "hillstone" at the "login" and "password" prompts, press Enter. And now you are successfully logged in and accessing the CLI. -
Page 23: Telnet Or Ssh
Launch a Web browser of the management PC, enter the URL https://192.168.1.1 in the address bar, and then press Enter. Type the default administrator name (hillstone) and password (hillstone) into the text boxes respectively. Select the language you want to use. -
Page 24: Chapter 5 Hardware Maintenance And Replacement
The device has no shutdown button, and can directly disconnect AC220V or DC12V for power down. Chapter 6 Troubleshooting Introduction This chapter provides solutions to some common problems of the Hillstone A200-Series device. Losing the Administrator Password If you lose the administrator password, please contact your local sales representative or you can reset. - Page 25 According to the status of the power indicator, the user can judge whether the power system of the product fails. For the status and meaning of the power indicator, please refer to the meaning of the indicator. When the power supply system works normally, the power indicator should keep green and always on;...
-
Page 26: Chapter 7 Addendum Statement
Chapter 7 Addendum Statement Warning: This is a class A product. In a domestic environment this product may cause radio interference in which case the user may be required to take adequate measures. FCC Statement This device complies with Part 15 of the FCC Rules. Operation is subject to the following two conditions: (1) this device may not cause harmful interference, and (2) this device must accept any interference received, including interference that may cause undesired operation. -
Page 27: Avis D'industrie Canada
Avis d'Industrie Canada Cet appareil est conforme à la norme CNR-210 des règlements d’Industrie Canada. Son fonctionnement est sujet aux deux conditions suivantes: 1) Cet appareil ne doit pas provoquer d’interférences et 2) Cet appareil doit accepter toutes les interférences, y compris celles pouvant entraîner son dysfonctionnement. Cet appareil numérique de la classe B est conforme à...
Need help?
Do you have a question about the A200 Series and is the answer not in the manual?
Questions and answers