Table of Contents
Advertisement
Quick Links
Advertisement
Table of Contents

Related Manuals for Unipulse TM200


Summary of Contents for Unipulse TM200
- Page 2 Introduction Thank you for purchasing the TM200 torque monitor. TM200 is a dedicated USB interface for the UNIPULSE UTM Ⅱ series. This product can be used with devices which utilize UTMⅡ. Be sure to read this operation manual before use in order to take full advantage of the superb quality of the TM200 and to use it properly and safely.
- Page 3 ● Prepare a safety circuit outside the TM200 so that the entire system functions safely if the TM200 fails or malfunctions. ● Be sure to contact our sales representative before use if the TM200 will be used in the following situations: - In an environment not described in the operation manual;...
- Page 4 USB cable plugging in and unplugging. ● Use only after warming up for 30 minutes or longer following the start of power supply. ● Protective performance of the TM200 may be lost if it is not used as specified. ● Cleaning - During cleaning, unplug the adapter from the outlet and the USB cable from the PC.
- Page 5 Product supporting RoHS Directive Product supporting RoHS Directive Product supporting RoHS Directive The parts and accessories used in this product (including the operation manual, package box and so on) support RoHS Directive, which regulates the use of toxic substances that may have adverse effects on the environment and the human body.
-
Page 6: Table Of Contents
1-1. Main features of the TM200 ........ - Page 7 6-3. TM200 block diagram ........
- Page 8 Contents Contents 7 Appendices ..........43 7-1.
- Page 9 Contents Contents M E M O VIII VIII...
-
Page 10: Outline
* Refer to P.6 "3-2.PC preparation" for details. This manual can be downloaded from the UNIPULSE website or can be viewed in the help of the dedicated PC application. When the dedicated PC application is updated, this operation manual may also be updated. -
Page 11: Connection With Other Devices
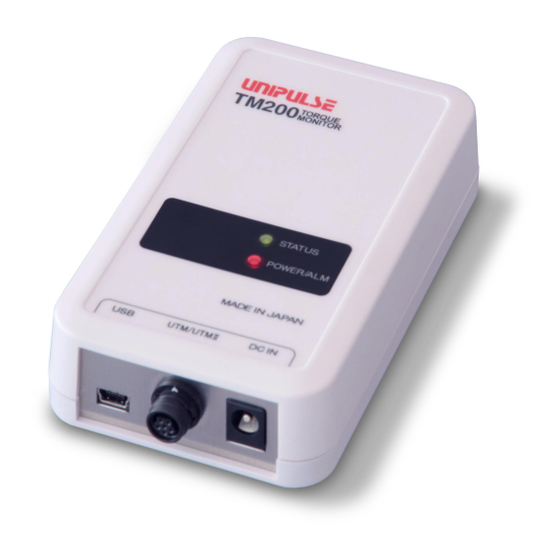
1 Outline From ■ Download at the bottom of this page, the operation manual and software can be downloaded. Chapter Operation manual Dedicated PC application 1-4. Connection with other devices 1-5. Part names and functions Power input connector UTMⅡ connection connector USB connector STATUS lamp POWER/ALM lamp... -
Page 12: Procedures For The First-Time Use
Install the USB driver and the dedicated PC application. Refer to P.6 "3-2.PC preparation". After installing this USB driver, connect the TM200 and PC with the USB cable. Hereinafter, use the dedicated PC application to operate the TM200. Set the sensor type. Refer to P.21 "3-6.Calibration tab" and perform calibration. -
Page 13: Connection
● Do not connect commercial power supply directly to the main unit. ● Be sure to check the wiring and so on carefully before turning the power on. ● Be sure to use the dedicated AC adapter included for the TM200. 2-1. -
Page 14: Connection Of The Usb Cable
PC for the first time. Refer to P.6 "3-2.PC preparation" for connection procedures. Once the USB cable is connected, the TM200 turns on due to power supply from the USB cable, and POWER/ALM lamp (red) lights on or lights off once or twice. -
Page 15: Setting Procedures
USB Ver.2.0 compliant, full speed (12Mbps) Connector mini-B TYPE 3-2. PC preparation Please make sure to install USB drive and PC application prior to connecting TM200 to the PC for the first time. PC operating environment Windows7 Core i3 2GHz or above Display 800×600 pixel or above... -
Page 16: Usb Connection
In the downloaded zip file, there is a file with CDM name xxx.exe (xxx differs depending on the file version downloaded). Execute this file to begin the driver installation. USB connection Following the installation procedures, connect the USB cable included to the PC. The USB connector of the TM200 is mini-B TYPE. -
Page 17: Check Of Virtual Com Port
Start menu. Key points If the COM port number of the TM200 cannot be determined due to multiple USB Serial Ports and so on, unplug the USB cable once and confirm that one COM port is removed from the list of ports (COM and LPT). When the USB cable is reconnected to the previous connector, the number of COM ports displayed in the list increases. -
Page 18: Turn-On Of Power Supply
If the lamp lights off twice, check that power is supplied from the AC adapter, and if the lamp lights off once, check that the virtual COM port of the TM200 has been properly selected in the PC application. -
Page 19: Menu
3 Setting Procedures 3-3. Menu File From the file menu, saving and opening the waveform data and printing the screen can be performed. Chapter Save(S) The setting of waveform display scale is overwritten on the file of the waveform data currently shown. -
Page 20: Com Port
This application software exits. Chapter COM port Use this port when changing to the virtual COM port number of other TM200 or re-connecting it. Refer to P.9 "Specification of COM port" for details. Help Help and the PC application version information are displayed. -
Page 21: Waveform Tab
3 Setting Procedures 3-4. Waveform tab Various indicated values such as torque, rotation speed and power as well as waveform data are acquired and displayed. Chapter Waveform tab (1) Cursor display switch Cursor display can be selected after waveform data is acquired or when historical data is shown. (2) Waveform Torque, rotation speed and power waveform are displayed from the upper section respectively. -
Page 22: Setting Conditions For Waveform Acquisition
3 Setting Procedures (5) Upper/Lower value Upper value and lower value of the waveform display scale are specified. <Setting value> -1000000 to 1000000 (Digits after the decimal point differ depending on each decimal place of the calibration tab.) Once the "Set Max/Min" button is clicked, the maximum and minimum values of each indicated value in (3) are set as upper value and lower value respectively and a graph is displayed in the whole frame. - Page 23 3 Setting Procedures (2) Waveform acquisition mode Waveform acquisition method is specified. <Setting value> Single/repeat/level trigger Single: Once the "Start" button is clicked, waveform data acquisition starts, and waveform data is acquired until the acquisition time is reached. Repeat: Once the "Start" button is clicked, waveform data acquisition starts, and waveform data is acquired until the acquisition time is reached.
- Page 24 If waveform acquisition mode is "Single" or "Repeat", waveform data is acquired from the TM200 and waveforms are successively displayed when the "Start" button on the bottom right of the screen is clicked.
-
Page 25: Digital Zero
3 Setting Procedures Digital zero Digital zero or digital zero reset is performed against torque. Refer to P.37 "5-2.Digital zero" for details. Cursor Cursor can be displayed after waveform data is acquired or when history waveform is shown. Chapter (1) Cursor display selection When cursor 1 is checked, the first cursor is displayed and cursor 2 can be checked. -
Page 26: Waveform Zoom-In
3 Setting Procedures Cursor movement Cursors can be moved by a mouse or using <Tab>, <Home>, <End>, <←>, or <→> keys. The cursors of torque, rotation speed and power move all together. - <Home> key The cursor is moved to the left end of the waveform being displayed. - <End>... -
Page 27: Setting For Smooth Waveform Display
3 Setting Procedures The selected area is zoomed in and displayed after specifying the end point. Zoom-in display can be performed five times consecutively. Chapter The graph can be scrolled in zoom-in display. Scrolling can be performed by dragging on the graph with the mouse. -
Page 28: Setting Tab
3 Setting Procedures 3-5. Setting tab Setting related to the indicated values of the TM200 is performed. Chapter System settings Refer to P.37 "5.Function Description Related to Indicated Values" for description related to these values. "Retrieve" button System setting values are received from the TM200 all at once. -
Page 29: Initialization Of The System Settings
When this button is clicked, a confirmation dialog is displayed. With this operation, settings on the PC and inside the TM200 are initialized and cannot be restored; therefore, click the "Yes (Y)" button only when it is absolutely necessary Chapter to initialize. -
Page 30: Calibration Tab
3 Setting Procedures 3-6. Calibration tab Setting of sensor type and setting and calibration related to the TM200 calibration values are performed. Chapter Detail items (Calibration setting, calibration, rotation speed) Detail When this item is checked, detail items related to calibration (calibration setting, calibration, rotation speed) are displayed. -
Page 31: Calibration Settings
Refer to P.30 "4-3.Procedures of equivalent input calibration and actual load calibration (torque)" for description related to these values. Chapter "Set" button Calibration setting values are written to the TM200 all at once. When this button is clicked, a confirmation dialog to overwrite is displayed, and click "Yes (Y)". Calibration Torque calibration is performed. -
Page 32: Management Tab
These items are recorded as a comment in the waveform data file. These settings are arbitrary. If the comment is rewritten, click the "Set" button and apply it to the TM200. <Number of characters allowed> Serial number 15 byte Comment... -
Page 33: Setting Protection
(green) → light on (red) → all light on. Once the self-check is complete, the display returns to normal. If the check is complete normally, "PASS" is displayed in the result. If an error is detected in the TM200, "NGXX" is displayed in the result. (XX represents a 2-digit number.) Caution ●... -
Page 34: Exiting Procedure
PC application exiting Click "File" → "Exit" from the menu, a confirmation dialog appears, and click "OK". If the POWER/ALM lamp (red) of the TM200 main unit lights on and then lights off once, it shows that the PC application has exited. -
Page 35: Calibration
4 Calibration Calibration 4-1. Calibration "Calibration" is the operation of matching the TM200 with UTMⅡ. This operation is performed on the "Calibration" tab of the PC application. The following two kinds of calibration methods are available for the TM200. Chapter The calibration in the sensor type setting is the equivalent input calibration; normally, only this is used. -
Page 36: Sensor Type Setting And Calibration
4 Calibration 4-2. Sensor type setting and calibration Standard Select the type of UTMⅡ connected. Chapter Custom Select UTMⅡ/UTM and input the rated capacity. The rated capacity unit is Nm. If using UTMⅡ not in the standard list, select custom. Calibration By setting the sensor type or clicking the "Calibration"... - Page 37 4 Calibration (1) Unit (torque) Chapter (2) Decimal place (torque) Check * Check "Invert the sign of torque display." to invert plus or minus of the torque display. (3) Unit (rotation speed)
- Page 38 4 Calibration (4) Unit (power) Chapter (5) Decimal place (power) (6) Equivalent input calibration/zero calibration Based on the above conditions, equivalent input calibration and zero calibration are automatically performed. Set the torque to the unloaded condition and click "OK". Key points Min.
-
Page 39: Procedures Of Equivalent Input Calibration And Actual Load Calibration (Torque)
Minimum value of the digital change desired is set. Min. scale division (torque) (Optional if there is no change.) Calibration setting is written to the TM200. Calibration setting PC → TM200 UTM Ⅱ is set to unloaded condition (where no torque load is being applied to UTM Ⅱ) and the zero point is... - Page 40 1, 2, 5, 10, 20, 50, 100 Chapter (4) Calibration setting is written to the TM200 The values selected in (1) to (3) are written to the TM200 in the following procedures. ■ Execution procedure Click the "Set" button. When the "Set" button is clicked, a confirmation dialog to overwrite is displayed, and click "Yes (Y)".
- Page 41 4 Calibration (6) a. Equivalent input calibration Rated output and rated capacity of UTMⅡ are registered. <Setting value> Rated output [V]: -6.000 to 6.000 (excluding 0) Display value (Rated capacity): In case of zero-digit decimal point: -99999 to 99999 (excluding 0) In case of one-digit decimal point: -9999.9 to 9999.9 (excluding 0.0) In case of two-digit decimal point:...
- Page 42 4 Calibration (6) b. Actual load calibration The known torque is applied to UTMⅡ and the torque is registered. <Setting value> In case of zero-digit decimal point: -99999 to 99999 (excluding 0) In case of one-digit decimal point: -9999.9 to 9999.9 (excluding 0.0) In case of two-digit decimal point: -999.99 to 999.99 (excluding 0.00) In case of three-digit decimal point:...
-
Page 43: Input Procedure Of Rated Capacity
4 Calibration Input procedure of rated capacity Decimal place and enabled number of digits of torque are determined according to the input value of the rated capacity. The possible number of digits for setting is up to five in total and up to three after the decimal point. e.g.) When UTMⅡ-10Nm is used i) When rated capacity is 10Nm Torque readings... -
Page 44: Display Setting Of Rotation Speed/Power
4 Calibration 4-4. Display setting of rotation speed/power Settings related to display of the rotation speed and power are performed. (1) Pulse rate (rotation speed) setting Select the pulse input rate. Select the number of pulses per rotation. <Setting value> 1 pulse, 4 pulses (2) Min. -
Page 45: Unit Conversion Table
4 Calibration (6) Calibration setting is written to the TM200. The values selected in (1) to (5) are written to the TM200. ■ Execution procedure Click the "Set" button. When the "Set" button is clicked, a confirmation dialog to overwrite is displayed, and click "Yes (Y)". -
Page 46: Function Description Related To Indicated Values
5 Function Description Related to Indicated Values Function Description Related to Indicated Values 5-1. Indicated values Torque Analog signals (±5V) from UTMⅡ are displayed as torque. Rotation speed Pulse signals from UTMⅡ are displayed as rotation speed. Power Power calculated from torque and rotation speed are displayed. Chapter Power [W] = torque [Nm] X rotation speed X ω... -
Page 47: Moving Average Filter
Input values in the moving average filter (torque)/moving average filter (rotation speed) respectively. When writing setting values to the TM200, click the "Set" button. When the "Set" button is clicked, a confirmation dialog to overwrite is displayed, and click "Yes (Y)". -
Page 48: Digital Low-Pass Filter
"Settings" tab. Chapter Select the cut-off frequency of the digital low-pass filter. When writing setting values to the TM200, click the "Set" button. When the "Set" button is clicked, a confirmation dialog to overwrite is displayed, and click "Yes (Y)". -
Page 49: Specifications
6 Specifications Specifications 6-1. Specifications UTMⅡ interface DC-input for torque Input resistance 1MΩ Signal input range ±5V Non-linearity 0.02%/F.S.±1digit Zero drift 0.2mV/℃ RTI or less Gain drift 0.01%/℃ or less Analog filter First-order low-pass filter (-6dB/oct) Fixed at 1k Hz Sampling speed 300 times/second A/D resolution 24 bit binary... -
Page 50: Usb Interface
69(W)×115(H)×28(D) mm (not including protruding sections) Weight Approx. 120g Accessories - Dedicated AC adapter for the TM200 (cable length 1.8m)... 1 Chapter - Dedicated cable for UTMⅡ connection 2m ......... 1 - miniB-PC USB connection cable 1.8m........1 - TM200 setup guide................ 1 6-2. -
Page 51: Tm200 Block Diagram
6 Specifications 6-3. TM200 block diagram SIG IN (±5V DC) Low-pass filter SIG GND A/D convert Reference PULSE IN + voltage 24 bit PULSE IN - PWR + (+24V) PWR - (0V) Watch Pulse Serial AC adapter (24V) counter port 32 bit... -
Page 52: Appendices
7 Appendices Appendices 7-1. List of setting values * Default value Factory default value * Protection ◎: System setting protection ●: Calibration setting protection * NOVRAM ◎: Saving on NOVRAM * Reference Reference page number for each item description ■ System setting (settings tab) Item Default Setting value name... - Page 53 7 Appendices ■ Calibration setting Item Default Setting value name Setting value range Protection Reference number value Zero calibration -5.000 to 5.000 [V] 0.000 ● ◎ Rated output -6.000 to 6.000 [V] (excluding 0) 5.000 ● ◎ In case of zero-digit decimal point: -99999 to 99999 (excluding 0) In case of one-digit decimal point: -9999.9 to 9999.9 (excluding 0.0)
-
Page 54: Waveform Data File Format
7 Appendices 7-2. Waveform data file format Waveform data files are saved in My Documents\UNIPULSE\TM200directory as CSV format text files. The format is as follows. Chapter... -
Page 55: Troubleshooting
7-3. Troubleshooting Item Question Answer/countermeasure Are correct indicated values Match the UTMⅡ output and TM200 by sensor type setting and displayed just by connecting calibration. UTMⅡ UTMⅡ? Indicated values proportional to the UTMⅡ output are displayed. Is the USB connector connected to the PC? The power cannot be turned on. - Page 56 The virtual COM port number Is the USB driver properly installed? does not appear in the Device Remove the USB cable of the TM200 once, and reinstall the USB Manager of the PC even if the driver. TM200 is connected.
Need help?
Do you have a question about the TM200 and is the answer not in the manual?
Questions and answers