Table of Contents
Advertisement
Instruction Manual
K100 K200 K300 K400 K500 K600
FUJI
K2
HIMALAIA
HIMALAIA
KILI
PICO
Read these instructions carefully before installing, using and servicing the unit. The
instruction manual is an integral part of the product.
Pellet Stove
Models
FUJI
PINE 8kW
K2
ASPEN 8kW
OLIVE 8kW
LEAF 8kW
ALPES 8kW
PINE 10kW
AMAZON 9kW
ASPEN 10kW
OLIVE 10kW
LEAF 10kW
ALPES 10kW
ASPEN 12kW
FUJI 12kW
HIMALAIA 12kW
K2 12kW
PINE 12kW
Mod.705-K
Advertisement
Table of Contents

Related Manuals for SOLZAIMA K2 K100


Summary of Contents for SOLZAIMA K2 K100
- Page 1 Pellet Stove Instruction Manual Models K100 K200 K300 K400 K500 K600 FUJI FUJI PINE 8kW PINE 10kW AMAZON 9kW ASPEN 12kW ASPEN 8kW ASPEN 10kW FUJI 12kW HIMALAIA HIMALAIA OLIVE 8kW OLIVE 10kW HIMALAIA 12kW KILI LEAF 8kW LEAF 10kW K2 12kW PICO ALPES 8kW...
- Page 2 * SOLZAIMA disclaims any responsibility for damages to the unit if installed by non- qualified personnel; * SOLZAIMA is not responsible for any damage to units not installed and used in compliance to the instructions included in this manual; * All local regulations, including but not limited to national and European standards, must be observed when installing, operating and servicing the unit;...
-
Page 3: Table Of Contents
Contents Solzaima ....................1 Package content..................2 2.1. Unpacking the unit ................2 Safety precautions ..................2 Advice on action in the event of a fire in a chimney (including equipment) ..3 Technical specifications ................4 Installing the free-standing pellet fire ............8 6.1. - Page 4 12.3. Recommendations for the installation of the ductable air (K500) ....91 Installing the ductable air auxiliary ventilator (PA1090G038 optional only K600) 13.1. Electrical connections ................. 97 Refilling the pellet reservoir ..............98 Maintenance ................... 98 15.1. Daily maintenance ................98 15.1.1.
-
Page 5: Solzaima
Fruit of the persistence and the unconditional support of its network of partners, Solzaima is today leader in the production of biomass heating, whose best examples are the recuperators of central heating to water and its range of salamanders to pellets. -
Page 6: Package Content
Do not touch the Free-Standing Fire when barefoot or if any part of your body is wet or humid; • Do not tamper with the safety devices or adjustment features without the SOLZAIMA SA manufacturer's authorization; • Do not cover or reduce the size of the vents at the installation area;... -
Page 7: Advice On Action In The Event Of A Fire In A Chimney (Including Equipment)
• The installation of the Free-Standing Pellet Fire has clearance requirements for proper combustion, so the air tight isolation of the room where the equipment is to be installed or the existence of air extraction sources in the room may prevent the unit from working properly;... -
Page 8: Technical Specifications
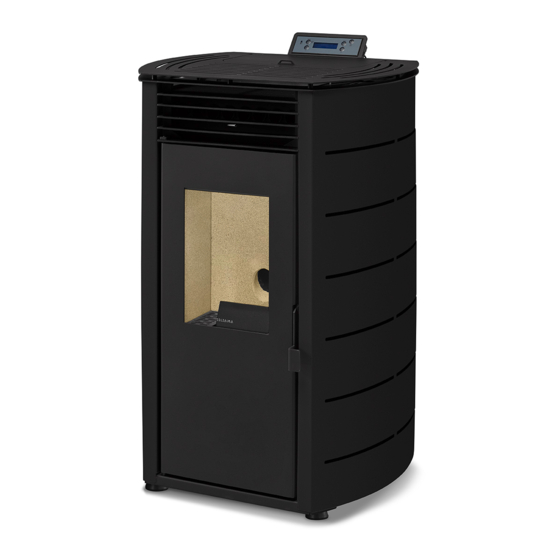
• Once outside, you must wait for the firemen and be ready to give them the following information: location of the fire, possible materials that are burning and what they can do to prevent fire progression. 5. Technical specifications Features K100 K200 K300... - Page 9 Front Side Back Figure 2-A - Dimensions of the free-standing pellet fire unit K100 (example model K2) Dimension Dimension Dimension Dimension Weight Model “H” (mm) “W” (mm) “D” (mm) “A” (mm) (kg) K100 KILI K100 95/92/88 (ceramic/glass/colour) PICO K100 FUJI K100 HIMALAIA K100...
- Page 10 Front Side Back Figure 2-C - Dimensions of the free-standing pellet fire unit K300 and K400 (example model Leaf) Dimension Dimension Dimension Dimension Weight Model “H” (mm) “W” (mm) “D” (mm) “A” (mm) (kg) PINE K400 1088 LEAF 1088 K400 ASPEN 1088 K400...
- Page 11 Dimension Dimension Dimension Dimension Weight Model “H” (mm) “W” (mm) “D” (mm) “A” (mm) (kg) Amazon 1072 K500 Table 6 - Dimensions of the free-standing pellet fire unit K500 Front Side Back Figure 2-E - Dimensions of the free-standing pellet fire unit K600 (example model Aspen) Dimension Dimension Dimension...
-
Page 12: Installing The Free-Standing Pellet Fire
6. Installing the free-standing pellet fire Before installing the unit, please follow these steps: • Check immediately after receipt if the delivered product is complete and in good state. Any defects should be noted before installing the appliance. • This unit is equipped with four feet at the base, adjustable in height, allowing for the easy regulation when installing the unit on a non-levelled surface. -
Page 13: Installing Ducts And Fume Extraction Systems
Figure 4 - Minimum safety distance around the unit: a) top view of the unit installation; b) side view of the unit installation WARNING! Keep combustible and flammable materials at a safe distance. 6.2. Installing ducts and fume extraction systems •... -
Page 14: Installing Without A Chimney
• Under normal operating conditions, the combustion gas flow should create a draught of 12 Pa, measured one meter above the chimney neck. • The stove cannot share the chimney with other equipment. • The pipes external to the operating area must have double stainless-steel insulation and an internal diameter of 80mm. - Page 15 Figure 6 - Examples of standard installations Failure to comply with the requirements would jeopardize the proper Working conditions of the stove and consequent loss of warranty. Comply with the instructions given in the diagrams. Free Standing Fires operate with the combustion chamber in depression, so it is absolutely necessary to have a flue that adequately draws the combustion gases.
-
Page 16: Installing With A Chimney
Insulation: Smoke ducts must be double wall insulated to ensure that the fumes do not cool during the course to the exterior, which would lead to improper drainage and condensation that could damage the appliance. Output “T-tube”: Always attach to the output of the unit a "T-tube" with a damper. Wind shield termination: A wind shield termination must be installed to avoid fume back flow. -
Page 17: Fuel
Figure 7 - Side view of the installation without a chimney, showing the inspection point The Free-Standing Pellet Fire should not be operated in adverse weather conditions, because these may seriously impact the draught (particularly with very strong winds). If the unit has not been used for a long period of time, before lightening the fire, check the unit to make sure that the flue pipes are clean and unblocked. -
Page 18: Using The Free-Standing Pellet Fire
Consequently, it may be necessary to adjust the pellets quantity according to its quality, even if the pellets are certified. The unit allows for an adjustment of ± 25% the pellet dosage at the start-up phase and at each power level WARNING! This unit may NOT be used as an incinerator. -
Page 19: Remote Control
the room temperature, avoid the contact between the end of the probe and the unit surfaces. You may also attach the probe to the wall beside the unit. Figure 9 - Room temperature probe 9. Remote control 9.1. Infrared remote control Figure 10 - Infrared remote control The infrared remote control allows the user to turn the unit ON and OFF, control the fan airflow and increase or decrease the unit's power level. -
Page 20: Selecting The Manual Or Automatic Mode
a) Key to toggle between b) Key to access menus c) Key to start/stop the unit manual and automatic mode and reset error messages. confirmation and exit menus (esc). (ok). d) Key to scroll menus to the left, to increase and e) Key to scroll menus to the right and reduce the fan flow and increase or reduce the increasing and to reduce the unit's power. -
Page 21: Date And Time
"A" where the value 1 corresponds to the lower speed and the value 5 to the higher speed of the fan, it is RECOMMENDED to use the value "A" means automatic value, this value was adjusted and tested by Solzaima for all power levels used in the equipment. - Page 22 • Year To set the year press “set”. The display starts to flash. Press the “+” or “-” key to select the desired year and then “ok” to confirm. Press "esc" to return to the "Data" (Date) menu, then press "+" to scroll to the next menu. The “Mês” (Month) menu is displayed.
-
Page 23: Timer
• Day To set the day of the week press “set”. The display starts to flash. Press the “+” or “-” key to select the desired day and then “ok” to confirm. Press the "+" key to scroll to the "Time" (Hour) menu. MODE MENU <... - Page 24 To activate the Timer mode, press “Set” - the display starts to flash. Press the “+” or “-" key to select “On” or “Off” and then “Ok” to confirm. Press the "+" key to scroll to the "Carga Perfil" (Profile Load) menu. There are 10 weekly programmes available on the Timer (see item 17 in the attachments).
- Page 25 The unit's programmer lets you choose from 6 different programmes for each day of the week. To set up programmes “P1” to “P6”, select the desired programme using the “-” and “+” keys, and press “set” to select. The "P1 Habilitação" (P1 Activation) menu appears. MODE MENU <...
- Page 26 To set the set point temperature for Programme P1, press “Set”. The display starts to flash. Press the “+” or “-" key to select the desired temperature, followed by “Ok” to confirm. Press the "+" key to go to the "P1 Temp. Água” (P1 Water Temp.) menu. MODE MENU 18ºC...
-
Page 27: Sleep (This Menu Is Displayed Only While The Unit Is Operating)
9.2.4. Sleep (this menu is displayed only while the unit is operating) The "Sleep" menu allows you to setup the time you want the unit to turn off. MODE MENU SLEEP Press "set". The display starts to flash. Select the desired time using the "-" and "+" keys. - Page 28 MODE MENU 520420 < ódigo Seguranç > Software code / Display firmware. Press the "+" key to scroll to the “Código de Parâmetros” (Parameter Code) menu. MODE MENU 500308 < Código Display > Parameter code. Press the "+" key to scroll to the “Horas de Trabalho” (Operation hours) menu.
- Page 29 The number of hours at which the next servicing should take place. This menu shows the phase/status of the free-standing fire. Fume extractor operating speed (rotation per minute). MODE MENU 49 rpm < Expulsor Fumos > Theoretical pellet consumption. Fume temperature. MODE MENU 18ºC...
-
Page 30: Settings Menu
9.2.6. Settings menu To modify the unit's settings, press "Set". The "Língua" ("Language") menu should then appear, allowing the user to choose a set language. MODE MENU < Configurações > • Language To select the language, press “set”. Using the “+” or “-” keys, select the language (Pt –... - Page 31 MODE MENU < > • Lighting To select lit screen, press “set”. The display starts to flash. Press the "+" or "-" key to select the time for the screen to light up, or select "On" to keep the light permanently on.
- Page 32 MODE MENU Auto < ºC / ºF > • Combustion recipe Press "set" to display the "Combustão receita" (Combustion recipe) menu. • Pellet This feature allows the user to increase or decrease by 25% the pellet quantity during the start-up and power process. Press "set". The display starts to flash. Press "+"...
-
Page 33: Technical Menu
• Pellet loading This function enables the worm screw motor to be turned on and fill the channel when it is empty so that the ignition does not fail. Press "set"; the "ok" option appears. Press "ok" to activate the drive; the message "habilitada" (enabled) is displayed. Press "esc" to stop. -
Page 34: Start-Up
MODE MENU < Password > Note: The password is only provided to authorised technicians Start-up After loading the pellets into the hopper (see chapter 9.2), press and hold the ON/OFF button for 3s, to start the stove. During the lighting phase, the display will show the message “Ativação”... -
Page 35: Instruction For Installing The Casings
Instruction for installing the casings 11.1. Installing the casings K100 and K200 Before installing the casings, you should check immediately whether the packing is complete and in perfect condition, possible damages or lack of element must be reported and marked before proceeding with its installation. This manual describes how to install the casings for the K100 and K200 unit. - Page 36 • Kili (metal, wood and ceramics version) Painted metal Glass Ceramics 1x Casing set with the selected coating 14 Screws (CO0704130400719) Figure 15 - Kili Kit • K2 14 Screws (CO0704130400719) 1x Set of casings – chosen colour Figure 16 - K2 Kit •...
- Page 37 • Fuji 14 Screws (CO0704130400719) 1x Set of casings – chosen colour Figure 18 - Fuji Kit a) Place the display located inside the pellet hopper on the back of the unit, as shown in Figure 20. To perform this task, slightly unfasten the screws located in the rear of the unit.
- Page 38 Figure 20 - Bottom side attachment of the casings c) Next, attach the side casing by sliding it downwards. During the assembly of the casing, make sure the flap on the top side (1) is placed overlapping the structure and, simultaneously, covering the rear side of the unit on the outside, as shown in Figure 21-b.
- Page 39 Figure 22 - Attaching the side casings the top of the unit e) Secure the side casings to the back of the unit using 10 screws from the kit, as shown in Figure 23. Figure 23 - Attaching the side casings f) For the model K200 it is also necessary to place the finishing front that came together with the machine.
- Page 40 Figure 24 - Attaching the front on the K200 model g) Kili and Pico models require the execution of an intermediate set of tasks before placing the cover. For models with painted metal sides and high temperature-resistant PVC coating (imitating wood or fabric), the sides should be attached by sliding them downwards into the grooves located in the unit's structural side parts (Figure 25).
- Page 41 h) To place Kili’s glass or ceramic front panels, before performing the previous procedure, the metal side tabs in the side structure (Figure 26) must be bent inwards to secure the parts onto the structure (there are 6 metal side tabs to bend). Figure 26 - Ceramics and glass supports The cover is equipped with four guide pins (1) in the bottom to ensure its proper placement.
-
Page 42: Installing The Casings K300 And K400
11.2. Installing the casings K300 and K400 Before installing the casings, you should check if the package is complete and in good condition. Any possible damage or missing elements should be reported before proceeding with the installation. This manual describes how to install the casings for the K300 and K400 models. This unit is available with different casing layout options. - Page 43 PA1060G007 – Cover Puller White (K300/K400) CA01050195 - Thin top K300/K400 Pine/Leaf/Aspen PA1060G008 – Cover Puller Black (K300/K400) PA1060G009 – Cover Puller Bordeaux (K300/K400) 1x Set of layers (A) - 4x Screw. DIN 912 M5x12 (B) - 2x Nut M5 DIN 6923 (C) - 2x Screw.
- Page 44 (A) - 4x Screw. DIN 912 M5x12 (B) - 2x Nut M5 DIN 6923 (C) - 2x Screw. DIN 7981 4,2x9,5 Figure 30 - Leaf Kit • Aspen CA01050072 - Cover Aspen Black (K300) CA01050190 - Grill K300 ASPEN PRETO CA01050073 - Cover Aspen Corten (K300) CA01050193 - Grill K400 ASPEN PRETO CA01050074 - Cover Aspen Oak (K300)
- Page 45 • Olive CA01050078 - Cover Lat. Olive White (K300) CA01050190 - Grill K300 ASPEN PRETO CA01050079 - Cover Lat. Olive Bordeaux (K300) CA01050193 - Grill K400 ASPEN PRETO CA01050086 - Cover Lat. Olive Black (K300) CA01050089 - Cover Lat. Olive Grey (K300) CA01050126 - Cover Lat.
- Page 46 (A) - 6x Screw DIN 912 M5x12 (D) - 1x Nut M6 DIN 6923 (E) - 1x Screw DIN 912 M6x14 or Screw ISO 3780 M8x12 (B) - 2x Nut M5 DIN 6923 (F) - 1x Screw DIN 7981 4,2x13 or 1x (C) - 12x Screw DIN 7981 Screw ISO 3780 M5x12 4,2x9,5...
- Page 47 2º - Grid placement - K300 and K400 2º (Pine, Leaf e Aspen) Figure 34 - Fitting the front grille c) In the upper part of the grate, fasten with two screws C (DIN 7981 4,2x9,5) directly to the cover previously placed, then fix with two screws A (DIN 912 M5x12) and use nuts B (Nuts M5 DIN 6923), finally, with two screws A (DIN 912 M5x12) attached to the lower part directly on the machine, as shown in Figure 35.
- Page 48 holes of the back (Figure 36) and join them with two screws A (DIN 912 M5x12) and two nuts B (Nuts M5 DIN 6923). 2º (Olive) Figure 36 - Joining the front grille with the top backtrack e) Subsequently, fit the assembly to the equipment, using four screws A (DIN 912 M5x12) as shown in Figure 37.
- Page 49 3º - Registration Bar Placement - K300 and K400 3º (Olive) Figure 38 - Registry pad grip g) Then place the side covers. On Pine and Leaf equipment, first fit the tabs 1 on the slots 2 and then the bolts 3 of side covers springs...
- Page 50 4º (Pine e Leaf) Figure 39 - Assembly of the Pine and Leaf covers h) On the Aspen equipment, first fit the lower holes 5 of the side covers into the guides 6 at the bottom of the machine, then in the downward direction to fit the tabs 7 in the slots 8, as shown in Figure 40.
- Page 51 Figure 40 - Assembly of the Aspen covers i) Finally, screw C (DIN 7981 4,2x9,5), in hole 9, as shown in Figure 41. 4º (Aspen) Figure 41 - Assembly of Aspen covers j) On the Olive equipment, before attaching the casing, you have to attach the front cap part with the casing, matching the holes of the cap with the holes in the casing Figure 42 ) and join them with 6 screws C (DIN 7981 4,2x9,5).
- Page 52 Figure 42 - Union of the covers with the frontal shot k) Then place the side covers; first fitting the tabs 10 on the slots 11 and then fitting the bolts 12 of the casing on the springs 13, as shown in Figure 43. 4º...
- Page 53 Figure 43 - Assembly of Olive covers l) To finalize, mount the bottom cap of the equipment as shown in Figure 44, open the door and fit the lower cap piece on the base of the equipment, matching the drilling of the part with that of the equipment and then assemble it with a F screw (DIN 7981 4,2x13) or screw (ISO 3780 M5x12).
-
Page 54: Installing The Casings Alpes K400 And Alpes K300
6º (Pine, Leaf, Aspen e Olive) Figure 45 - Handle fitting 11.3. Installing the casings Alpes K400 and Alpes K300 Before installing the casings, you should check if the package is complete and in good condition. Any possible damage or missing elements should be reported before proceeding with the installation. - Page 55 Assembly (kit 1) CA01050211 – Side and top cover (K400) This assembly includes the following elements: - Right lateral structure –Top cover - Humidifier - Left lateral structure - Finishing front support - Front grille - Register – Handle Tube (E) –...
- Page 56 CA01050002 – Cover Alpes Bordeaux (K400) CA01050003 - Cover Alpes Corten Light (K400) CA01050004 - Cover Alpes Dark Corten (K400) CA01050005 - Cover Alpes Red (K400) CA01050006 – Cover Alpes Grey (K400) CA01050007 – Cover Alpes Stainless steel (K400) CA01050008 – Cover Alpes Orange (K400) CA01050209 - Cover Alpes Black (K400) CA01050210 –...
- Page 57 Assembly (kit 1) CA01050212 – Side and top cover (K300) This group includes the following elements: - Right lateral structure – Top cover - Humidifier - Left lateral structure - Front grille - Register – Handle Tube (E) – 1x Screw DIN 912 M8x14 or 1x Screw ISO 7380 M8x12 (A)- 8 x Screw DIN 912 M5x14 (B)- 4x Nut M5 DIN 6923 (G) - 2x Screw DIN 7981 5.5x13...
- Page 58 CA01050013 - Cover Alpes Blue (K300) CA01050014 – Cover Alpes Bordeaux (K300) CA01050015 - Cover Alpes Corten Light (K300) CA01050016 - Cover Alpes Dark Corten (K300) CA01050017 - Cover Alpes Red (K300) CA01050018 – Cover Alpes Grey (K300) CA01050019 – Cover Alpes Stainless steel (K300) CA01050020 –...
- Page 59 Very important: These screws will be reused a posteriori. Use extreme caution when removing the display, so as not to disconnect it from the cable connecting it to the machine's control unit. 1º (Alpes K400 and Alpes K300) Figure 48 - Removing the display on the machine b) With the display support removed, cover the holes that have been opened inside the equipment using 2 of the screws removed in line a.
- Page 60 3º (Alpes K400 and Alpes K300) Figure 50 - Removing the rubber seal on the equipment d) Insert the rubber seal, removed from indent c on the top cover of kit 1, as shown in Figure 51. 4º (Alpes K400 and Alpes K300) Figure 51 - Placement of the rubber seal on the top cover e) Screw the display support with the two screws removed in indent a, as shown in Figure 52.
- Page 61 5º (Alpes K400 and Alpes K300) Figure 52 - Fixation of the display in the correct position on the equipment structure f) Place the top cover on top of the equipment frame and match it with the holes shown in Figure 53-b. Very important: Be careful when placing the cover to avoid damaging the display connection cable to the control unit and the paint of the display stand.
- Page 62 Figure 54 - Fixing the top of the equipment frame h) Fasten the display to the top by screwing two screws G (DIN 7981 5,5x13), as shown in Figure 55. Very important: It may be necessary to center the display relative to the center axis of the top so you should loosen the screws and move the display horizontally until it is centered, tighten the screws again.
- Page 63 8º (Alpes K400 and Alpes K300) 8º (Alpes K400 and Alpes K300) Figure 56 - Front grille assembly j) Then pull the rod from the log forward (Figure 57-a), match the hole of the rod and the hole of the blade and join them with a screw E (DIN 912 M6x14) or spindle (ISO 3780 M8x12).
- Page 64 In the case of the K300 Alpes it is not necessary to carry out this operation. 10º (Alpes K400) 10º (Alpes K400) Figure 58 A and B - Finishing front grip Alpes K400 10º (Alpes K300) Figure 57 C - Finishing front Alpes K300 l) Depending on the equipment, fit the assembly previously mentioned into the equipment structure as shown in Figure 59-a or Figure 59-b.
- Page 65 10º (Alpes K400) 10º (Alpes K300) 10º (Alpes K400 and Alpes K300) Figure 59 - Placing the finishing frontal on the machine m) Tighten the front end and the trim plate using two screws A (DIN 912 M5x12) and two nuts B (DIN 6923 M5) in the holes prepared for the purpose see Figure 60. Important: Ensure that the front is aligned with the top, it may be necessary to apply a little force to adjust the parts.
- Page 66 Figure 60 - Finishing front panel grip on equipment Alpes K400 n) In order to place the side casings in the case of the Alpes K400, slightly fold outwards some tabs that are at the top in order to facilitate the assembly of the part see figure 60-A.
- Page 67 Figure 62 - Bottom fitting of side frames 13º (Alpes K400 and Alpes K300) Figure 63 - Lateral attachment of lateral structures p) The upper tab r previously mentioned must pass between the finish front and the structure of the machine as shown in Figure 64. In the case of Alpes K300 Tab is not visible.
- Page 68 Figure 64 - Attach the tabs to the side frames q) After attaching the sides, tighten these to the equipment frame. In the case of the Alpes K400 using two screws A (DIN 912 M5x12) and two nuts B (DIN 6923 M5), in the prepared holes see Figure 65-a and b.
- Page 69 Figure 64 C - Assembly of the structural sides Alpes K300 s) To install the finishing side covers, insert the eight fittings (6) into the grooves in the side frame that was previously fitted (5). 15º (Alpes K400 and Alpes K300) Figure 66 - Placement of the side cover panels t) Then fix the lower cap of the equipment as shown in Figure 67, opening the door and placing the lower cap at the base of the equipment, matching the drilling of the part...
- Page 70 Figure 67 - Fixing lower trim finish u) To install the handle, remove the handle base, which is in the door with the hexagonal key n5 (Figure 68-a) and apply the kit tube 1 (Figure 68-b), and then tighten the previously removed, in the opposite direction to Figure 68-a. 17º...
-
Page 71: Installing The Casings K500
Figure 69 - Humidifier placement on the equipment 11.4. Installing the casings K500 Before installing the casings, you should check immediately whether the packing is complete and in perfect condition, possible damages or lack of element must be reported and marked before proceeding with its installation. This manual describes how to install the casings for the K500 unit. - Page 72 CA01050150 – Casings Amazon White (K500) A) - 8x Screws DIN 7981 5,5x13 CA01050151 – Casings Amazon Black (K500) CA01050152 – Casings Amazon Bordeaux (K500) Figure 71 – Casings Amazon a) Remove the top cover from the equipment by detaching the pins (1) from the springs (2) in the structure, exerting upward force.
- Page 73 Figure 73 – Front grille assembly c) Screw the front to the frame using two screws A (DIN 7981 5,5x13) found in the kit (Do not screw the front to the end, as a small adjustment may be necessary, see point "i").
- Page 74 Figure 75 – Remove the door d) Then to engage the side covers, you must first fold the tab as shown in Figure 75 to ensure that it is at an angle of less than 90°. Figure 76 – Tab angle Insert the slots on the back of the covers (4) into the screws (5) on the back of the unit.
- Page 75 Figure 77 – Placing the side casings When fitting the covers, check that the tabs on the bottom overlap the combustion chamber (6) and that the upper parts rest on the structure of the equipment (7). Figure 78 – Attaching the side casings g) Screw the cover to the front of the finish using four screws A (DIN 7981 5,5x13) which are in the kit (see point "i").
-
Page 76: Installing The Casings K600
Figure 79 – Attachment of the cover to the front h) Screw the cover to the front of the device using two screws A (DIN 7981 5,5x13) found in the kit (see point "i"). Figure 80 – Attachment of the cover to the front of the equipment There are some oblong holes (8) in the side shell and in the finishing front which help align the covers to the finishing front (9) and also ensure equal spacing between the covers and the door (10) to complete the assembly, place the top cover in the opposite... - Page 77 reported and marked before proceeding with its installation. This manual describes how to install the casings for the K600 unit. This unit is available with different casing layout options: Aspen, Fuji, Himalaia, K2 and Pine. To assemble the casings the Installer must have available: Star shaped screwdriver Hexagonal key interior PH3 screw...
- Page 78 Figure 84 – Top cover placement 2º - Grid placement - Aspen b) Fit the front grille, matching the holes in the grille to the holes in the appliance (Figure 84). Figure 85 – Fitting the front grille c) In the upper part of the grate, fasten with two screws C (DIN 7981 4,2x9,5) directly to the cover previously placed, then fix with two screws A (DIN 912 M5x12) and use nuts B (Nuts M5 DIN 6923), finally , with two screws C (DIN 7981 4,2x9,5) attached to the lower part directly on the machine, as shown in Figure 85.
- Page 79 Figure 86 – Front grille tightening 3º - Laying the sides - Aspen d) Then fit the lower holes 1 of the side covers into the guides 2 at the bottom of the machine, and then in the downward direction fit the tabs 3 into the slots 4 as shown in Figure 86.
- Page 80 Figure 87 – Assembly of the Aspen covers e) Finally, screw C (DIN 7981 4,2x9,5), in hole 5, as shown in Figure 87. Figure 88 – Assembly of the Aspen covers • Fuji / Himalaia / K2 CA01050231 – Casing Fuji Oak - K600 CA01050237 - Grill K600 K2/Fuji/Himalaia CA01050232 –...
- Page 81 CA01050240 – Top cover K600 Fuji/Himalaia 1x Set of layers (A) - 1x Screw DIN 7991 M6x10 (B) - 8x Screws DIN 7981 4,2x9,5 Figure 89 – Kit Fuji CA01050233 - Casing Himalaia White - K600 CA01050237 - Grill K600 K2/Fuji/Himalaia CA01050234 - Casing Himalaia Black - K600 CA01050240 –...
- Page 82 CA01050229 - Casing K2 White - K600 CA01050237 - Grill K600 K2/Fuji/Himalaia CA01050230 - Casing K2 Bordeaux - K600 CA01050239 – Top cover K600 K2 1x Set of layers (A) - 1x Paraf. DIN 7991 M6x10 (B) - 8x Paraf. DIN 7981 4,2x9,5 Figure 91 –...
- Page 83 b) Then, pull the registry bar forward (Figure 92-a), match the hole of the shaft and the hole of the blade and join them with a screw A (DIN 912 M6x10). Figure 93 – Registry pad grip 2º - Laying the sides - Fuji, Himalaia, K2 c) Then fit the lower holes of the side covers (Figure 93-a) into the guides at the bottom of the machine (Figure 93-b).
- Page 84 Figure 95 – Attaching the side casings Repeat the process described in b) and c) in this manual for the other casing and secure the side parts using four screws B (DIN 7981 4,2x9,5) from the kit, two on each side, as shown in Figure 95.
- Page 85 Important notice: You may need to gently press the guide pins onto the structure to secure them. Figure 97 – Securing the cover • Pine / Pine Oak CA01050227 - Casing Pine Oak - K600 CA01050235 - Grill K600 Pine CA01050228 - Casing Pine White - K600 CA01050238 –...
- Page 86 1º - Placement of the top – Pine / Pine Oak Fit the top plate as shown in Figure 98. To ensure that the top is properly seated, it contains four pins on the bottom that should fit the springs in the frame. Figure 99 –...
- Page 87 c) In the upper part of the grate, fasten with two screws C (DIN 7981 4,2x9,5) directly to the cover previously placed, then fix with two screws A (DIN 912 M5x12) and use nuts B (Nuts M5 DIN 6923), finally , with two screws C (DIN 7981 4,2x9,5) attached to the lower part directly on the machine, as shown in Figure 100.
- Page 88 Figure 102 – Assembly of the covers e) Finally, on the back of the enclosures, match the hole in the hole in the previously mounted worktop with two screws C (DIN 7981 4,2x9,5). Figure 103 – Tightening of the casings...
- Page 89 Installing ductable auxiliary ventilator (PA1090G030 optional only K500) Make sure the auxiliary ventilator kit includes the following components: 1x Ventilator 1x Air outlet duct Ø 100 mm 1x Air dumper (CO0308000000000) (CO0503380120601) (IC0427000260000) 1x Air guide 1x Power cable (IC0409000260001) (IC5150000000052) (B) 8x Screws DIN (A) 6x Screws DIN 7981...
- Page 90 To install the ventilator, the installer must have available: Cutting pliers or Star shaped Hex wrench No. 4 similar tool screwdriver PH2 and PH3 screw Figure 105 – Accessories for the installation of the ventilation kit IMPORTANT NOTICE: Before installing the ventilator, it is mandatory that the unit is turned off (unplugged from the power socket).
- Page 91 Figure 107 – Removing top cover c) Remove the upper front visor from the combustion chamber by simply breaking the existing joints, you may need to use a cutting pliers. Figure 108 – Removing the front visor d) Tighten the fan on the support piece in the ventilation kit using 4 screws B (DIN 7981 4,2x9,5).
- Page 92 e) Tighten the Figure 109 assembly on the top face of the combustion chamber using 4 screws A (DIN 7981 5,5x13) in the holes prepared for this purpose (2). Figure 110 – Fixing the ventilator to the equipment f) Remove the rear lid from the unit's chassis marked in Figure 110, by cutting the identified areas using a pair of pliers.
-
Page 93: Electrical Connections
h) Screw the accessory on the ventilator using 2 screws A (DIN 7981 5,5x13). Figure 113 – Fitting the air guide to the free-standing fire unit i) Screw the air outlet duct in the ductable air guide using 4 screws B (DIN 7981 4,2x9,5). - Page 94 Optional fan cable Terminals of the terminals connecting cable of the control unit of the equipment Figure 115 – Connecting the ventilator cable to the unit k) The attached cables terminals as they connect to the ventilator, as illustrated in the Figure.
-
Page 95: Adjustable Ductable Air Inlet
Moving the tab to one side to the other Figure 117 – Check the ductable air damper 12.2. Adjustable ductable air inlet The user can adjust the size (reduce the size) of the part if necessary, for this to happen, the part must be cut at the marked location. a) Disassemble the upper covers on the pipe, carefully removing the parts, as there is thermal isolation inside and it can be damaged. -
Page 96: Recommendations For The Installation Of The Ductable Air (K500)
c) Reassemble the covers in the holes prepared for this purpose. Install the channel following the instructions in point 12. Figure 120 – Reassembly of the thermal isolation 12.3. Recommendations for the installation of the ductable air (K500) It is recommended that the installation of ductable air is carried out by an accredited professional or installer in order to be properly sized. - Page 97 Installing ductable auxiliary ventilator (PA1090G038 optional only K600) Make sure the auxiliary ventilator kit includes the following components: 1x Support bracket 1x Ventilator 1x Air outlet duct Ø 100 mm (CO0308000000000) (CO0503380120601) 1x Support bracket 1x Air guide 1x Power cable 116 (A) 6x Screws DIN 7981 (B) 19x Screws DIN 7981 FA 4,2x13...
- Page 98 To install the ventilator, the installer must have available: Star shaped screwdriver Cutting pliers or PH2 and PH3 screw similar tool Figure 123 – Accessories for the installation of the ventilation kit IMPORTANT NOTICE: Before installing the ventilator, it is mandatory that the unit is turned off (unplugged from the power socket).
- Page 99 b) Screw the ventilator and support assembly in a second support bracket which is also in the ventilation kit, using 6 screws B (DIN 7981 4,2x8). Figure 125 – Securing the support bracket to the ventilator d) Screw the Figure 124 assembly into the side face of the combustion chamber using 6 screws A (DIN 7981 FA 4,2x13) into the holes provided for this purpose.
- Page 100 d) Remove the rear lid from the unit's chassis Figure 126, by cutting the identified areas using a pair of pliers (4). Figure 127 – Removing the rear lid of the free-standing fire unit e) Fit the "ductable air guide" accessory on the back of the unit, ensuring that it fits into the inside of the ventilator's air outlet (5).
- Page 101 f) Screw the accessory into the ventilator using 2 screws B (DIN 7981 4,2x8) and then screw the "ductable air guide" accessory on the back of the unit with 3 screws B (DIN 7981 4,2x8). Figure 129 – Securing the air guide to the free-standing fire unit g) Screw the air outlet in the ductable air guide using 4 screws B (DIN 7981 4,2x8).
-
Page 102: Electrical Connections
13.1. Electrical connections The unit is equipped with a cable attached that allows you to connect the ventilator to the electronic control unit. You need to connect the terminals of the connection cable in the kit to the terminals in that cable. Important note: The connections must respect the colour system. -
Page 103: Refilling The Pellet Reservoir
Refilling the pellet reservoir Open the pellet reservoir lid by sliding the lock sideways and lifting the lid, Pour the pellets into the reservoir and close the pellet reservoir again (Figure 132). Figure 133 – Refilling the pellet reservoir Maintenance 15.1. -
Page 104: Cleaning The Glass
15.1.1. Cleaning the glass The glass can only be cleaned when it is completely cold; Must be cleaned with a suitable product in accordance with the instructions for use and to prevent the product from reaching the sealing cord and painted metal parts - so as not to cause undesired oxidation. -
Page 105: Additional Cleaning
Figure 137 – a) Ash basket; b) Grid; c) Burner basket It is also necessary to clean the interior of the salamander by opening the trapdoor, as shown in Figure 137. Finally, assemble the parts in the reverse order from which they were removed and close the appliance door. - Page 106 Figure 139 – Example K100 a) Remove the screws; b) Remove the cover Figure 140 – Example K300, K400, K500 a) Remove the lug nuts; b) Remove the cover Figure 141 – Example K100 a) Aspirate the interior; b) Cleaning with a brush Figure 142 –...
- Page 107 If you noticed that the fume extraction is not effective, we recommend cleaning the interior of the extractor with a vacuum cleaner, as shown in Figure 142. Regardless, this operation should be performed, at least, once a year. Figure 143 – a) Remove the screws; b) Remove the extractor WARNING! The maintenance task frequency depends on the quality of the pellets.
-
Page 108: Alarm / Failure / Recommendation List
Alarm / Failure / Recommendation List Alarm Code Troubleshooting - The worm drive channel is empty - restart the unit - Resistance burnt – replace resistance Ignition failure - Burning basket incorrectly installed Maximum time 2400 s - Locked worm - unlock - Smoke temperature ñ... - Page 109 - Failures Failures “Service” (Maintenance) Air sensor failure The door is open Air temperature probe failure Table 9 – List of failures Important notice: A “service” warning on the display (maintenance due) indicates that the unit has exceeded 2100 operating hours. In this case, the client must perform the unit's maintenance procedure (following the instruction on the Technical Manual).
-
Page 110: Installing And Operating With The Remote Control - "Programmable Thermostat" (Optional)
Installing and operating with the remote control - “programmable thermostat” (optional) The pellets stove is mass produced with a remote control (display). Alternatively, the unit can be operated using a generic remote-control unit (programmable thermostat) or other type of remote control, as long as it is a no-voltage contact. To remotely connect the pellet burning unit to a programmable thermostat or a thermostat, you must use the provided interface (Figure 144-b), which is a board located on the right side of the unit (Figure 143). - Page 111 Figure 145 – Remote control (programmable thermostat) and connection interface – both not included For wireless remote controls, both wires must be connected, as indicated in the following figure: Colour codes: CN – Grey N – Black C – Brown A - Blue Figure 146 –...
-
Page 112: Instructions To Assemble The Remote Control
17.1. Instructions to assemble the remote control a) Turn off the unit at the master power switch and remove the right cover of the unit (see section 10 of this manual). Remove the unit's terminals phase (F) and neutral (N). b) Crimp the terminals to the cable that supplies the transmitter with 220V power. - Page 113 d) Mount the interface at the appropriate location on the unit and position the remote control (On/Off contact) switch to "remote" (Figure 147-j). e) Connect the interface cable to the communication socket on the circuit board (Servizi 5J). Figure 148 – Installing the programmable thermostat...
-
Page 114: Maintenance Plan And Log
Maintenance plan and log To ensure the proper operation of the unit, maintenance operations must be performed, as described in Chapter 15 of this Instruction Manual or in the Maintenance and Cleaning Guide (Chapter 19). There are specific maintenance tasks that must be performed by authorised technicians only. -
Page 118: Maintenance Guide Label
Maintenance guide label Figure 149 – Maintenance guide label Note: The safety warnings sticker label is attached from factory to the unit’s pellet lid, in the Portuguese language. Attached to the manual you will find other language versions of the sticker labels (Spanish, English, French and Italian). If necessary, remove the Portuguese language label and replace it with the label in your country’s language. -
Page 119: Electrical Diagram Of The Free-Standing Fire Unit
Electrical diagram of the free-standing fire unit extractor de fumos 220 V Servizi 5J ventilador ambiente 220 V ficha comunicação (apenas p/ versão ar) termostato depósito 220 V de pellets - NA 220 V pressostato / pressure switch - em "OFF"... -
Page 120: Life Cycle Of A Free-Standing Fire Unit
Rua dos Outarelos, 111 3750-362 Belazaima do Chão This document does not substantiate the provision by Solzaima S.A. of a voluntary warranty on it’s produced and marketed products (from now on mentioned as "Product (s)"), but rather a guide, intended to be enlightening for the effective activation of the legal warranty that benefits consumers (from now on mentioned as "Warranty"). - Page 121 3. Product warranty terms 3.1 Solzaima, S.A., responds to the Buyer, for the lack of conformity of the Product with the respective contract of sale, within the following periods: 3.1.1 A period of 24 months from the date of delivery of the good, in the case of domestic use of the product, save the provisions of the following number regarding the intensive use;...
- Page 122 Monday through Friday within the working time and calendar legally established in each region. 3.8 All requests for assistance must be submitted to the Solzaima, S.A. Customer support service, means proper form present Website www.solzaima.co.uk, or, e-mail: support.cliente@solzaima.pt. At the time of the...
- Page 123 every 2000-3000 kg of pellets consumed in the case of automatic boilers. In the event that these quantities are not consumed, at least one systematic preventive maintenance must be carried out annually. 3.11 It is the Buyer's responsibility to ensure that periodic maintenance is carried out, as indicated in the instruction and handling manuals accompanying the Product.
- Page 124 Buyer, and the Buyer shall be responsible for any charges arising therefrom. 3.17 The Warranty is valid for the Products and equipment sold by Solzaima SA solely and exclusively within the geographical and territorial zone of the country where the Product was sold by Solzaima.
- Page 125 4.8. Defects caused by the use of accessories or replacement components other than those determined by Solzaima, S.A.; 4.9. Defects arising from non-compliance with the installation, use and operation instructions or applications not conforming to the intended use of the Product, or from abnormal climatic factors, unusual operating conditions, overload or maintenance or cleaning performed improperly;...
- Page 126 4.16. The installation of the equipment supplied by Solzaima, S.A. should contemplate the possibility of their easy removal, as well as points of access to the mechanical, hydraulic and electronic components of the equipment and the installation.
- Page 127 Solzaima have a 6-month guarantee. 9. Warranty Spare Parts provided by Solzaima The parts supplied by Solzaima, as part of the commercial sale of spare parts, i.e., not incorporated in the equipment, have no guarantee.
- Page 128 From the moment they are removed from the equipment, the Parts used are considered as waste. Solzaima as a producer of waste in the scope of its activity is obliged by the legislation in force to deliver them to a licensed entity that performs the proper waste management operations under the law and therefore is prevented from giving them another destination, whatever.
-
Page 129: Annexes
Annexes Timer weekly programming Daily programming Prog No. Days Mon-Fri Sat-Sun Mon-Fri Sat-Sun Mon-Fri Sat-Sun Mon-Fri Sat-Sun Mon-Fri Sat-Sun Mon-Fri Sat-Sun Mon-Fri Sat-Sun Mon-Fri Sat-Sun Mon-Fri Sat-Sun Sat-Sun Note: the salamander is active in the filled squares and deactivates in the blank squares. -
Page 130: Flow Chart
Flow chart 24.1. Flow chart K100, K200, K500 and K600 Lighting... - Page 132 Disabling...
-
Page 133: Flow Chart K300 And K400
24.2. Flow chart K300 and K400... - Page 135 Disabling...
-
Page 136: Statement Of Performance
Statement of performance ECLARAÇÃO DE ESEMPENHO ECLARACIÓN RESTACIONES ECLARATION OF ERFORMANCE ÉCLARATION DE ERFORMANCE DD-036 º 1. Código de identificação único do produto-tipo | Código de identificación único del tipo de producto | Unique identification code of the product type | Le code d'identification unique du type de produit | Codice unico di identificazione del tipo di prodotto K100–... - Page 137 9. Desempenho declarado | Desempeño declarado | Declared performance | Performance déclarée | Dichiarazione di prestazione Especificações técnicas Características essenciais | harmonizadas | Especificaciones Características esenciales | técnicas armonizadas | Desempenho | Desempeño | Essencial characteristics | Harmonized technical Performance | Prestazione Caractéristiques essentielles specifications | Spécifications | Caratteristiche essenziali...
- Page 138 prova CEE-0008/18-2 CEE-0009/18-2 A cada 10 m de conduta de fumos deve ser colocado um suporte de carga | cada 10 m de la salida de humos se debe colocar un soporte de carga | every 10 m of the flue should be placed a load support | tous les 10 m de conduit de fumée doit être placé...
- Page 139 ECLARAÇÃO DE ESEMPENHO ECLARACIÓN RESTACIONES ECLARATION OF ERFORMANCE ÉCLARATION DE ERFORMANCE ICHIARAZIONE DELLE PRESTAZIONI DD-064 º 1. Código de identificação único do produto-tipo | Código de identificación único del tipo de producto | Unique identification code of the product type | Le code d'identification unique du type de produit | Codice unico di identificazione del tipo di prodotto K200 –...
- Page 140 9. Desempenho declarado | Desempeño declarado | Declared performance | Performance déclarée | Dichiarazione di prestazione Especificações técnicas Características essenciais | harmonizadas | Especificaciones Características esenciales | técnicas armonizadas | Harmonized Essencial characteristics | Desempenho | Desempeño | technical specifications | Caractéristiques Performance | Prestazione Spécifications techniques...
- Page 141 OK. De acordo com relatório de ensaio | De acuerdo com informe de la prueba | According to the test report | Selons le rapport d’essai | Secondo i rapporto di prova CEE-0009/18-2 CEE-0201/19-1 Resistência mecânica De acordo com os requisitos | De A cada 10 m de conduta de Resistencia mecânica...
- Page 142 ECLARAÇÃO DE ESEMPENHO ECLARACIÓN RESTACIONES ECLARATION OF ERFORMANCE ÉCLARATION DE ERFORMANCE ICHIARAZIONE DELLE PRESTAZIONI DD-059 º 1. Código de identificação único do produto-tipo | Código de identificación único del tipo de producto | Unique identification code of the product type | Le code d'identification unique du type de produit | Codice unico di identificazione del tipo di prodotto W –...
- Page 143 9. Desempenho declarado | Desempeño declarado | Declared performance | Performance déclarée | Dichiarazione di prestazione Especificações técnicas Características essenciais | harmonizadas | Especificaciones Características esenciales | técnicas armonizadas | Desempenho | Desempeño | Essencial characteristics | Harmonized technical Performance | Prestazione Caractéristiques essentielles specifications | Spécifications | Caratteristiche essenziali...
- Page 144 d’essai | Secondo i rapporto di meccanico requisiti 4.2, 4.3(EN14785) prova CEE/0053/12 A cada 10 m de conduta de fumos deve ser colocado um suporte de carga | cada 10 m de la salida de humos se debe colocar un soporte de carga | every 10 m of the flue should be placed a load support | tous les 10 m de conduit de fumée doit...
- Page 145 ECLARAÇÃO DE ESEMPENHO ECLARACIÓN RESTACIONES ECLARATION OF ERFORMANCE ÉCLARATION DE ERFORMANCE ICHIARAZIONE DELLE PRESTAZIONI DD-022 º 1. Código de identificação único do produto-tipo | Código de identificación único del tipo de producto | Unique identification code of the product type | Le code d'identification unique du type de produit | Codice unico di identificazione del tipo di prodotto Alpes 8 kW –...
- Page 146 9. Desempenho declarado | Desempeño declarado | Declared performance | Performance déclarée | Dichiarazione di prestazione Especificações técnicas Características essenciais | harmonizadas | Especificaciones Características esenciales | técnicas armonizadas | Desempenho | Desempeño | Essencial characteristics | Harmonized technical Performance | Prestazione Caractéristiques essentielles specifications | Spécifications | Caratteristiche essenziali...
- Page 147 résistance Resistenza test report | Selons le rapport Selons les exigences | Secondo i d’essai | Secondo i rapporto di meccanico requisiti 4.2, 4.3(EN14785) prova CEE-0008/18-2 CEE-0009/18-2 A cada 10 m de conduta de fumos deve ser colocado um suporte de carga | cada 10 m de la salida de humos se debe colocar un soporte de carga| every 10 m of the flue should be...
- Page 148 ECLARAÇÃO DE ESEMPENHO ECLARACIÓN RESTACIONES ECLARATION OF ERFORMANCE ÉCLARATION DE ERFORMANCE DD-046 º 1. Código de identificação único do produto-tipo | Código de identificación único del tipo de producto | Unique identification code of the product type | Le code d'identification unique du type de produit | Codice unico di identificazione del tipo di prodotto K500 –...
- Page 149 9. Desempenho declarado | Desempeño declarado | Declared performance | Performance déclarée | Dichiarazione di prestazione Especificações técnicas Características essenciais | harmonizadas | Especificaciones Características esenciales | técnicas armonizadas | Desempenho | Desempeño | Essencial characteristics | Harmonized technical Performance | Prestazione Caractéristiques essentielles specifications | Spécifications | Caratteristiche essenziali...
- Page 150 10 m de conduit de fumée doit être placé un support de charge | ogni 10 m della canna fumaria deve essere posto un supporto di carico De acordo com os requisitos | De Potência térmica Potencia acuerdo requisitos térmica | Thermic output | According to the requirements | Puissance thérmique | Potenza Selons les exigences | Secondo i...
- Page 151 ECLARAÇÃO DE ESEMPENHO ECLARACIÓN RESTACIONES ECLARATION OF ERFORMANCE ÉCLARATION DE ERFORMANCE ICHIARAZIONE DELLE PRESTAZIONI DD-057 º 1. Código de identificação único do produto-tipo | Código de identificación único del tipo de producto | Unique identification code of the product type | Le code d'identification unique du type de produit | Codice unico di identificazione del tipo di prodotto K600 –...
- Page 152 9. Desempenho declarado | Desempeño declarado | Declared performance | Performance déclarée | Dichiarazione di prestazione Especificações técnicas Características essenciais | harmonizadas | Especificaciones Características esenciales | técnicas armonizadas | Desempenho | Desempeño | Essencial characteristics | Harmonized technical Performance | Prestazione Caractéristiques essentielles specifications | Spécifications | Caratteristiche essenziali...
- Page 153 OK. De acordo com relatório de ensaio | De acuerdo com informe de la prueba | According to the test report | Selons le rapport d’essai | Secondo i rapporto di prova CEE-0201/19-1 A cada 10 m de conduta de Resistência mecânica De acordo com os requisitos | De...
Need help?
Do you have a question about the K2 K100 and is the answer not in the manual?
Questions and answers