Carrier Infinity SYSTXCCICF01-B Owner's Manual
Hide thumbs
Also See for Infinity SYSTXCCICF01-B:
- Owner's manual (56 pages) ,
- Installation instructions manual (120 pages) ,
- Installation instructions manual (94 pages)
Table of Contents
Advertisement
SYSTXCCITC01-C,
SYSTXCCWIC01-B,
SYSTXCCICF01-B,
SYSTXCCWIF01-B
Infinity® System Control
The features and functions outlined in the Owner's Manual reflect
Version 1.3 or later software. Occupancy sensing is only available with
Series B or Series C Infinity System Controls. Not all features or
functions are available on all version of the system controls. See the
Downloads section of www.MyInfinityTouch.Carrier.com for the latest
software release and literature.
US Patents: Carrier® U.S. Pat No. 7,243,004, Carrier® U.S. Pat No.
7,775,452, pointSET™ U.S. Pat No. 7,415,102
Owner's Manual
A210174
A170203A
A180218C
Advertisement
Table of Contents

Related Manuals for Carrier Infinity SYSTXCCICF01-B


Summary of Contents for Carrier Infinity SYSTXCCICF01-B
- Page 1 See the Downloads section of www.MyInfinityTouch.Carrier.com for the latest software release and literature. US Patents: Carrier® U.S. Pat No. 7,243,004, Carrier® U.S. Pat No. 7,775,452, pointSET™ U.S. Pat No. 7,415,102...
-
Page 3: Table Of Contents
Table of Contents 1. Introduction ........... . . 6 2. - Page 4 7. Vacation............34 8.
- Page 5 17.Wireless ............58 18.Weather .
-
Page 6: Introduction
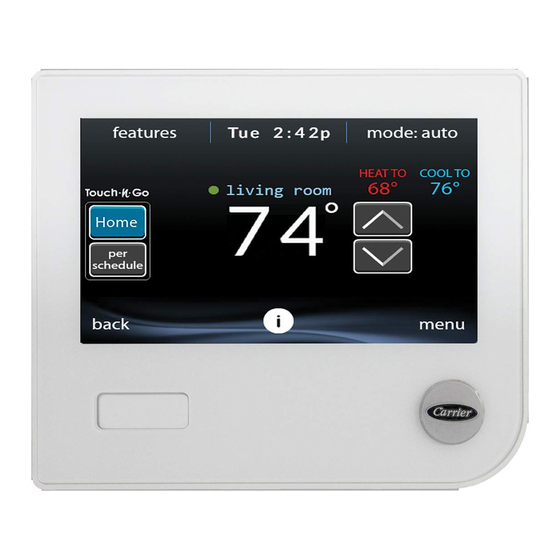
NOTE: When you connect your system to the Internet and register on the My Infinity website, you can access nearly all of the consumer features on the Carrier® Home mobile app. See the WIRELESS section for more information. The information displayed on the Home Screen will appear when there has been no interaction with the Infinity System Control for at least two minutes. -
Page 7: Occupancy Status
2.2. Occupancy Status When the occupancy sensing feature is enabled, a dot (occupancy sensing indicator) next to the zone name is shown to indicate if the room is sensed to be occupied. When no movement is detected, Occupancy Status indicator stays GRAY. When movement is detected, but the system hasn’t yet determined that the space is occupied (example, someone is just walking through the room), Occupancy Status indicator turns BLUE. - Page 8 MyInfinity Server, a triangle will appear over the strength bars as depicted in the image below. Connection strength to the home Wi-Fi network will continue to be displayed by the number of solid bars. If this problem persists, please contact 1-800-Carrier for assistance.
-
Page 9: Information Buttons
A170247 • Pressing on the Connectivity Status bars from the Home Screen will allow you to view the Remote Access Status screen. A13262C 2.4. Information Buttons On the bottom of some screens will be an information icon. By pressing the information icon, a text box will display to show what interactions are available on that particular screen. -
Page 10: Main Screen
The Main Screen is where most interactions will take place. Touch anywhere on the Home Screen to arrive at the Main Screen. The most convenient way to interact with your control is using the Carrier® Home mobile app. See the WIRELESS section for more details on connecting your product to the Internet. -
Page 11: Set Day And Time
• If OFF is selected your system will not control temperatures, humidity, or fan. • If AUTO is selected, the Infinity System Control automatically switches between heating and cooling to maintain your comfort during transitional seasons. NOTE: AUTO mode is intended to switch between heating and cooling modes based on temperature demand. -
Page 12: Adjust Temperature (Temporary Hold)
• Touch the DAY and TIME label located at the top middle of the screen or access by going through the menu screen (see page 44). • To set the HOUR, MINUTE, MONTH, DAY, or YEAR touch the feature you wish to change. •... -
Page 13: Adjusting Heating
• To return to the scheduled program, touch HOLD UNTIL, and then select PER SCHEDULE. 3.5. Adjusting Heating NOTE: If OFF is selected, the Heat, Cool, Auto and Fan Only will not be available. When changing from the OFF mode to Heat, Cool, Auto, or Fan Only, it is normal for the system to run the blower for a minute or two. -
Page 14: Adjust Temperature (Permanent Hold)
• Use the Up (Y) and Down (B) buttons to change the time to temporarily hold the desired temperature in 15 minute increments. • When the correct time interval is displayed, touch DONE. • To return to the scheduled program, touch HOLD UNTIL, and then select PER SCHEDULE. -
Page 15: Adjusting Cooling
• To return to the scheduled program, touch HOLD, and then touch PER SCHEDULE. 3.10. Adjusting Cooling • To adjust the cooling temperature, enter the Main Screen by touching anywhere on the Control. • With the system in either AUTO or COOL mode, use the Up (Y) and Down (B) buttons to set the desired temperature. -
Page 16: Occupancy Override
• Once you have selected the desired activity for ALL ZONES, you will have the option to either permanently (HOLD) or temporarily (HOLD UNTIL) override your programmed schedule. A14239 – Selecting the HOLD option will permanently override your programmed schedule until you CANCEL ALL ZONES. –... - Page 17 A170203 The Occupancy Sensing feature can be enabled or disabled under the “sensors” icon on the main screen. See Occupancy Setup section on page 65. When the Occupancy Sensing feature is enabled, the current scheduled activity is HOME or WAKE, and timing is “per schedule,” the activity and set point(s) change to AWAY automatically when the space is determined to be Unoccupied.
-
Page 18: Features
4. Features 4.1. Adjust Fan Speed The Features function of Infinity System Control allows you to adjust the fan speed during continuous fan operation. • To adjust the fan speed, enter the Main Screen by touching anywhere on the Control. •... -
Page 19: Comfort Profiles
Carrier® Home mobile app. See the WIRELESS section for more details on connecting your product to the Internet. 5.1. Comfort Profiles You will need to set the comfort profiles before you attempt to program your new Infinity System Control. COMFORT PROFILES •... - Page 20 A14241 – For example to change your HOME comfort profile, touch the HOME icon. – Use the Up (Y) and Down (B) buttons to change the fan settings, heating and cooling temperatures. When you are done, press the DONE button on the bottom right. –...
-
Page 21: Home Comfort Profile Humidity Control
• Set your desired humidity and fresh air (if applicable) using the HUMIDITY AND FRESH AIR PROFILES for each activity. A14242 5.2. Home Comfort Profile Humidity Control • Touch WHEN AT HOME to set your humidity settings while the home is occupied to enjoy superior comfort. A14243... - Page 22 • If you have a humidifier installed for your system, touch HEATING HUMIDITY to set the desired humidity level within the home. – You will have the option to turn ON or OFF your humidifier from this screen. A14244 – Once your Humidifier is turned ON, use the Up (Y) and Down (B) buttons to set the desired humidity level between 5-45%.
-
Page 23: Home Comfort Profile Fresh Air Control
A14245 – Use the Up (Y) and Down (B) buttons to set the desired dehumidification level between 46-58%. – Touch YES or NO for the system to over-cool the conditioned space by up to 3ºF to remove as much humidity out of the air as possible. - Page 24 A14246 • You will have the option of choosing among AUTO, MANUAL, or OFF. NOTE: This option may not be available with the ERVXXNVA ventilator due to its simplified Control design. – The AUTO setting will allow the user to choose the maximum fresh air that the ventilator will provide.
-
Page 25: Away Comfort Profile Humidity Control
• If applicable, next select the amount of fresh air to circulate during cooling mode by touching COOLING FRESH AIR. Again, you will have the option of choosing among AUTO, MANUAL and OFF. – Use the Up (Y) and Down (B) buttons to set the desired ventilator speed level. -
Page 26: Away Comfort Profile Fresh Air Control
– Use the Up (Y) and Down (B) buttons to set the minimum humidity level between 5%-45%. – Press SAVE when finished, or CANCEL to discard any changes. • To set the desired humidity level during cooling, touch COOLING HUMIDITY. –... -
Page 27: Vacation Comfort Profile Humidity Control
several selections available: Off, Low 25%, Low 50%, Low 75%, Low 100%, Medium, and High. The percent values are percent of an hour. – Use the Up (Y) and Down (B) buttons to set the desired ventilation level. – Press SAVE when finished, or CANCEL to discard any changes. •... - Page 28 A14248 • If you have a humidifier installed for your system, touch HEATING HUMIDITY to set the desired humidity level when you are away from home. – Use the Up (Y) and Down (B) buttons to set the minimum humidity level between 5%-45%. –...
-
Page 29: Vacation Comfort Profile Fresh Air Control
You may select to use the guided scheduling feature, view or edit your schedule or upload your schedule from a micro SD memory card. The most convenient way to program your control is using the Carrier® Home mobile app. See the WIRELESS section for more details on... -
Page 30: View Or Edit Schedule
A14249 6.1. View or Edit Schedule • To set a specific day use the Left (A) and Right (") buttons beside the day names. – If you wish to copy this schedule to other days, touch COPY above the day. –... -
Page 31: Guided Scheduling
6.2. Guided Scheduling The Guided Scheduling feature will prompt you with simple questions to help set a schedule that meets your desired comfort level and lifestyle. If you are satisfied with your comfort settings, proceed to the next screen. If you are not, go through the process outlined under Comfort Profiles (page 19). - Page 32 • Use the Up (Y) and Down (B) buttons to set the time you return home. • After you have selected the correct time, touch NEXT to continue. 5. If you select YES or have completed the previous steps, the next question will ask if you want different sleep settings.
-
Page 33: Upload My Schedule For Series B
6.3. Upload My Schedule for Series B As noted earlier, programming the control with the Carrier® Home mobile app is the most convenient way. You can program a system that is not connected to the Internet using a PC or MAC computer using the process shown, below. -
Page 34: Vacation
• Install the micro SD card into the micro SD card slot on the bottom of the Infinity System Control. • On the Infinity System Control, select Schedules from the Menu screen, then select the Upload Schedule option. • If the folder and file have been placed correctly on the micro SD card, you will be asked if you wish to upload the schedule. -
Page 35: Reminders
• Use the Up (Y) and Down B) buttons to set the time and date of when your vacation begins; then touch NEXT. The Control won’t allow you to select a vacation start date/time earlier than the current date/time. • Use the Up (Y) and Down (B) buttons set the fan speed and the temperature range you wish to keep your house;... -
Page 36: Operating Status
With the Infinity System Control, there are accessory messages to remind you when it is time for maintenance. Select the REMINDERS icon from the menu screen. A12123 • You have the option of choosing a pop-up reminder for your air filter, humidifier, UV lights, or ventilator pre-filter. -
Page 37: Accessories Status
operating. A message stating, “System Check in Progress” means that the system is performing its normal 1 p.m. Filter check. This also happens any time the system mode is changed from Off to Auto, Heat, Cool, or Fan Only. When you are finished looking at the operating status, press the DONE button to return to the previous menu. -
Page 38: Temperature Control Status
9.3. Temperature Control Status The Temperature Control Status allows you to take a quick look at the actual temperatures, and temperature set points for each zone in your system. • When you are done looking at your zone status, press DONE. The system will indicate which mode is running by showing flashing arrows towards either the heating or cooling set point. -
Page 39: Display
10. Display The following display preferences can be adjusted for Infinity System Control, Temperature Units (°F or °C), Backlight Levels, Sound Settings and Screen Saver Settings. A14256 10.1. Temperature Units Select the desired temperature units, either °F for Fahrenheit, or °C for Celsius and touch SAVE. -
Page 40: Set Backlight Levels
A14257 10.2. Set Backlight Levels • Backlight levels are programmable for each Comfort Profile setting HOME, AWAY, WAKE, or SLEEP. • Use the Up (Y) and Down (B) buttons to set/change the brightness of back lighting. – Brightness levels include OFF or 1-10. NOTE: After 30 seconds of inactivity on the touch screen, the backlight level will be set back to the current selected level which may be OFF. -
Page 41: Sound Settings
10.3. Sound Settings The control can emit a ”click” sound in response to each screen touch. Select ENABLED to turn this sound on; or DISABLED to turn it off. A14259 10.4. Screen Saver Settings To allow a photo to act as a screen saver, touch ENABLE; otherwise, touch DISABLE. -
Page 42: Activate Screen Lock
A14260 10.5. Activate Screen Lock • A message will pop up asking if you want to proceed with the screen lock. Selecting Yes will lock the screen and take you back to the home screen. A13247... -
Page 43: Energy Tracking
• To unlock the screen, press and hold UNLOCK in the bottom left hand corner for 10 seconds. A13248 • The screen will change and the Control will then be accessible. If the screen is to be locked again, return to the menu, select the screen lock and touch YES. -
Page 44: Time / Date
• Touch VIEW ENERGY USAGE to view the estimated energy consumption in daily, monthly or annual time intervals. You can view energy consumption in units (kWh for electric and selected unit for gas heat), or in dollars. • If a gas furnace is installed, you can SELECT FUEL TYPE (natural gas or propane), and also SELECT FUEL DISPLAY UNITS. -
Page 45: Set Time And Date
A14250 12.1. Set Time and Date The time and date can either be set manually or can be synchronized with the web server (only for Wi-Fi connected units). From the Main Screen, touch MENU, on the bottom of the Control. The TIME/DATE icon will bring up the time and date menu. -
Page 46: Setup Daylight Savings Time
• Use the Up (Y) and Down (B) buttons to make the appropriate changes. • When you have completed all of the settings touch SAVE. 12.3. Setup Daylight Savings Time You can program your Infinity System Control to automatically adjust for daylight saving time. -
Page 47: Enable Time Synchronization
A14217 12.5. Enable Time Synchronization For systems with Wi-Fi® capability, after setting up the time zone, the time synchronization can then be done. Both must be done in order to enable time synchronization. A14253... -
Page 48: Service
Your dealer information is easily accessible and may already be pre-programmed in your Control by your dealer. Select the SERVICE INFORMATION option. • Either your dealer’s contact information or the Carrier service number, 1-800-Carrier, will appear. • This information will also appear if your system requires service. -
Page 49: Service Reminder Update
A13250C 13.2. Service Reminder Update Setup option will allow you to setup routine service reminders. Once the reminder option is enabled, you can select the frequency of these reminders (3 to 18 months). A13251... -
Page 50: Software Update For Series B
13.3. Software Update for Series B Carrier will periodically issue software updates for the Infinity System Control. Updates will download automatically through your Wi-Fi connection, allowing you to install them at your convenience. Software updates will be made available on the MyInfinity website for download to a micro SD card. - Page 51 • At the bottom of the EULA, choose “Yes” if you accept the agreement. NOTE: If you do not wish to accept the agreement, you will not be able to download the software update. • Use the Download link provided in the EULA document to download the software update package.
-
Page 52: Updating Software Using Wi-Fi
A13254C • Plug the micro SD card into the bottom of the Infinity System Control and click on the UPDATE SOFTWARE USING MICRO SD CARD. • Press Yes to continue with the software upgrade. The upload and installation will take several minutes. •... - Page 53 A13255 Touch anywhere inside the software update reminder message to install the latest software or customize your reminder messages for software updates. (Note: The version numbers shown below are examples. Actual version numbers will vary.) A150194 Selecting YES will initiate the software update process. Your Infinity System Control will reboot in order to complete the software update...
-
Page 54: Model / Serial Numbers
process. All of your previously stored information and settings will be maintained. NOTE: Select DETAILS to view the release notes associated with the software to be downloaded. Selecting NO will allow to set-up a reminder for a later time or you can disable the reminder feature for this particular software update. -
Page 55: Photo Upload For Series B
14. Photo Upload for Series B With the Infinity System Control, you can upload a personal photo to act as a screen saver. Select the PHOTO UPDATE icon from the menu screen. NOTE: Use a 4GB to 32GB micro SD memory card. The card should be formatted for FAT32 (rather than FAT64 or exFAT) in order to be read by the control. -
Page 56: Heat Source (If Applicable)
15. Heat Source (If Applicable) With the Infinity System Control, you can select the desired heat source of your system, if your system is equipped as a HYBRID HEAT® System. Select the HEAT SOURCE icon from the menu screen. A170239C NOTE: Options available on this screen will correspond to the equipment attached. -
Page 57: Home Automation System Interface (If Applicable)
A170240C • Touch the zone in which you choose to change the name. • Choose between selecting a COMMON NAME or CREATE A CUSTOM NAME. – If you choose select a common name, touch the name you want for that particular zone. –... -
Page 58: Wireless
System Control, and/or the MyInfinity web server, with, and the availability of, the user’s Internet service provider or mobile device carrier service, or that the ability to remotely access and adjust the settings of the Infinity System Control will not be negatively affected by the network-related modifications, upgrades, or similar activity of the user’s Internet service provider or mobile device carrier service. - Page 59 A170241C • Select WIRELESS from the menu screen. • Make sure the Wi-Fi connection is enabled, by touching ENABLED. • Touch SETUP A WI-FI CONNECTION to begin the process. • Next, touch SCAN FOR AVAILABLE ACCESS POINTS. A13235...
- Page 60 • On the next screen look for the SSID of the router/access point. After being selected, it will be outlined in faint blue and will be indicated by a checkmark. Then select NEXT. A150175 • The selected network will show. Choose an appropriate Wi-Fi security.
- Page 61 MAC address of the Infinity System Control , click on Menu, Down Arrow, Wireless and View MyInfinity Registration Info.When using the Carrier® Home mobile app you can take a picture of the QR code and these items will be filled in for you. This screen will provide the information needed on the MyInfinity website during registration.
-
Page 62: Weather
A170285C • When the connection to the MyInfinity web server has been established, the status screen will show Connected for both Wi-Fi and the server. A13242C 18. Weather When the Infinity System Control is connected to a Wi-Fi® network, use the WEATHER icon to retrieve the weather forecast based your postal code. - Page 63 A170242C • To enter your postal code, touch CHANGE CURRENT LOCATION. • Next, select your country (United States or Canada). • To enter your postal code, touch in the blank area; then enter your postal code using the on screen keyboard. Note that you may select a postal code other than where the system is located, if another postal code has a more relevant weather forecast for your area.
-
Page 64: Sensors
19. Sensors 19.1. Menu An occupancy sensor is built into the main system control. This sensor is used to control occupancy for the entire home, including all zones in zoning systems. By selecting the SENSORS icon in the menu, a menu will be shown that offers options to setup the occupancy sensor. -
Page 65: Occupancy Setup
Sensors Menu for Zoning System A170156 Sensors Menu for Non-Zoning System A170286 19.2. Occupancy Setup Home or zone (for zoning systems) occupancy setup is used to enable or disable the occupancy sensing feature in the home or each zone (for zoning systems). - Page 66 NON-ZONING SYSTEMS A170174 ZONING SYSTEMS A170175 NOTE: Occupancy sensing indicator ONLY displays on the main and home screen when the occupancy sensing feature is ENABLED.
-
Page 67: Utility Demand Event Response Setup
20. Utility Demand Event Response Setup This section is only applicable if your utility company is running a demand response or price response program in which you have agreed to participate. Contact your local electrical utility company for information about programs in your area. NOTE: If you wish to participate with your electrical utility company, a service person or Utility representative must enable the utility event interface. -
Page 68: Price Response
the type of event, the adjustment to the heating and cooling set points, the time the event will end, an accept button, and an override button. • Pressing the accept button will accept the adjustments made to the heating and cooling set points. •... -
Page 69: Price Settings
20.4. Price Settings When the electric rate from the utility company meets or exceeds the “ELECTRICAL RATE”, the heating and cooling set points will be adjusted according to the absolute temperature or offset shown here. If the set point at the time of the event is more favorable (uses less energy) than what you have programmed, the Infinity System Control will use the more favorable set point for the duration of the event. -
Page 70: Demand Settings
A14265 20.6. Demand Settings When a demand response is received from the utility company, the heating and cooling set points will be adjusted according to the absolute temperature or offset shown here. If the set point at the time of the event is more favorable (uses less energy) than what you have programmed, the Infinity System Control will use the more favorable set point for the duration of the event. -
Page 71: Response Limits
A14266 20.7. Response Limits Response limits are minimum heating and maximum cooling temperatures allowed during a utility event. These limits are not exceeded and are intended to protect the occupant premises from extreme temperatures that might otherwise be imposed by a utility event. Unless otherwise indicated, all settings temperatures will be shown in Fahrenheit degrees. -
Page 72: Restore Ue Factory Default Settings
A14267 20.8. Restore UE Factory Default Settings Restore UE (Utility Event) factory default settings will restore all utility event set points and price settings to their original factory default values. A14268... -
Page 73: Statement Information
21. Statement Information This device complies with Part 15 of the FCC Rules. Operation is subject to the following two conditions: (1) This device may not cause harmful interference, and (2) This device must accept any interference received, including interference that may cause undesired operation. Changes or modifications not expressly approved by the party responsible for compliance could void the user’s authority to operate the equipment. - Page 74 installed to provide a separation distance of at least 20 cm from all persons and must not be co-located or operating in conjunction with any other antenna or transmitter. Pour se conformer aux limites d’exposition RF FCC et IC pour la population générale / l’exposition incontrôlée, l’antenne utilisée pour cet émetteur doit être installée pour assurer une distance de séparation d’au moins 20 cm de toutes les personnes et fonctionnant conjointement avec...
- Page 75 A180093...
- Page 76 Infinity®Evolution®, Touch ’N’ Go®, True Sense™ and HYBRID HEAT® are trademarks or registered trademarks of Carrier Corporation in the United States and other countries. Other brands and product names are trademarks of their respective holders. Wi-Fi® is a registered trademark of Wi-Fi Alliance Corporation.
Need help?
Do you have a question about the Infinity SYSTXCCICF01-B and is the answer not in the manual?
Questions and answers