
Related Manuals for DNP CX-D80D


Summary of Contents for DNP CX-D80D
- Page 1 SERVICE MANUAL CARD PRINTER CX-D80D, CX-D80DS, CX-D80SR, CX-D80SRS, CX-D80DR No.HD003 <Rev.004> 2019/2...
-
Page 2: Specification
SPECIFICATION CX-D80D, CX-D80DS, CX-D80SR, CX-D80SRS, CX-D80DR Specifications Recording system Dye sublimation retransfer Paper feed mode Automatic Recording density 300 dpi Reproduction gradation 256 levels each for Y, M and C 2 levels for Resin K Interface USB 2.0 (Hi-Speed/Full-Speed) Ethernet (100BASE-TX/10BASE-T) Operating environment conditions Temperature: 15C to 30C... -
Page 3: Section 1 Precaution
SECTION 1 PRECAUTION SAFETY PRECAUTIONS Prior to shipment from the factory, JVC products are strictly in- cathode ray tubes and other parts with only the specified spected to conform with the recognized product safety and elec- parts. Under no circumstances attempt to modify these cir- trical codes of the countries in which they are to be cuits.Unauthorized modification can increase the high volt- sold.However,in order to maintain such compliance, it is equally... - Page 4 1.1.2 Safety Check after Servicing Examine the area surrounding the repaired location for damage (4) Leakage current test or deterioration. Observe that screws, parts and wires have been Confirm specified or lower leakage current between earth returned to original positions, Afterwards, perform the following ground/power cord plug prongs and externally exposed ac- tests and confirm the specified values in order to verify compli- cessible parts (RF terminals, antenna terminals, video and...
-
Page 5: Section 2 Specific Service Instructions
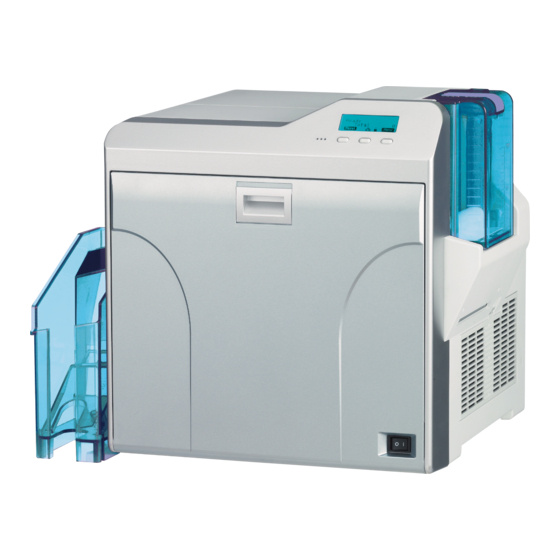
CX-D80SR : Single Side with Bend Remedy Unit CX-D80SRS : Single Side with Bend Remedy Unit (HS Model) CX-D80D : Dual Side without Bend Remedy Unit CX-D80DS : Dual Side without Bend Remedy Unit (HS Model) CX-D80DR : Dual Side with Bend Remedy Unit Model name of built in option units. - Page 6 Name and functions of parts 2.4.1 Exterior Card Hopper Space for input Display Panel Card Exit out put connectors Card stacker Security Slot AC Inlet Cooling Fan Printer door NG Card Exit Host Interface Communication Port for Laminator Power Switch Preliminary screw hole 2.4.2 Internal mechanism Retransfer heating roller...
- Page 7 2.4.3 Sensors locations CF-7MGS(Option) MG Unit Symbol No.167 Symbol No.230 Card Edge and Head LSA20169-01A8 LSA20169-01A2/B2 Position Sensor I LOCK BOARD ASSEMBLY EDGECDEX P ASSEMBLY Symbol No.2 TURN M SUB ASSEMBLY Symbol No.231 Symbol No.179 LSA20169-01A1/B1 LSA20169-01A7/B7 EDGECDEX P ASSEMBLY NOCARD BOARD ASSEMBLY Symbol No.34 HEAT ROL UNIT Symbol No.113...
- Page 8 ATTACHING THE SEPARATELY SOLD PARTS (4) Disconnect the wire connected to the MAIN Board. 2.5.1 Preparation Release the wires from the wire clamp. Before connecting the separately sold parts, remove the top cov- er and the rear cover to pull open the MAIN Board. (1) Remove the two screws attaching from the rear side of the main unit.
- Page 9 2.5.2 Attaching the reform H unit 2.5.3 Attaching the IC contact unit Note: Note: After mounting the reform H unit, be sure to check the rel- After mounting the IC contact unit, be sure to check the evant item referring to "2.3 Check details after mounting relevant item referring to "2.3 Check details after mount- separately sold parts".
- Page 10 (4) Mount the IC contact unit. (6) Connect the wire from the IC contact unit following the drawing below. View A CN1 CN3 IC Contact unit Screw : Run the wires through QYSDST2604NA x 2 this wire clamp. Slide the IC contact unit into the hook of the bracket on the main unit.
- Page 11 2.5.4 Attaching the MG unit (7) Reattach the turn unit. Note: After mounting the MG unit, be sure to check the relevant item referring to "2.3 Check details after mounting sepa- After attaching this screw, attach rately sold parts". another two screws. Screw : QYSDST3006NA x 3 (1) Mount the MG unit.
- Page 12 (3) Close back the MAIN Board to its original position, and fix (4) Connect the wires from the MG unit and the turn unit follow- the MAIN Board with the four screws. ing the drawing below. Securely hook the two brackets, fixing the Connect the MG unit and the board bracket, and fix them with screws.
- Page 13 (2) Mount the IC R/W unit. Run the earth wire under the wires from the FRONT Board. QYSDSF3008NA x 2 IC R/W Unit QYSDST3006NA QUB340-07DMDM-E (3) Connect the wires from the IC R/W unit following the draw- ing below. Connect the supplied USB cable and the connector J1 on the MAIN Board.
- Page 14 Check details after mounting separately sold parts Item Check details Required tools Reform H unit The warpage of the printed card should be within the specs (1.5 Blank card mm). IC Contact unit Check the IC contact position mark using a blank card and a Blank card, Contact label contact label.
- Page 15 2.6.1 IC contact position adjustment Apply a contact label (part number: KXL46372-001) on the IC chip of a contact IC card. Select the IC contact test from “off line test” in the service mode to perform the test. After the test, measure the IC contact position mark on the con- tact label using a vernier caliper to check if the position stays within the specs.
-
Page 16: Section 3 Disassembly
SECTION 3 DISASSEMBLY Before disassembly, be sure to turn OFF the power and unplug (2) Slide the top cover unit to the rear side, then remove the the power cord. top cover unit. Removing the covers (See figure 1 to figure 4) Top cover unit (1) Remove the two screws A attaching the top cover unit. - Page 17 (4) Remove the two screws C attaching the side cover U-R (2) Remove the two screws D attaching the cover, then re- and side cover U-L, then remove the side cover U-R and move the cover. side cover U-L. Side cover U-R Side cover U-L Cover Head unit...
- Page 18 (4) Disconnect the two cables from the connectors on the front (7) Front panel unit with the cover removed. board. Cover Fig.10 Front panel unit Connectors (8) Disconnecting the cable from the RFID1 board detaches Fig.8 the front panel unit from the main unit. (5) Remove the one screw F attaching the cover.
- Page 19 Removing the major boards and major units (See fig- (4) Hanging the left and right brackets on the main board to the ure 13 to figure 33) hooks on the chassis prevents the main board from falling. (1) Disconnect the four cables from the connectors on the Hook main board.
- Page 20 (9) Remove the four screws K to release the SECURITY PWB (6) Removed MG encoding unit. ASSY and the solenoid on the front side. Fig.18 (7) The KEY LOCK UNIT consists of a SECURITY PWB ASSY and two solenoids. Solenoid SECURITY PWB ASSY Solenoid SECURITY PWB ASSY...
- Page 21 (14) Remove the two screws N attaching the cover, then re- (12) Removed IC R/W UNIT. move the cover. This bracket is an accessory of the IC contact unit. Cover Fig.27 Fig.24 (15) Before removing the IC contact unit, the turn unit needs to (13) Remove the one screw M attaching the bracket with CON- be removed first.
- Page 22 (16) Remove the four screws P attaching the turn unit from the (18) Remove the two screws Q attaching the IC contact unit, front side and the rear side. then remove the unit. Turn unit IC contact unit Fig.29 Fig.32 Turn unit (19) Removed IC contact unit.
- Page 23 Replacing the head unit (See figure 34 and figure 35) Removing the reform H unit (See figure 36 and figure (1) Remove the one screw R attaching the head unit. (1) Remove the one screw S attaching the reform H unit, then pull out the reform H unit.
- Page 24 (3) Remove the five screws V attaching the motor base unit, (2) Pulled out heater. then remove the motor base unit. Heater Motor base unit Fig.39 Fig.42 Removing the motor base unit (See figure 40 to figure (4) Main unit with the motor base unit removed. (1) Push two tabs on the PS cover, then remove the PS cover.
- Page 25 SECTION 4 ADJUSTMENT This service manual does not describe ADJUSTMENT. SECTION 5 TROUBLE SHOOTING When an error message is display (1) Set the card hopper knob to [OPEN]. When the error occurs, the error code and the error code number are displayed in the operation panel.
- Page 26 5.1.2 Jam(Hopper) 90 • The card is discharged from the NG card outlet. Jam (Hopper) • Card jam near the card hopper and cleaning roller. Remove the jammed card. Note: • Do not apply excessive force on the card hopper. Doing so may damage it.
- Page 27 5.1.3 Jam(TurnOver) 91 (6) Install the cleaning unit. (7) Attach the jog dial to the card turn over unit shaft, and set Jam (Turn Over) the card turn over unit to “Home Pos.” • “Home Pos.” is the position where the slit on the jog dial points to the right and the card turn over unit is horizontal.
- Page 28 5.1.4 Jam(MG) 92 (3) Set the card turn over unit to “Home Pos.” • “Home Pos.” is the position where the slit on the jog dial Jam (MG) points to the right and the card turn over unit is horizontal. •...
- Page 29 5.1.6 Jam(Discharge) 94 • The card is discharged from the NG card outlet. Jam (Discharge) • Card jam near the card outlet. Remove the jammed card. (1) Press [RESET] to reset the printer. 5.1.5.1 If the card cannot be discharged (1) Turn off the power, and detach the card hopper.
- Page 30 (4) Turn the card feed roller shaft in the anti-clockwise direc- (5) Press [RESET] . tion, while checking the position of the card. • A [Jam Card Removed?] message appears. (6) Press [Yes] . Cautions: • Initializing the printer without first removing the card will cause the printer to malfunction.
- Page 31 5.1.7.2 If the card is inside the printer unit 5.1.7.3 If the card is caught in the card feed roller to the right of the retransfer heating roller • If the card is not drawn into the card feed roller and is left inside the printer, use the tweezers (supplied) to remove the card.
- Page 32 5.1.7.4 If the card is caught in the card feed roller to the 5.1.8 Film Search A1 left of the retransfer heating roller Film Serch (1) Turn off the power. (2) Check the position of the card. (3) Attach the jog dial to the card feed roller shaft. •...
- Page 33 5.1.9 MG Test Err A8 (4) Turn the take-up side using your hand until the broken por- tion can no longer be seen. MG Test Err • A writing error has occurred during magnetic encoder self-di- agnosis. Press [RESET] to reset the printer.
- Page 34 (7) Press [RESET] (2) Press and hold down the cassette button, and remove to reset the printer. the ink ribbon cassette. (on the right) (3) Cut away the broken portion, and attach the unused portion at the supply side to the other end at the take-up side using an adhesive tape, while making sure that the joint surface is even.
- Page 35 5.1.16 MG Mechanical AB 5.1.23 TR Thermister F2 MG Mechanical TR Thermister • An error has occurred in the mechanical component of the • The retransfer heating roller thermistor is faulty. magnetic encoder. Turn off and on the power again. If the same problem recurs, Turn off and on the power again.
- Page 36 Use of service mode Besides "User mode" that is for setting this unit depending on the printing media or card used by the user, there is a "Service mode" for status checking and changing setting of this unit during service. The checking and adjustment of the following items can be per- formed in service mode: (1) Fine adjustment of the printing position (4) Information display of printer...
- Page 37 Setting of the retransfer heating roller temperature [ENTER] >>Retransfer >>>Temp Level [-2, -1, 0, +1, +2] [EXIT] Select with [ ] and save with [ [NEXT] [NEXT] Setting of the front side retransfer speed >>>Speed (Front) [-3 ~ -1, 0, +1, +2] Select with [ ] and save with [ [NEXT]...
- Page 38 [ENTER] Select interface >>Network >>>Host IF [LAN, USB] [EXIT] Select with [ ] and save with [ [NEXT] [ENTER] Switching DHCP >>>IPv4 >>>DHCP [On, Off] [EXIT] Select with [ ] and save with [ [NEXT] [ENTER] Setting of the IPv6 >>>IPv6 >>>Adrs Config [Auto, Manual]...
- Page 39 >>Sensor 0010010001100100 [NEXT] >>Memory In case of an error, the buzzer sounds and the LED lights. When there is no error, the indication just returns to the initial indication. [NEXT] >>Display [NEXT] Display for 1 sec Display for 1 sec >>Back Color Display for 1 sec Display for 1 sec...
- Page 40 [ENTER] Select operational mode [ENTER] >>User Mode> >>>Mode >Laminator> [Laminate, Pass] [EXIT] [EXIT] Select with [ ] and save with [ [NEXT] [NEXT] Select film used with upper cassette >>>Film-T [Patch, Overlay] Select with [ ] and save with [ [NEXT] Select film used with lower cassette >>>Film-B...
-
Page 41: Maintenance
Explanation of the Various Modes (3) Print and check the result. (4) To adjust to the standard setting: 5.3.1 Maintenance In the service mode, print color patterns on single sides of Set to this mode if a constant setting that is different from the 4 to 5 cards. -
Page 42: Off-Line Test
5.3.2 Off-line Test 5.3.2.2 Side This is used to print the built-in test pattern of this printer and for Selection whether test printing is to be done on one side or both execution of an MG self-test. sides. 5.3.2.1 Pattern setting 5.3.2.3 Times This printer has nine types of built-in printing patterns. - Page 43 5.3.3.6 Registers (10) Cam Mo-Platen (Heater Cam Motor - Platen) The heater cam motor rotates, keeps pressing the platen This printer has four temperature-detecting thermistors: for about 3 seconds, leaves the platen, then goes back to (1) Retransfer heat roller thermistor the standby position.
-
Page 44: Wiring Diagram
Wiring diagram 1-44 (No.HD003<Rev.004>) -
Page 45: Block Diagram
Block diagram (No.HD003<Rev.004>)1-45... -
Page 46: Troubleshooting Sheet
Troubleshooting Sheet Rev. 1.0 Customer Details Device Info. Company Department Model Printer In-charge Serial No. Printer Note 1) In-charge Purchase date Printer Details of Trouble (Multiple entries allowed) Frequency of Occurrence (Multiple entries allowed) Timing of Occurrence (Multiple entries allowed) A: Does not switch to the Ready mode. - Page 47 Distributor : DAI NIPPON PRINTING CO., LTD.
Need help?
Do you have a question about the CX-D80D and is the answer not in the manual?
Questions and answers