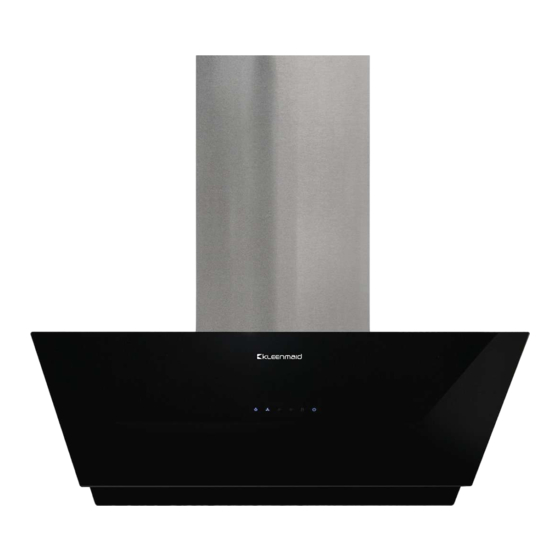
Kleenmaid RHGV90 Instructions For Use And Warranty Details
Wall mounted rangehood, cooking collection
Hide thumbs
Also See for RHGV90:
- Instructions for use and warranty details (17 pages) ,
- Instructions for use and warranty details (17 pages)

Subscribe to Our Youtube Channel
Related Manuals for Kleenmaid RHGV90


Summary of Contents for Kleenmaid RHGV90
- Page 1 Instructions for use and warranty details To register your warranty or make a warranty claim, scan this QR code: Wall Mounted Rangehood Model No.: RHGV90...
- Page 2 Once installation is complete, please read this instruction manual carefully and get to know the controls and the features of your new Kleenmaid appliance. These simple instructions will enable you to achieve excellent results from the very first time you use it.
-
Page 3: Recommendations And Suggestions
RECOMMENDATIONS AND SUGGESTIONS NOTE: Before making preparations for or commencing installation, the installer should refer to the current online version of the User Manual, which is available on the Kleenmaid website (see back cover for details). INSTALLATION The manufacturer will not be held liable for any damages resulting from incorrect or improper installation. - Page 4 COMPONENTS Ref. Qty. Product Components Hood Body, complete with: Controls, Light, Blower, Filter. Lower Decorative Chimney Upper Decorative Chimney Qty . Ref. Installation Components Screws 5 x 50 Wall Plugs Screws Hood fixing bracket ( optional ) Chimney fixing bracket ( 0 / 1 optional ) Qty.
- Page 5 DIMENSIONS Min. Min.
-
Page 6: Installation
INSTALLATION WALL DRILLING AND BRACKET FIXING As a first step, proceed with the following drawings: A vertical line up to the ceiling or up to the upper limit, at the center of the area in which the hood is to be fitted. A horizontal line A at 1320 –... -
Page 7: Ducted Version Air Exhaust System
Mark a point (3) on the horizontal line C, mm to the right of the vertical reference line. Repeat this operation on the other side, checking that the two marks are Fix the brackets Drill at the marked points (1) (2) (3), using a ɸ10 mm drill bit. Insert the Wall Plugs 11 into the holes (1) (2) (3). -
Page 8: Chimney Assembly
CHIMNEY ASSEMBLY The chimney can only be installed with hood. Lower Decorative Chimney Fix a Chimney fixing bracket 21 onto the Lower Decorative Chimney with 2 screws 12 x 9.5) supplied with the hood. Slightly widen the two sides of the flue and hook them onto the hood body, making sure that they are well seated. -
Page 9: Control Panel
CONTROL PANEL Button Function Remarks Turns the Motor ON. When is off. Enable shutdown the Motor with a 3 When is on. delay lashes. Turns the Motor OFF. When is flashing. Turns the Motor on at speed . Buttons are on. Turns the Motor on at speed Buttons... - Page 10 MAINTENANC FILTERS...
- Page 11 Open the co panels pulling them downwards. REMOVE Remove the metal grease filters Remove the saturated filter . Fit the new filters. Replace the metal grease filters. REMOVE Close the co panel...
-
Page 12: Light Replacement
LIGHTING LIGHT REPLACEMENT 1.5W LED light. Max Power Voltage Picture Lamp Cap ILCOS D code Disconnect he light. DISPOSAL OF OLD ELECTRICAL APPLIANCES The European directive 2012/19/EU on Waste Electrical and Electronic Equipment (WEEE), requires that old household electrical appliances must not be disposed of in the normal unsorted municipal waste appliances must be collected separately in order to optimize the recovery and recycling of the materials they contain, and reduce the impact on human health and the environment. -
Page 13: Troubleshooting
TROUBLE SHOOTING Fault Cause Solution The capacitor is damaged. Replace capacitor. Light on, but The motor is damaged. Replace motor. motor does not The internal wiring of motor is cut off/ work Replace motor. disconnected. An unpleasant smell may be produced. Apart from the above mentioned, check the following: Both light and Light damaged. - Page 14 ’s ’s ’ Product ceases to carry the original manufacturer’s serial number or is sold at an auction;...
- Page 15 Replacement items are “ for like” and is not “new for old” and does not indicate in any way that a faulty Product will be “Like for like” may eithe ‘ ’ Competition and Consumer Act 2010...
- Page 16 Other products available in the Kleenmaid range of appliances Washing machines Clothes dryers Dishwashers Ovens Cooktops Steam ovens Microwave ovens Built in espresso coffee machines Rangehoods Freestanding ovens Refrigerators & Freezers Beverage Serving Cabinets Water Dispensers Vacuum Cleaners Compass Capital Services Pty Limited...
Need help?
Do you have a question about the RHGV90 and is the answer not in the manual?
Questions and answers