Table of Contents
Advertisement
Quick Links
Advertisement
Table of Contents

Related Manuals for Ultra-tow 57762


Summary of Contents for Ultra-tow 57762
- Page 1 Tag-Along Trailer Kit Owner’s Manual WARNING: Read carefully and understand all ASSEMBLY AND OPERATION INSTRUCTIONS before operating. Failure to follow the safety rules and other basic safety precautions may result in serious personal injury. Item #57762 READ & SAVE THESE INSTRUCTIONS...
- Page 2 Thank you very much for choosing an Ultra-Tow™ product! For future reference, please complete the owner’s record below: Serial Number/Lot Date Code: ________________________________ Purchase Date: ____________________________________________ Save the receipt, warranty, and this manual. It is important that you read the entire manual to become familiar with this product before you begin using it.
-
Page 3: Table Of Contents
Table of Contents Intended Use ............................4 Packaging Contents ..........................4 Technical Specifications ........................5 Important Safety Information ....................... 5 Specific Operation Warnings ....................... 6 Main Parts of Trailer ..........................7 Assembly Instructions ........................10 Before Each Use ..........................14 Operating Instructions ........................ -
Page 4: Intended Use
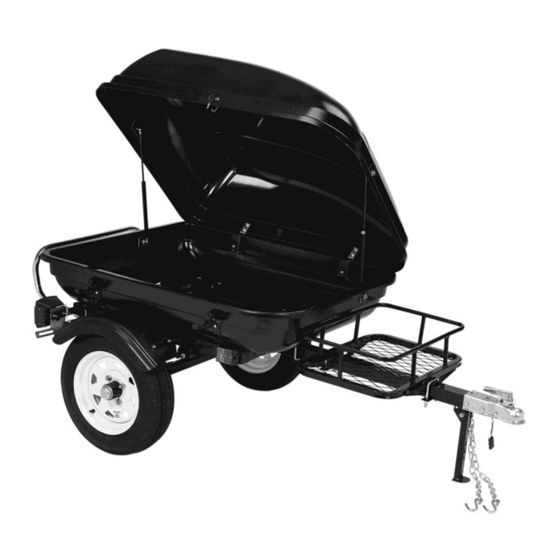
Intended Use The Ultra-Tow Tag-Along Trailer Kit adds 16 cubic feet of storage space to your car, truck, or motorcycle. There is a 600 lb. max capacity for the vehicle and a 200 lb. max for the motorcycle. The trailer features a lockable shell lid to keep items protected from damage as well as self-assisted hydraulic struts for easy opening. -
Page 5: Technical Specifications
Technical Specifications Property Specification Tow Ball (required) 1-7/8" (not supplied) Tire Air Pressure Maximum 60 PSI (cold) Capacity - Auto 600 lb. Capacity - Motorcycle 200 lb. Storage Space 16 Cubic Feet Important Safety Information ⚠WARNING Read and understand all instructions. Failure to follow all instructions may result in serious injury or property damage. -
Page 6: Specific Operation Warnings
⚠WARNING PERSONAL SAFETY Stay alert, watch what you are doing, and use common sense when operating the tool. Do not use the tool while you are tired or under the influence of drugs, alcohol, or medication. A moment of inattention while operating the tool may result in serious personal injury. -
Page 7: Main Parts Of Trailer
condition that may affect its safe operation. Do not use the Trailer even if minor damage appears. Before each use, always attach the Safety Chains of the trailer to the towing vehicle. Make sure the Safety Chains are attached to the towing vehicle with the equal length at each side. Do not allow the Safety Chains to drag on the ground. - Page 8 Page 8 of 28...
- Page 9 Part Description Qty. Part Description Qty. Trailer Body Bolt (M10 x 40) Leaf Spring Bolt (M12 x 80) Axle Bolt (M10 x 70) Hubs Bolt (M10 x 90) Tire Bolt (M6 x 45) Drawbar Washer (10) Coupler Washer (6) Safety Chain Washer (8) Side Running Light Lock Nut (M6)
-
Page 10: Assembly Instructions
Part Description Qty. Part Description Qty. Hinge Bracket Cooler Rack Gas Spring Mounting Plate Snap Latch Latch Body Bracket Stand Lock Bracket Bumper Bolt (M8 x 20) Spring Plate Latch Spring Bolt (M6 x 20) Assembly Instructions ⚠WARNING Beams have sharp edges. Wear work gloves to prevent cuts on hands and fingers. ... - Page 11 2. Use the bolts (25) and lock nuts (35) to fasten the leaf springs (2) onto the sides of the trailer body. Mount the leaf springs with the mounting eye facing towards the front of the trailer. See Figure B. Place the axle (3) on top of the leaf springs.
- Page 12 5. Place tires (5) onto the hubs (4) at the end of the axle. Lock tires into place using the lug nuts (38). Note: Use two jack stands (not included) to support the axle while the tires are being attached. 6.
- Page 13 9. The left tail light (10) and right tail light (11) are pre-wired but need to be attached to back of fenders, along with the license plate bracket (12). The tail light wire pigtails run from the fenders through the trailer body and connect to the wiring at the back of the drawbar. See Figure F. ⚠WARNING Use care to secure the tail light wiring inside the fenders and away from the tires.
-
Page 14: Before Each Use
⚠WARNING Make sure the rubber pads are placed between the underside of the body bracket and surface of trailer during assembly. 12. Use bolts (23), lock nuts (32), and washers (30) to fasten snap latches (18) to the top inside of the upper shell (14). -
Page 15: Operating Instructions
Always check to make sure the payload being transported properly and safely secured in the trailer. Load the Trailer evenly from side to side with 60% of the load forward of the Axle. Make sure the towing vehicle is capable of towing this trailer and its payload. Make sure the hitch on the towing vehicle is capable of towing the Trailer and its payload. - Page 16 4. Pull up and down on the coupler to make sure the hitch ball is fitting snugly in the coupler. There must be no play between the hitch ball and coupler. If there is play, tighten the adjusting nut until no play is present.
- Page 17 running lights (9), and tail lights (10L, 11R) at least every 100 miles. 10. Carry emergency flares and fire extinguisher, if required for operation in your state. Carry extra bulbs and fuses if towing the trailer at night over long distances. Glossary Accessory Weight- the combined weight of automatic transmission, power steering, power brakes, power windows, power seats, radio, and heater, to the extent that these items are available as...
- Page 18 Tire Markings Section Width- This number gives the width of the tire in inches; the larger the number, the wider the tire. (The markings on the example tire diagram show 4.80. The markings on your tire may differ.) Inner Diameter- This number gives the inner diameter of the tire in inches. This is also the rim diameter in inches.
- Page 19 Note: You may not find this information on all tires because it is not required by law. Tire Ply Composition and Materials Used- The number of plies indicates the number of layers of rubber-coated fabric in the tire. In general, the greater the number of plies, the more weight a tire can support.
- Page 20 7. If the tires’ pressure was not measured “cold”, then the pressure should be rechecked with the tires cold as soon as possible. Tire Size To maintain safety, only purchase new tires of the same size as the original tires. Look at the Tire and Loading Information Placard, the Specifications Chart in this manual, or the sidewall of the tire being replaced.
-
Page 21: After Each Use
Steps for Determining Correct Load Limit 1. Locate the statement “The weight of cargo should never exceed 271 kilograms or 600 pounds” on your vehicle’s placard. 2. That figure equals the available amount of cargo and luggage load capacity. 3. Determine the combined weight of luggage and cargo being loaded on the vehicle. That weight may not safely exceed the available cargo and luggage load capacity. - Page 22 slot in the bearing is completely full of grease. As you finish assembling the hub, be careful not to get any dirt or debris on any part of the assembly. Replace the dust hub cap over each bearing. Hitch Check the nuts, bolts, and other fasteners to ensure that the hitch remains secured to the tow vehicle and the coupler remains secured to the trailer.
-
Page 23: Troubleshooting
Troubleshooting General Handling 1. Use the driving gear that the towing vehicle manufacturer recommends for towing. 2. Drive at moderate speeds. This will place less strain on your tow vehicle and trailer. Trailer instability (sway) is more likely to occur as speed increases. Do not exceed 55 miles per hour when towing the trailer. -
Page 24: Parts Diagram
Parts Diagram Page 24 of 28... -
Page 25: Parts List
Parts List Part Description Qty. Part Description Qty. Trailer Body Bolt (M10 x 40) Leaf Spring Bolt (M12 x 80) Axle Bolt (M10 x 70) Hubs Bolt (M10 x 90) Tire Bolt (M6 x 45) Drawbar Washer (10) Coupler Washer (6) Safety Chain Washer (8) Side Running Light... -
Page 26: Replacement Parts
Part Description Qty. Part Description Qty. Fender R U-Bolt (10-85x78) Upper Shell Lug Nut Bottom Shell Rubber Pad Hinge Bracket Cooler Rack Gas Spring Mounting Plate Snap Latch Latch Body Bracket Stand Lock Bracket Bumper Bolt (M8 x 20) Spring Plate Latch Spring Bolt (M6 x 20) Replacement Parts... -
Page 27: Limited Warranty
Northern Tool and Equipment Company, Inc. ("We'' or "Us'') warrants to the original purchaser only ("You'' or "Your") that the Ultra-Tow product purchased will be free from material defects in both materials and workmanship, normal wear and tear excepted, for a period of one year from date of purchase. - Page 28 Distributed by: Northern Tool & Equipment Company, Inc. Burnsville, Minnesota 55306 www.northerntool.com Made in China Page 28 of 28...
Need help?
Do you have a question about the 57762 and is the answer not in the manual?
Questions and answers