Table of Contents
Advertisement
Available languages
Available languages
Quick Links
VDPC130
240-CHANNEL DMX CONTROLLER WITH JOG WHEELS
240-KANAALS DMX CONTROLLER MET JOG-WIELEN
CONTRÔLEUR DMX 240 CANAUX AVEC ROUES JOG
CONTROLADOR DMX DE 240 CANALES CON RUEDAS JOG
240-KANAL-DMX-STEUERGERÄT MIT JOG-RÄDERN
240 KANAŁOWY STEROWNIK DMX Z DWOMA POKRĘTŁAMI
USER MANUAL
GEBRUIKERSHANDLEIDING
NOTICE D'EMPLOI
MANUAL DEL USUARIO
BEDIENUNGSANLEITUNG
INSTRUKCJA OBSŁUGI
Advertisement
Table of Contents

Subscribe to Our Youtube Channel
Related Manuals for Velleman HQ Power VDPC130


Summary of Contents for Velleman HQ Power VDPC130
- Page 1 VDPC130 240-CHANNEL DMX CONTROLLER WITH JOG WHEELS 240-KANAALS DMX CONTROLLER MET JOG-WIELEN CONTRÔLEUR DMX 240 CANAUX AVEC ROUES JOG CONTROLADOR DMX DE 240 CANALES CON RUEDAS JOG 240-KANAL-DMX-STEUERGERÄT MIT JOG-RÄDERN 240 KANAŁOWY STEROWNIK DMX Z DWOMA POKRĘTŁAMI USER MANUAL GEBRUIKERSHANDLEIDING NOTICE D’EMPLOI MANUAL DEL USUARIO BEDIENUNGSANLEITUNG...
-
Page 2: Safety Instructions
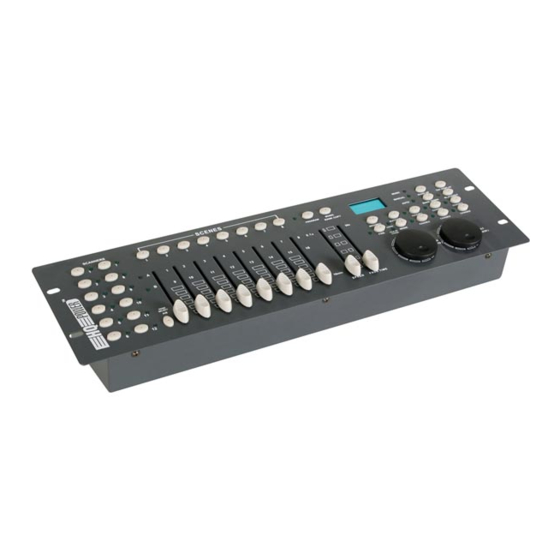
• All modifications of the device are forbidden for safety reasons. • Only use the device for its intended purpose. All other uses may lead to short circuits, burns, electroshocks, crash, etc. Using the device in an unauthorized way will void the warranty. VDPC130_v3 VELLEMAN... - Page 3 22. CHASER buttons (chaser 1 ~ chaser 6) 23. SPEED fader 24. FADE TIME fader 25. FINE button 26. PILE UP / CHASE LED 27A. PAN wheel 27B. TILT wheel 28. MODE button b. Rear Panel (fig. 2) VDPC130_v3 VELLEMAN...
- Page 4 XLR plug with a 120Ω resistor between pins 2 and 3, which is then plugged into the XLR output socket of the last device in the chain. Please see illustrations. f. Projector Addressing Projector Start Address Projector Start Address Projector Start Address VDPC130_v3 VELLEMAN...
-
Page 5: Operation
Select the desired scanner using the corresponding SCANNER button (1). Adjust the desired function through the faders. • Checking a BANK / SCENE Select the desired bank using the BANK buttons (16 and 17). Select the desired scene using the SCENE buttons (3). VDPC130_v3 VELLEMAN... - Page 6 Select the desired scanner using the SCANNER buttons (1). o Adjust the desired settings using the respective CHANNEL faders (4). o Press the MIDI / REC button (19) to prepare for saving. o Select the desired scene using the SCENE button (3) and save. VDPC130_v3 VELLEMAN...
- Page 7 Select the bank in which the scene will be copied using the BANK buttons (15 and 16). Select the scene you want to copy using the SCENE buttons (3). Press the MIDI / REC button (19) to copy the scene. All LEDs on the panel will flash. VDPC130_v3 VELLEMAN...
- Page 8 Select the bank where the scene is to be inserted using the BANK buttons (15 and 16). o Select the scene to be inserted using the SCENE buttons (3). o Press the MIDI / REC button (19) to insert the scene. All the LEDs on the panel will flash. VDPC130_v3 VELLEMAN...
- Page 9 Press and hold the MIDI / REC button (19) for about 2 seconds. o Select the respective MIDI channel (1 ~ 20) using the BANK buttons (15 and 16). o Press the MIDI / REC button (19) again to save the setting and to exit. VDPC130_v3 VELLEMAN...
-
Page 10: Cleaning And Maintenance
• De voedingskabel mag niet omgeplooid of beschadigd zijn. Laat uw dealer zo nodig een nieuwe kabel plaatsen. • Trek de stekker uit het stopcontact (trek nooit aan de kabel!) voordat u het toestel reinigt en als u het niet gebruikt. VDPC130_v3 VELLEMAN... -
Page 11: Algemene Richtlijnen
19. MIDI / REC 20. ASSIGN LED 21. AUTO / DEL 22. CHASER (chaser 1 ~ chaser 6) 23. SPEED schuifknop 24. FADE TIME schuifknop 25. FINE 26. PILE UP / CHASE LED 27A. PAN-wiel 27B. TILT-wiel 28. MODE VDPC130_v3 VELLEMAN... -
Page 12: Montage
XLR-stekker met een weerstand van 120Ω van pin 2 naar 3. Deze XLR- stekker wordt dan aangesloten op de XLR uitgang van het laatste toestel in de reeks. Zie de illustraties links. f. De projector adresseren Projector Startadres Projector Startadres Projector Startadres VDPC130_v3 VELLEMAN... - Page 13 Selecteer de gewenste scanner door middel van de overeenstemmende SCANNER-knop (1). Regel de gewenste functie door middel van de schuifknoppen. • Een BANK / SCÈNE controleren Selecteer de gewenste bank met de BANK-knoppen (16 en 17). Selecteer de gewenste scène met de SCÈNE- knoppen (3). VDPC130_v3 VELLEMAN...
- Page 14 Selecteer het te wijzigen programma met de BANK-knoppen (15 en 16). o Selecteer de gewenste scanner met de SCANNER-knoppen (1). o Configureer met de respectievelijke KANAAL-schuifknoppen (4). o Druk op MIDI / REC (19). o Selecteer de gewenste scène met de SCÈNE-knop (3) en bewaar. VDPC130_v3 VELLEMAN...
- Page 15 Selecteer de bank waarnaar u de scène wenst te kopiëren met de BANK-knoppen (15 en 16). Selecteer de te kopiëren scène met de SCÈNE-knoppen (3). Druk nu op MIDI / REC (19) om de scène te kopiëren. Alle LEDs op het paneel flitsen. VDPC130_v3 VELLEMAN...
- Page 16 Selecteer de bank waar u de scène wenst in te voegen met de BANK-knoppen (15 en 16). o Selecteer de in te voegen scène met de SCÈNE-knoppen (3). o Druk op MIDI / REC (19) om de scène in te voegen. Alle LEDs op het paneel flitsen. VDPC130_v3 VELLEMAN...
-
Page 17: Automatische Modus
Houd MIDI / REC (19) gedurende een tweetal seconden ingedrukt. o Selecteer de respectieve MIDI-kanalen (1 ~ 20) met de BANK-knoppen (15 en 16). o Druk opnieuw op MIDI / REC (19) om de instellingen te bewaren en om te verlaten. VDPC130_v3 VELLEMAN... -
Page 18: Reiniging En Onderhoud
• Cet appareil ressort à la classe de protection III. Cet appareil doit être utilisé avec un adaptateur secteur adapté. Contrôler régulièrement l’état de l’adaptateur secteur, du cordon d’alimentation et de l’appareil. • La tension réseau ne peut pas dépasser la tension mentionnée dans les spécifications à la fin de cette notice. VDPC130_v3 VELLEMAN... -
Page 19: Directives Générales
19. Bouton « MIDI / REC » 20. Témoin LED ASSIGN 21. Bouton « AUTO / DEL » 22. Boutons de POURSUITE (poursuite 1 ~ poursuite 6) 23. Glissière de VITESSE 24. Glissière du DÉLAI DU FONDU 25. Bouton FINE VDPC130_v3 VELLEMAN... -
Page 20: Installation
électrique. La terminaison DMX n’est rien d’autre qu’une fiche XLR avec une résistance de 120Ω de broche 2 vers broche 3 (voir illustration à gauche). Cette fiche XLR est connectée à la sortie XLR du dernier appareil de la série. VDPC130_v3 VELLEMAN... - Page 21 Toutes les LEDs clignoteront pour indiquer la sauvegarde de la configuration. 6. Emploi a. Le mode manuel Pour sélectionner le mode manuel, enfoncer le bouton AUTO / DEL (21) jusqu’à ce que la LED MANUAL (14) s’allume. VDPC130_v3 VELLEMAN...
- Page 22 Régler la vitesse à l’aide de la glissière SPEED (23) et la fréquence de répétition à l’aide de la glissière du DÉLAI DU FONDU (24). o Il est possible de régler la vitesse en enfonçant le bouton TAP (17) à deux reprises. Le délai entre deux pressions détermine la vitesse (jusqu’à 10 minutes). VDPC130_v3 VELLEMAN...
- Page 23 Maintenir enfoncé le bouton de PROGRAMMATION (11) et sélectionner votre poursuite à l’aide des boutons de sélection CHASER (22). o Enfoncer le bouton DISPLAY pour commuter vers le mode des scènes. Vérifier chaque scène individuellement en enfonçant le bouton BANK (15 et 16) respectif. VDPC130_v3 VELLEMAN...
- Page 24 Maintenir enfoncé le bouton AUTO / DEL (21) et le bouton CHASER (22) respectif pour effacer la poursuite. Toutes les LEDs clignoteront. • Effacement de toutes les poursuites ATTENTION : En sélectionnant cette fonction, toutes les poursuites programmées seront irrévocablement effacées. Cependant, les scènes et les programmes seront toujours disponibles. VDPC130_v3 VELLEMAN...
- Page 25 Sélectionner le banc qui sera contrôlé par la musique à l’aide des boutons BANK (15 et 16). o Ajuster le délai du fondu à l’aide de la glissière du DÉLAI DU FONDU (24). VDPC130_v3 VELLEMAN...
-
Page 26: Nettoyage Et Entretien
No tire este aparato (ni las pilas eventuales) en la basura doméstica; debe ir a una empresa especializada en reciclaje. Devuelva este aparato a su distribuidor o a la unidad de reciclaje local. Respete las leyes locales en relación con el medio ambiente. Si tiene dudas, contacte con las autoridades locales para eliminación. VDPC130_v3 VELLEMAN... -
Page 27: Instrucciones De Seguridad
4. Conmutadores deslizantes de CANAL: Ajuste de los valores DMX. Es posible ajustar los canales 1 ~ 8 al pulsar el botón de escáner correspondiente. Es posible ajustar los canales 9 ~ 16 al pulsar el botón de la selección de la página. VDPC130_v3 VELLEMAN... -
Page 28: Instalación
Un sobrecalentamiento podría dañar el aparato. Fije el VDPC130 con cuatro tornillos M6. Introduzca el adaptador de red en la toma de entrada CC (35) del aparato. Conecte el adaptador a la red eléctrica. VDPC130_v3 VELLEMAN... - Page 29 • Ajuste el conmutador deslizante FADE TIME (24) para seleccionar el canal de control (p.ej. la rueda PAN (27A) o TILT (27B)). • Para configurar los canales 19 y 20, pulse el botón de selección de la página (10). El indicador LED de la PÁGINA B (9) se ilumina. Repita los dos pasos anteriores. VDPC130_v3 VELLEMAN...
- Page 30 Un banco consta de diferentes escenas que se reproducirán sucesivamente. El VDPC130 le permite programar hasta 30 bancos de 8 escenas cada uno. • Atribuir una rueda a un canal o Seleccione el canal. o Pulse MIDI / REC (19) para confirmar. VDPC130_v3 VELLEMAN...
- Page 31 Pulse el botón MUSIC / BANK COPY (12) para copiar el banco. Todos los LEDs se iluminarán. c. Chaser Un chaser consta de una secuencia de diferentes bancos que se reproducirán sucesivamente. Con el VDPC130, es posible programar hasta 6 chaser de 240 escenas cada uno. VDPC130_v3 VELLEMAN...
- Page 32 Si quiere introducir una escena entre escena 5 y 6, pulse el botón BANK UP / DOWN (15 ó 16) hasta que STEP05 se visualice. Pulse el botón MIDI / REC (19). La escena siguiente se visualiza. Seleccione el banco en que quiere introducir la escena con los botones BANK (15 y 16). VDPC130_v3 VELLEMAN...
- Page 33 Seleccione la escena que quiere copiar con los botones SCENE (3). o Pulse el botón MIDI / REC (19). o Seleccione el banco al que quiere copiar la escena con los botones BANK (15 y 16). o Pulse el botón SCENE (3) deseado. Todos los LEDs parpadearán. VDPC130_v3 VELLEMAN...
-
Page 34: Modo Automático
4. Limpie el aparato regularmente con un paño húmedo sin pelusas. Evite el uso de alcohol y de disolventes. 5. El usuario no habrá de efectuar el mantenimiento de ninguna pieza. 6. Contacte con su distribuidor si necesita piezas de recambio. VDPC130_v3 VELLEMAN... -
Page 35: Especificaciones
Grifffläche an und ziehen Sie nie an der Netzleitung. • Schließen Sie die Stromversorgung immer zuletzt an. • Bei Schäden verursacht durch eigenmächtige Änderungen erlischt der Garantieanspruch. • Halten Sie Kinder und Unbefugte vom Gerät fern. VDPC130_v3 VELLEMAN... -
Page 36: Allgemeine Richtlinien
18. BLACKOUT-Taste: Verdunkelt die Lichtausbeute von allen angeschlossenen Scheinwerfern über den Shutter. 19. MIDI / REC-Taste 20. ASSIGN LED 21. AUTO/DEL-Taste 22. CHASER-Taste (Chaser 1 ~ Chaser 6) 23. GESCHWINDIGKEITSBLENDREGLER 24. FADE TIME Blendregler 25. FINE-Taste 26. PILE UP / CHASE LED VDPC130_v3 VELLEMAN... - Page 37 Kabel lang ist oder in einer Umgebung mit vielem elektrischem Rauschen (z.B. Discos). Der Abschlusswiderstand verhindert Störung des digitalen Steuersignals durch elektrisches Rauschen. Der DMX-Abschlusswiderstand ist nur eine XLR-Buchse mit einem 120Ω Widerstand zwischen 2 und 3, die den XLR-Ausgang des letzten Geräts in der Kette angeschlossen wird. Siehe Abbildung. VDPC130_v3 VELLEMAN...
-
Page 38: Bedienung
• Drücken Sie gleichzeitig MODUS (28) und TAP / DISPLAY (17) um Ihre Einstellungen zu speichern. Alle LEDs auf dem Bedienfeld werden blinken wenn die Einstellungen gespeichert sind. 6. Bedienung a. Manueller Modus Um den manuellen Modus zu selektieren, drücken Sie die AUTO / DEL-Taste (21) bis die MANUAL LED (14) aufleuchtet. VDPC130_v3 VELLEMAN... - Page 39 Drücken Sie die BANK-Tasten (15 & 16) und wählen Sie die gewünschte Speicherbank. o Drücken Sie die AUTO / DEL-Taste (21). Die Auto LED wird aufleuchten. o Regeln Sie die Geschwindigkeit mit dem GESCHWINDIGKEITSBLENDREGLER (23) und die Wiederholdungsrate mit dem FADE TIME-Blendregler (24). VDPC130_v3 VELLEMAN...
- Page 40 Chasergeschwindigkeit, indem Sie die TAP-Taste (17) zweimal drücken. Das Zeitintervall zwischen zwei Tastendrücken bestimmt die Geschwindigkeit (bis zu 10 Minuten). o Drücken Sie die MIDI / REC-Taste (19) und wählen Sie die gewünschte Aufnahme mit den SCANNER- Auswahltasten (1). VDPC130_v3 VELLEMAN...
- Page 41 Drücken Sie die TAP / DISPLAY-Taste (17) um auf den Schritt-Modus umzuschalten. Wählen Sie die zu löschende Szene mit den BANK-Tasten (15 und 16). Drücken Sie die AUTO / DEL-Taste (21) um die Szene zu löschen. Alle LEDs auf dem Bedienfeld werden blinken. VDPC130_v3 VELLEMAN...
- Page 42 Wählen Sie den gewünschten CHASER mit den Auswahltasten (21). o Drücken Sie die SZENE-Taste (3), die mit der zu löschenden Szene übereinstimmt. o Die Szene ist gelöscht worden. Alle LEDs auf dem Bedienfeld werden blinken. All 240 DMX-Kanäle der gelöschten Szenen werden auf 0 eingestellt. VDPC130_v3 VELLEMAN...
-
Page 43: Auto Modus
5. Es gibt keine wartbaren Teile außer der Lampe und der Sicherung. 6. Bestellen Sie eventuelle Ersatzteile bei Ihrem Fachhändler. 8. Technische Daten Stromversorgung 9-12VDC, 500mA Stromverbrauch max. 4W DMX EIN/AUS 3-polige(r) XLR Buchse/Stecker MIDI-Eingang 5-poliger DIN-Anschluss Abmessungen 19” x 132 x 80mm Gesamtgewicht 2.5kg Alle Änderungen vorbehalten. VDPC130_v3 VELLEMAN... -
Page 44: Wskazówki Ogólne
• Wybieraj miejsca pracy wolne od wysokiej temperatury, dużego zapylenia oraz wilgotności. • Zapoznaj się z instrukcją obsługi zanim rozpoczniesz pracę z urządzeniem. Nie dopuszczaj do obsługi urządzenia osób niewykwalifikowanych. Wiele szkód urządzenia wynika z nieprofesjonalnego i niezgodnego z przeznaczeniem użytkowaniem produktu. • Do transportu używaj tylko oryginalnego opakowania. VDPC130_v3 VELLEMAN... -
Page 45: Opis Produktu
50. FADE TIME fader - suwak wykorzystywany do kontroli czasu przejścia jednej sceny w następną 51. FINE - przełącznik włączania precyzyjnej regulacji pokręteł. 52. PILE UP / CHASE LED 27A. PAN - pokrętło panoramy. 27B. TILT - pokrętło kąta pochylenia. 28. MODE - przycisk trybu pracy. VDPC130_v3 VELLEMAN... - Page 46 DMX ( dyskoteki). Terminator zapobiega uszkodzeniu lub utracie sygnału sterującego DMX. Budwa terminatora DMX jest bardzo prosta. Wystarczy pomiędzy nóżki 2 i 3 wlutowac rezystor 120Ω we wtyczce żeńskiej XLR. Terminator podłącza się do ostatniego urządzenia w sieci DMX. Patrz na rysunek. VDPC130_v3 VELLEMAN...
- Page 47 • Aby zapamiętać ustawione parametry jednocześnie wciśnij i przytrzymaj przyciski MODE (28) oraz TAP DISPLAY (17). Przyjęcie danych zostanie zasygnalizowane pulsowaniem diod LED. 6. Działanie. a. Tryb ręczny MANUAL MODE. Aby wybrać ręczny tryb pracy wciśnij przycisk AUTO / DEL (21) dopóki się nie zaświeci dioda MANUAL LED (14). VDPC130_v3 VELLEMAN...
- Page 48 Aby wyjść z trybu programowania wciśnij ponownie i przytrzymaj przycisk PROGRAM (11). • Uruchamianie programu. o Za pomocą przycisków wyboru banku BANK UP (15) /BANK DOWN (16) wybierz bank, który chcesz odtworzyć. o Naciśnij przycisk AUTO / DEL (21). Dioda LED AUTO zaświeci się. VDPC130_v3 VELLEMAN...
- Page 49 Możesz zaprogramować kolejny krok sekwencji scen. Wybierz kolejna scenę, którę chcesz zaprogramować powtarzając trzy poprzednie kroki. Pamiętaj, że jedna sekwecja scen CHASER może pomieścić do 240 scen. o Aby wyjść z trybu programowania i zapamiętać sekwencje sen wciśnij i przytrzymaj przycisk PROGRAM (11). VDPC130_v3 VELLEMAN...
- Page 50 BANK UP (15) /BANK DOWN (16) wybieraj kolejno sceny, aż na wyświetlaczu pojawi się STEP05. Wciśnij przycisk MIDI / REC (19), aby przygotować scene do wstawienia. Wyświetlacz wyświetli kolejny numer sceny. VDPC130_v3 VELLEMAN...
- Page 51 Aby wsyawić scenę wciśnij przycisk MIDI / REC (19). Wszystkie diody LED na panelu zaświecą się. • Kopiowanie scen. o Wejdź w tryb programowania przez naciśniecie i przytrzymanie przycisku PROGRAM (11) przez 2 sekundy dopóki nie zacznie pulsować dioda PROGRAM LED. VDPC130_v3 VELLEMAN...
- Page 52 Wciśnij przycisk CHASER (22). Sterownik DMX VDPC130 uruchamis się automatycznie w trybie AUTO MODE. Możesz wybrać kilka kolejnych sekwencji scen, które będą odtwarzane jedna po drugiej. o Za pomocą suwaków SPEED (23) oraz FADE TIME (24) możesz wyregulować czas trwania oraz czas przejścia pomiędzy scenami. VDPC130_v3 VELLEMAN...
-
Page 53: Czyszczenie I Konserwacja
Zasilanie 9-12VDC, 500mA. Pobór mocy max. 4W. 3-pin XLR żeńskie / męskie. Złacza DMX wej./ wyj. MIDI wej. 5-pin DIN Wymiary 19” x 132 x 80mm Waga 2.5kg Informacje zawarte w niniejszym podręczniku mogą ulec zmianie bez uprzedzenia. VDPC130_v3 VELLEMAN... - Page 54 Tous nos produits répondent à des exigences de qualité rigoureuses et à des • Velleman® can decide to replace an article with an equivalent article, or to dispositions légales en vigueur dans l’UE. Afin de garantir la qualité, nous refund the retail value totally or partially when the complaint is valid and a soumettons régulièrement nos produits à...
- Page 55 - daños causados por reparaciones o modificaciones efectuadas por una tercera persona sin la autorización explicita de SA Velleman® ; - se calcula gastos de transporte de y a Velleman® si el aparato ya no está cubierto por la garantía.
Need help?
Do you have a question about the HQ Power VDPC130 and is the answer not in the manual?
Questions and answers