Table of Contents
Advertisement
Available languages
Available languages
Quick Links
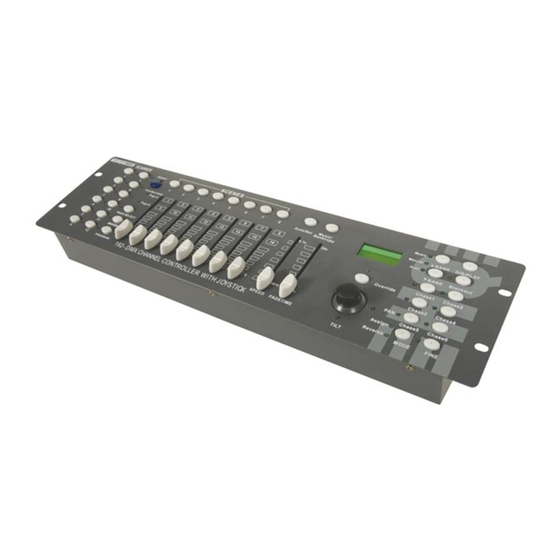
VDPDMXC174 – 192-CHANNEL DMX CONTROLLER WITH JOYSTICK
1. Introduction & Features
To all residents of the European Union
Important environmental information about this product
This symbol on the device or the package indicates that disposal of the device after its lifecycle could harm
the environment.
Do not dispose of the unit (or batteries) as unsorted municipal waste; it should be taken to a specialised
company for recycling.
This device should be returned to your distributor or to a local recycling service.
Respect the local environmental rules.
If in doubt, contact your local waste disposal authorities.
Thank you for buying the VDPDMXC174! Please read the manual thoroughly before bringing this device into service.
If the device was damaged in transit, don't install or use it and contact your dealer.
2. Safety Instructions
Be very careful during the installation: touching live wires can cause life-threatening electroshocks.
Keep this device away from rain and moisture.
Unplug the mains lead before opening the housing.
• Damage caused by disregard of certain guidelines in this manual is not covered by the warranty and the dealer
will not accept responsibility for any ensuing defects or problems.
• A qualified technician should install and service this device.
• Do not switch the device on immediately after it has been exposed to changes in temperature. Protect the device
against damage by leaving it switched off until it has reached room temperature.
• Make sure that the available voltage does not exceed the voltage stated in the specifications of this manual.
• Do not crimp the power cord and protect it against damage. Have an authorised dealer replace it if necessary.
• Disconnect the device from the mains to clean it or when it is not in use. Handle the power cord by the plug only.
• Note that damage caused by user modifications to the device is not covered by the warranty.
• Keep the device away from children and unauthorised users.
3. General Guidelines
• This device is designed for professional use on stage, in discos, theatres, etc. The VDPDMXC174 should only be
used indoors and be connected to a current of max. 9-12VDC / 500mA.
• Do not shake the device. Avoid brute force when installing or operating the device.
• Select a location where the device is protected against extreme heat (see "Technical Specifications"), dust and
moisture. Respect a minimum distance of 0.5m between the device's light output and any illuminated surface.
• Familiarise yourself with the functions of the device before actually using it. Do not allow operation by unqualified
people. Any damage that may occur will most probably be due to unprofessional use of the device.
• Use the original packaging if the device is to be transported.
• All modifications of the device are forbidden for safety reasons.
• Only use the device for its intended purpose. All other uses may lead to short circuits, burns, electroshocks,
crash, etc. Using the device in an unauthorised way will void the warranty.
VDPDMXC174
1
VELLEMAN
Advertisement
Table of Contents

Related Manuals for Velleman HQ Power VDPDMXC174


Summary of Contents for Velleman HQ Power VDPDMXC174
- Page 1 • All modifications of the device are forbidden for safety reasons. • Only use the device for its intended purpose. All other uses may lead to short circuits, burns, electroshocks, crash, etc. Using the device in an unauthorised way will void the warranty. VDPDMXC174 VELLEMAN...
- Page 2 Press the Up / Down button to select one of the 30 banks. 16. Tap / Display Used to create a standard beat or to change the value mode between % and 0 ~ 255. 17. Blackout Button Tap to momentarily pause the whole output. VDPDMXC174 VELLEMAN...
-
Page 3: Display Information
DMX channels. In addition, two units can set up communication so that they can send or receive a complete file dump. • Display Information The LCD display contains a maximum of 2 lines, each of 8 characters. Below are the definitions: VDPDMXC174 VELLEMAN... - Page 4 • Programming a Scene 1. Enter the PROGRAM mode (See “Enabling the PROGRAM Mode”). 2. Check the blackout key and verify that the LED is not lit. If the LED is lit, press it once to exit the BLACKOUT mode. VDPDMXC174 VELLEMAN...
- Page 5 3. Select the scene you wish to copy by pressing its scene button. 4. Using the bank UP / DOWN button select the bank you wish to copy the scene to. 5. Tap the MIDI / REC button. 6. Tap the scene button you wish to copy the scene to. VDPDMXC174 VELLEMAN...
- Page 6 7. Once you have selected the scene you wish to add, press the MIDI / REC button again. All LEDs will flash three times indicating the new step has been inserted into the chase. VDPDMXC174 VELLEMAN...
- Page 7 1. Activate the ASSIGN or REVERSE mode. 2. Tap the scanner button to select the scanner you wish to delete. 3. Press the MODE and AUTO / DEL buttons simultaneously. All LEDs will flash three times indicating the requested operation has been performed. VDPDMXC174 VELLEMAN...
- Page 8 2. Use the bank UP / DOWN button to select a bank of scenes you wish to run. The scenes selected will run through sequentially to the beat of the music identified by the built-in microphone. 3. Tap the MUSIC / BANK COPY button again to exit MUSIC mode. VDPDMXC174 VELLEMAN...
-
Page 9: File Transfer
4. Disconnect the device from the mains prior to maintenance activities. 5. Wipe the device regularly with a moist, lint-free cloth. Do not use alcohol or solvents. 6. There are no user-serviceable parts. 7. Contact your dealer for spare parts if necessary. VDPDMXC174 VELLEMAN... -
Page 10: Technical Specifications
• Dit toestel is ontworpen voor professioneel gebruik op podia, in disco's, enz. U mag dit toestel enkel binnenshuis gebruiken en aansluiten op een spanning van maximum 9-12VDC / 500mA. • Schud het toestel niet dooreen. Vermijd brute kracht tijdens de installatie en de bediening van dit toestel. VDPDMXC174 VELLEMAN... - Page 11 Druk op deze knop op de uitgang te pauzeren. 18. Chase-knop (1 ~ 6) Activering van de chase van de geprogrammeerde scènes. 19. Fine-knop Wanneer deze is ingedrukt, dan kunt u met de pan of tilt joystick de scanner met de kleinste stappen besturen. VDPDMXC174 VELLEMAN...
- Page 12 Omkeren van kanalen 10 en 13 b. Opstelling • Opstelling van een toestel De VDPDMXC174 kent 16 kanalen per toestel toe. Om uw toestellen aan de scannerknoppen links van de controller toe te wijzen, houd 16 kanalen vrij per ingegeven toestel. VDPDMXC174 VELLEMAN...
- Page 13 10. Herhaal stap 2 tot 7 tot alle scanners geprogrammeerd zijn. 11. Wenst u verder geen andere toestellen meer in te geven, houd de PROGRAM-knop gedurende een drietal seconden ingedrukt om de PROGRAM-modus te verlaten. De LED dooft. VDPDMXC174 VELLEMAN...
- Page 14 4. Druk op UP / DOWN om de gewenste bank te selecteren. 5. Druk op MUSIC / BANK COPY, alle LEDs lichten eventjes op om aan te geven dat de functie voltooid is. 6. Om de modus te verlaten, houd de PROGRAM-knop gedurende een drietal seconden ingedrukt. VDPDMXC174 VELLEMAN...
- Page 15 1. Houd de PROGRAM-knop ingedrukt tot de LED oplicht. 2. Houd gelijktijdig de MODE- en de FINE-knop ingedrukt. De ASSIGN LED licht op. Licht de REVERSE LED op, druk opnieuw op FINE en MODE om u in de ASSIGN-modus te begeven. VDPDMXC174 VELLEMAN...
- Page 16 De LCD geeft het volgende weer: ONLY TIME TIME 3. Druk gelijktijdig op MODE en TAP / DISPLAY om de instelling op te slaan. Wenst u de instelling niet op te slaan, druk op BLACKOUT om te verlaten. VDPDMXC174 VELLEMAN...
-
Page 17: Automatische Modus
Een bestandsoverdracht laat toe alle informatie opgeslagen in uw VDPDMXC174 naar een tweede VDPDMXC174 te zenden. Koppel de toestellen met 3-pin XLR-kabels als volgt: Koppel de DMX OUT van het zendtoestel met de DMX IN van het ontvangsttoestel. VDPDMXC174 VELLEMAN... -
Page 18: Reiniging En Onderhoud
DMX IN / OUT 3-pin vrouwelijke / mannelijke XLR-stekker MIDI IN 5-pin DIN-stekker Afmetingen 482 x 134 x 85m Gewicht 2.7kg Max. omgevingstemperatuur 45°C De informatie in deze handleiding kan te allen tijde worden gewijzigd zonder voorafgaande kennisgeving. VDPDMXC174 VELLEMAN... -
Page 19: Prescriptions De Sécurité
• Toute modification de l’appareil est interdite pour des raisons de sécurité. • N’utilisez votre VDPDMXC174 qu’à sa fonction prévue. Tout autre usage peut causer des courts-circuits, des brûlures, des électrochocs etc. Un usage impropre annule d'office la garantie. VDPDMXC174 VELLEMAN... - Page 20 Activez le mode « ASSIGN » ou « REVERSE » en enfonçant simultanément les boutons « FINE » et « MODE ». b. Panneau arrière (voir ill. 2) 1. MIDI In Entrée des données MIDI. 2. DMX Polarity Select Sélection de la polarité DMX. VDPDMXC174 VELLEMAN...
- Page 21 Appareil Adresse DMX numérique Commutateurs DIP du scanner 1 sur ON 1 et 5 sur ON 1 et 6 sur ON 1, 5 et 6 sur ON 1 et 7 sur ON 1, 5 et 7 sur ON VDPDMXC174 VELLEMAN...
- Page 22 3. Veillez à ce que la page A soit sélectionnée. Enfoncez « PAGE SELECT » pour sélectionner la page. 4. Placez la première et la deuxième glissière au maximum. 5. Sélectionnez le banc 1 à l’aide des boutons « UP / DOWN ». 6. Enfoncez le bouton « MIDI / REC ». VDPDMXC174 VELLEMAN...
- Page 23 5. Enfoncez « MUSIC / BANK COPY ». Toutes les LEDs flashent trois fois pour indiquer que l’opération est réussite. 6. Maintenez enfoncé le bouton « PROGRAM » pendant trios secondes pour quitter le mode « PROGRAM ». VDPDMXC174 VELLEMAN...
- Page 24 • Effacement de toutes les poursuites 1. Débranchez l’appareil. Maintenez simultanément enfoncé « AUTO / DEL » et « DOWN ». 2. Rebranchez l’appareil. Toutes les poursuites ont été effacées. VDPDMXC174 VELLEMAN...
- Page 25 1. Débranchez l’appareil et enfoncez simultanément les boutons « MODE » et « TAP / DISPLAY ». 2. Rebranchez l’appareil. Enfoncez les boutons « TAP / DISPLAY » pour choisir entre « FADE TIME » et « ASSIGN FADE TIME ». Le résultat s’affiche sur le LCD. VDPDMXC174 VELLEMAN...
- Page 26 1. Enfoncez le bouton « MUSIC / BANK COPY » pour activer le mode « MUSIC ». 2. Sélectionnez la poursuite en enfonçant un des six boutons « CHASE ». Ceci activera la poursuite qui réagira au rythme de la musique. VDPDMXC174 VELLEMAN...
-
Page 27: Nettoyage Et Entretien
à 3 points / embase XLR mâle MIDI IN embase DIN à 5 points Dimensions 482 x 134 x 85m Poids 2.7kg Température amiante max. 45°C Toutes les informations présentées dans cette notice peuvent être modifiées sans notification préalable. VDPDMXC174 VELLEMAN... -
Page 28: Instrucciones De Seguridad
• Por razones de seguridad, las modificaciones no autorizadas del aparato están prohibidas. • Utilice sólo el VDPDMXC174 para las aplicaciones descritas en este manual a fin de evitar p.ej. cortocircuitos, quemaduras, descargas eléctricas, etc. Un uso desautorizado puede causar daños y anula la garantía completamente. VDPDMXC174 VELLEMAN... - Page 29 Active el modo « ASSIGN » o « REVERSE » al pulsar simultáneamente los botones « FINE » y « MODE ». b. Panel trasero (véase fig. 2) 1. MIDI In Entrada de datos MIDI. 2. DMX Polarity Select Selección de la polaridad DMX. VDPDMXC174 VELLEMAN...
- Page 30 1 en la posición ON 1 y 5 en la posición ON 1 y 6 en la posición ON 1, 5 y 6 en la posición ON 1 y 7 en la posición ON 1, 5 y 7 en la posición ON VDPDMXC174 VELLEMAN...
- Page 31 3. Asegúrese de que el rango A esté seleccionado. Pulse « PAGE SELECT » para seleccionar el rango. 4. Ponga el primer y el segundo deslizador en la posición máxima. 5. Seleccione el banco 1 con los botones « UP / DOWN ». 6. Pulse el botón « MIDI / REC ». VDPDMXC174 VELLEMAN...
- Page 32 5. Pulse « MUSIC / BANK COPY ». Todos los LEDs parpadean tres veces para indicar que la operación ha salido bien. 6. Mantenga pulsado el botón « PROGRAM » durante tres segundos para salirse del modo « PROGRAM ». VDPDMXC174 VELLEMAN...
- Page 33 • Borrar todos los chases 1. Desconecte el aparato. Mantenga pulsado simultáneamente « AUTO / DEL » y « DOWN ». 2. Vuelva a conectar el aparato. Todos los chases están borrados. VDPDMXC174 VELLEMAN...
- Page 34 1. Desconecte el aparato y pulse simultáneamente los botones « MODE » y « TAP / DISPLAY ». 2. Vuelva desconectar el aparato. Pulse los botones « TAP / DISPLAY » para seleccionar entre « FADE TIME » y « ASSIGN FADE TIME ». El resultado se visualiza en la pantalla LCD. VDPDMXC174 VELLEMAN...
- Page 35 1. Pulse el botón « MUSIC / BANK COPY » para activar el modo « MUSIC ». 2. Seleccione el chase al pulsar uno de los seis botones « CHASE ». Esto activará el chase que reaccionará al ritmo de la música. VDPDMXC174 VELLEMAN...
-
Page 36: Limpieza Y Mantenimiento
3 polos / XLR macho MIDI IN DIN de 5 polos Dimensiones 482 x 134 x 85m Peso 2.7kg Temperatura ambiente máx. 45°C Se pueden modificar las especificaciones y el contenido de este manual sin previo aviso. VDPDMXC174 VELLEMAN... -
Page 37: Einführung & Eigenschaften
• Nehmen Sie das Gerät erst in Betrieb, nachdem Sie sich mit seinen Funktionen vertraut gemacht haben. Lassen Sie das Gerät nicht von Personen bedienen, die sich nicht mit dem Gerät auskennen. Meist ist die Beschädigung des Gerätes das Ergebnis von unfachmännischer Bedienung. • Verwenden Sie die Originalverpackung, wenn das Gerät transportiert werden soll. VDPDMXC174 VELLEMAN... - Page 38 Drücken Sie diese Taste um den Ausgang zu pausieren. 18. Chase-Taste (1 ~ 6) Chase-Aktivierung der programmierten Chases. 19. Fine-Taste Wenn diese Taste gedrückt ist, können Sie mit dem Schwenk- oder Neigejoystick den Scanner mit den kleinsten Schritten steuern. VDPDMXC174 VELLEMAN...
-
Page 39: Bedienung
Zuteilen der Kanäle 4 und 5 Umkehren der Kanäle 10 und 13 b. Aufstellung • Gerät aufstellen Der VDPDMXC174 weist 16 Kanäle pro Gerät zu. Um Ihre Geräte an die Scannertaste links auf dem Steuergerät zuzuweisen, halten Sie 16 Kanäle pro Gerät frei. VDPDMXC174 VELLEMAN... - Page 40 Sie einen anderen. 10. Wiederholen Sie Schritt 2 bis 7 bis alle Scanner programmiert sind. 11. Wenn Sie keine anderen Geräte eingeben wollen, halten Sie die PROGRAMM-Taste einige Sekunden gedrückt um den Programmmodus zu verlassen. Die LED erlischt. VDPDMXC174 VELLEMAN...
- Page 41 2. Schalten Sie das Gerät ein. Alle Szenen sind gelöscht. • Eine vollständige Bank mit Szenen kopieren 1. Schalten Sie den Programmmodus ein. 2. Drücken Sie UP / DOWN bis Sie die gewünschte Bank erreicht haben. 3. Drücken Sie MIDI / REC. VDPDMXC174 VELLEMAN...
- Page 42 2. Halten Sie AUTO / DEL und die CHASE-Taste gedrückt. Alle LEDs blinken dreimal als Anzeige, dass die Aufgabe ausgeführt ist. • Alle Chases löschen 1. Bei einem ausgeschalteten Gerät, halten Sie die AUTO / DEL und die DOWN-Taste zur gleichen Zeit gedrückt. 2. Schalten Sie das Gerät erneut ein. Alle Chases sind gelöscht worden. VDPDMXC174 VELLEMAN...
- Page 43 1. Bei einem ausgeschalteten Gerät, drücken Sie gleichzeitig MODE und TAP / DISPLAY. 2. Schalten Sie das Gerät ein und drücken Sie TAP / DISPLAY um zwischen FADE TIME und ASSIGN FADE TIME zu wählen. Das LCD zeigt das folgende: VDPDMXC174 VELLEMAN...
-
Page 44: Musikgesteuerter Modus
3. Verwenden Sie den SPEED- und FADE TIME-Schiebeschalter um die Chase nach Wunsch einzustellen. • Musikgesteuerter Modus 1. Drücken Sie MUSIC / BANK COPY um den Modus einzuschalten. 2. Wählen Sie die gewünschte Chase mit der entsprechenden Chase-Taste. Das schaltet die Chase ein und lässt sie im Takt der Musik bewegen. VDPDMXC174 VELLEMAN... -
Page 45: Reinigung & Wartung
7. Bestellen Sie eventuelle Ersatzteile bei Ihrem Fachhändler. 7. Technische Daten Stromversorgung 9-12VDC / 500mA DMX IN / OUT 3-polig XLR-Stecker/Buchse MIDI IN 5-poliger DIN-Stecker Abmessungen 482 x 134 x 85m Gewicht 2.7kg Max. Umgebungstemperatur 45°C Alle Änderungen vorbehalten. VDPDMXC174 VELLEMAN...
Need help?
Do you have a question about the HQ Power VDPDMXC174 and is the answer not in the manual?
Questions and answers