Table of Contents
Advertisement
Advertisement
Table of Contents

Related Manuals for Motic SMZ-171 BL


Summary of Contents for Motic SMZ-171 BL
- Page 2 We are constantly endeavoring to improve our instruments and to adapt them to the requirements of modern research techniques and testing methods. This involves modification to the mechanical structure and optical design of our instruments. Therefore, all descriptions and illustrations in this instruction manual, including all specifications are subject to change without notice.
-
Page 3: Table Of Contents
TABLE OF CONTENTS Section Page INTRODUCTION Nomenclature UNPACKING AND ASSEMBLING THE MICROSCOPE Unpacking the Microscope Assembling the Microscope MICROSCOPE ALIGNMENT AND OPERATION Interpupillary Distance Focusing the Microscope Magnification and Working Distance Changing the Bulb KNOWING YOUR MICROSCOPE Stereo Body with Binocular or Trinocular Head Stand External Illuminator Eyepieces and Auxiliary Objectives... -
Page 4: Introduction
1. INTRODUCTION The Motic SMZ-171 series stereomicroscopes are high performance Greenough design stereomicroscopes with continuous zoom ranges of 6.7:1. The microscopes in this series allow continuous variable magnification between 7.5X-50X, while total magnification varies from 2.25X to 200X depending on the eyepieces and auxiliary objectives used. With the bilateral zoom knobs, users are able to adjust magnification while the microscope remains perfectly parfocal. -
Page 5: Nomenclature
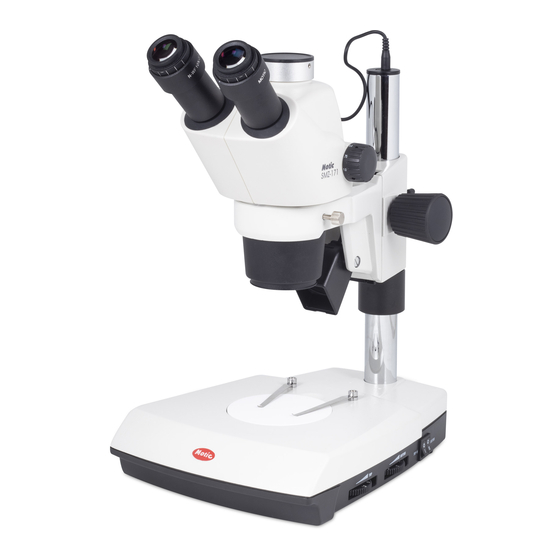
1.1 Nomenclature SMZ-171 BL (Fig.1) SMZ-171 TL (with ESD) (Fig.2) -
Page 6: Unpacking And Assembling The Microscope
2. UNPACKING AND ASSEMBLING THE MICROSCOPE 2.1 Unpacking the Microscope The components for SMZ-171 stereomicroscopes are shipped detached for protection. Open the Styrofoam packing with care and do not leave any components attached to the packing being removed. Do not discard any of the packing materials until all of the components have been identified. If any damage occurs during transit, contact both the carrier and your supplier immediately. -
Page 7: Microscope Alignment And Operation
3. MICROSCOPE ALIGNMENT AND OPERATION 3.1 Interpupillary Distance Adjust the two eyepiece tubes until only one circular field can be seen through the two eyepieces. If two separate circles appear, the interpupillary distance is too large; if two overlapping circles appear, the interpupillary distance is too small. -
Page 8: Magnification And Working Distance
3.2.3 Turn the zoom to the lowest magnification. Adjust the right eyepiece diopter until the image seen through the right eyepiece is clear and sharp. 3.2.4 Repeat the procedure for the left eyepiece. Next, check the image focus for the entire zoom range;... - Page 9 3.4.3 For transmitted light, turn the microscope over so that the bottom plate of the stand faces towards the user. Remove the bottom plate with the supplied Allen key, unplug the lamp collector piece, remove the old LED circuit board from the socket and carefully plug in the new LED circuit board.
-
Page 10: Knowing Your Microscope
For the SMZ-171 stereomicroscopes, the binocular or trinocular tubes are built into the stereo body to form a single unit called a “Stereo-head”. The SMZ-171 BL (Fig.1) is equipped with a binocular tube while the SMZ-171 TL (Fig.2) is equipped with a trinocular tube. -
Page 11: Stand
4.1.3 Trinocular tube for the SMZ-171T ● The procedures for adjusting the interpupillary distance and securing the eyepieces are the same for the trinocular tube as they are for the binocular tube. ● By turning the knob at the left side of the trinocular tube, all the light from the right eyepiece tube will be deflected into the phototube for the attached imaging device. - Page 12 (Fig.8) ● Optional with ESD feature ● The head holder can be moved freely along the vertical post and be removed totally from the stand. The diameter of the post is 32mm. ● This stand is installed with built-in transmitted light (3W LED) and incident light (3W LED) illuminators.
- Page 13 (Fig.10) (Fig.11) ● Besides the black and the white stage plate, a frosted glass stage plate is provided for transmitted light. 4.2.2 LED stand with Arm version (Fig.2) ● Basically the same as the “Pole version” stand except that the head holder cannot be moved freely along the arm and cannot be removed from the stand.
-
Page 14: External Illuminator
4.3.3 A 3W LED ring light illuminator for Motic SMZ-171 stereomicroscopes also is available. 4.4 Eyepieces and Auxiliary Objectives 4.4.1 There are N-WF eyepieces with high eye-point of different magnifications to choose from including 10X, 12.5X, 15X and 20X. -
Page 15: Other Accessories
4.4.4 Add an additional objective to the microscope at the bottom part of the stereo-head and screwing an additional objective onto the stereo head. The height of the microscope must be re- adjusted as the working distance will change when an additional objective is attached. Other Accessories 4.5.1 For the SMZ-171 there are various accessories designed for various applications:... - Page 16 Photo adapter SY10 ● Attaches to the top of the trinocular tube, allowing any SLR camera to be connected to the microscope for imaging purposes. ● The SY10 adapter for the selected camera has to be screwed into the adapter before connecting to the camera.
-
Page 17: Cleaning And Caring For The Microscope
5. CLEANING AND CARING FOR THE MICROSCOPE To keep the microscope in good working order avoid, dust and water. If any dust or water happens to get into the microscope, fungus will grow, damaging the microscope. Please note that once fungus has grown, even after cleaning, the problem may reoccur. -
Page 18: Moving The Microscope
Under no circumstances should users clean any lens surface with a dry cotton swab, dry cloth or dry lens paper as this will scratch the lens surface causing irreparable damage. Water is not recommended for cleaning lenses as it will leave water stains on the lens surface possibly leading to fungus growth causing irreparable damage. -
Page 19: Appendix 1: Smz-171 Specifications
APPENDIX 1: SMZ-171 SPECIFICATIONS Model SMZ-171 BL SMZ-171TL Optical system Greenough Binocular head 45°/ 60° Observation angle Magnification rang 0.75X--5X (standard) Zoom ratio 1:6.7 N-WF, high eye-point 10X(Ф23), Diopter adjustable Eyepiece interchangeable with biological eyepieces N-WF 12.5X(Ø18), 15X(Ф16), 20X(Ф13) for optional... - Page 21 Fax: 86-0592-562 7855 © 2000-2012 Motic China Group Co., Ltd. All rights reserved. Motic is a registered trademark and service mark of Motic China Group Co., Ltd. Microsoft Windows logo is a registered trademark of Microsoft Corporation. All other trademarks are the property of their respective owners.
Need help?
Do you have a question about the SMZ-171 BL and is the answer not in the manual?
Questions and answers