Table of Contents
Advertisement
Quick Links
Advertisement
Chapters
Table of Contents

Related Manuals for Datamax PrintPAD Series


Summary of Contents for Datamax PrintPAD Series
- Page 1 110288 000 PrintPAD MC65 User Guide...
-
Page 2: Table Of Contents
ABLE OF ONTENTS PrintPAD MC65 Printer Views ....................1 Open View..........................1 Closed View..........................1 Using Batteries: General Guidelines ..................1 Installing and/or Replacing Batteries ..................2 Charging the Batteries and Handheld Computer ..............2 Determining Battery Condition ....................3 Installing the Driver ........................3 Using a Handheld Computer (HHC) ................... -
Page 3: Printpad Mc65 Printer Views
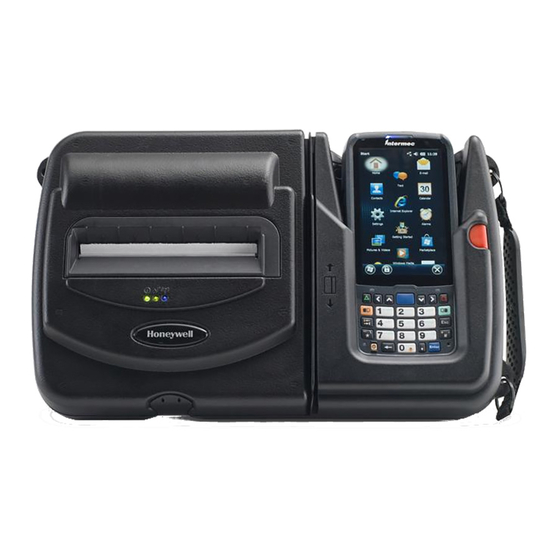
PrintPAD MC65 USER'S GUIDE PrintPAD MC65 Printer Views Open View Paper/paper cavity Roller 2.5 mm DC jack port Data port Radio LED Reset button Battery Status LED Self-test/paper feed button Power LED Bluetooth button Battery clip Battery/battery cavity Closed View Power LED LEDs Radio LED... - Page 4 PrintPAD MC65 USER'S GUIDE Installing and/or Replacing Batteries 1. Open the printer by unsnapping the latch on the front of the case (Figure 1). 2. Lift the battery cover up by pushing the retainer clip inward with your finger (Figure 2). Figure 1 Figure 2 3.
- Page 5 The operating temperature of this portable printer is 50° C. However, the operating temperature when used with Datamax-O’Neil power supply for charging the portable printer is limited to 40° C. Charge the printer in a suitable location that meets this temperature requirement.
- Page 6 PrintPAD MC65 USER'S GUIDE Loading Paper 1. Press a new roll of paper into the paper cavity. The end of the roll should exit from the bottom of the paper cavity and face the printer's roller (Figure 8). When properly installed, the roll of paper “latches” into place. Roller End of paper roll Paper latch...
- Page 7 PrintPAD MC65 USER'S GUIDE Printing a Self-Test 1. Open the printer's cover. 2. Press and hold the red self-test button for 4-5 seconds, until the printer starts to print (Figure 13). Figure 13 3. After printing starts, release the red self-test button. Configuring the Printer The printer has many configurable settings.
- Page 8 PrintPAD MC65 USER'S GUIDE Using Bluetooth Note: The following information applies to printers with Bluetooth capabilities. Radio printers are configured with default factory settings. To determine your printer's radio configuration, print a Printing a Self-Test on page 5 self-test. (For more information, see .) If you have multiple printers, configure them specifically for use in your environment.
- Page 9 DEX/UCS port Figure 15 The direct exchange (DEX)/UCS port can only be used with the Datamax-O’Neil approved DEX cable (P/N 210237- xxx). When the DEX cable is plugged into the data port, the printer automatically turns off to allow data transfer between the handheld and the DEX port.
- Page 10 PrintPAD MC65 USER'S GUIDE Using a CardReader Note: The following information applies to printers with the CardReader option. Figure 16 General Guidelines To wake up the CardReader, insert a card into the CardReader slot. One short beep indicates the CardReader/ ...
- Page 11 For more information, see the instruction sheet(s) included with the accessories. Warning: Use of any product not approved by Datamax-O’Neil for use with their printers could cause damage to the batteries and/or printer and will void the warranty.
- Page 12 PrintPAD MC65 USER'S GUIDE Agency Approvals FCC Notice This equipment has been tested and found to comply with the limits for a Class B digital device, pursuant to Part 15 of the FCC Rules. These limits are designed to provide reasonable protection against harmful interference in a residential installation.
- Page 13 This manual and any examples contained herein are provided “as is” and are subject to change without notice. Datamax-O’Neil makes no warranty of any kind with regard to this manual, including, but not limited to, the implied warranties of merchantability and fitness for a particular purpose. Datamax-O’Neil shall not be liable for any errors or for incidental or consequential damages in connection with the furnishing, performance, or use of this manual or the examples herein.
- Page 14 110219 003 PRINTPAD MC70 User Guide...
- Page 15 ABLE OF ONTENTS PrintPad MC70 Printer Views......1 Open View............ 1 Closed View..........1 Using Batteries: General Guidelines ....2 Installing and/or Replacing Batteries ....2 Charging the Batteries and Handheld Comput- er ..............4 Determining Battery Condition ...... 6 Using a Handheld Computer (HHC) ....
-
Page 16: Open View
PRINTPAD MC70 USER'S GUIDE PrintPad MC70 Printer Views Open View Paper/paper cavity Roller Data port Radio LED Battery Status LED Charge LED Power LED Self-test button Battery clip Battery/ battery cavity Closed View Power LED Handheld cavity LEDs Radio LED Hand strap Battery Status... -
Page 17: Using Batteries: General Guidelines
PRINTPAD MC70 USER'S GUIDE Using Batteries: General Guidelines The printer ships with two batteries installed, but they are not operational. Before operating the printer, remove the two red, battery isolator labels either by gently pulling the labels out, or by lifting the batteries up. - Page 18 PRINTPAD MC70 USER'S GUIDE 4. Insert the new batteries. Verify the battery contacts are facing down and are facing the outside edge of the printer (Figure 3). Contacts Figure 3 5. Close the battery cover by snapping it into place.
-
Page 19: Charging The Batteries And Handheld Computer
PRINTPAD MC70 USER'S GUIDE Charging the Batteries and Handheld Computer If the battery is low when the printer “wakes up,” the printer sounds three short beeps. 1. Remove the red battery isolator labels, if necessary. 2. Plug the power supply connector into the printer's external DC port. - Page 20 PRINTPAD MC70 USER'S GUIDE Caution: Do not plug DC power into the internal and external power ports at the same time. Caution: Do not plug in either DC plug to power if using external charge contacts and they are powered.
-
Page 21: Determining Battery Condition
Caution: The operating temperature of this portable printer is 50° C. However, the operating temperature when used with a Datamax-O’Neil power supply for charging the portable printer is limited to 40° C. Please charge the printer in a suitable location that meets this temperature requirement. -
Page 22: Using A Handheld Computer (Hhc)
PRINTPAD MC70 USER'S GUIDE Using a Handheld Computer (HHC) 1. Insert the handheld into the cavity by slightly rotating it into the side channels. 2. Press down until the handheld is fully seated (Figure Figure 5 Compatible Handheld Computers Note: The PrintPad MC70 is intended for use with UL Listed Accessory Handheld Computer Symbol Technologies MC70 series. -
Page 23: Loading Paper
PRINTPAD MC70 USER'S GUIDE Loading Paper 1. Press a new roll of paper into the paper cavity. The end of the roll should exit from the bottom of the paper cavity and face the printer's roller (Figure 6). When properly installed, the roll of paper “latches” into place. -
Page 24: Printing A Self-Test
PRINTPAD MC70 USER'S GUIDE moving the paper through the printer. Verify the paper exits straight. 5. Lower the printhead release lever (Figure 10). Figure 9 Figure 10 6. Feed the end of paper through opening in the printer's cover. 7. Remove any excess paper by grasping the top corner of the paper and pulling it up and away. -
Page 25: Configuring The Printer
PRINTPAD MC70 USER'S GUIDE Configuring the Printer The printer has many configurable settings. To configure or upgrade firmware, download the Windows configuration program. Using the Printer Data Cables 1. Select the appropriate cable for use with the host and/or device you are using. 2. -
Page 26: Using Bluetooth
PRINTPAD MC70 USER'S GUIDE Using Bluetooth Note: The following information applies to printers with Bluetooth capabilities. Radio printers are configured with default factory settings. To determine your printer's radio configuration, print a self-test. (For more information, Printing a Self-Test on page 9 .) If you have multiple printers, configure them specifically for use in your environment. -
Page 27: Printpad Mc70 Leds And Indicators
PRINTPAD MC70 USER'S GUIDE PrintPad MC70 LEDs and Indicators Power LEDs Power LED Radio LED Battery Status LED Battery Description Action Status LED Red (solid): • If A/C power is not plugged • Charge the The battery in, the printer will soon turn battery. -
Page 28: Audio Indicators
PRINTPAD MC70 USER'S GUIDE Orange flash - Charge has timed out. Restart battery slow charge (battery may be bad). Orange flash - Internal code error. Remove the fast battery, then re-connect A/C power. Orange, red, or When the AC adapter is None. -
Page 29: Radio Led
PRINTPAD MC70 USER'S GUIDE Radio LED Radio LED Blue flash - slow RF power is on and printer is asleep. Blue flash - fast RF power is on and printer is awake. RF power is off. Power LED Power LED Description Printer is asleep. -
Page 30: Using Dex/Ucs Capabilities
DEX/UCS port Figure 13 The direct exchange (DEX)/UCS port can only be used with the Datamax-O’Neil approved DEX cable (P/N 210237-xxx). When the DEX cable is plugged into the data port, the printer automatically turns off to allow data transfer between the MC70 and the DEX port. -
Page 31: Using A Cardreader
PRINTPAD MC70 USER'S GUIDE Using a CardReader Note: The following information applies to printers with the CardReader option. Figure 14 General Guidelines To wake up the CardReader, insert a card into the CardReader slot. One short beep indicates the CardReader/printer is awake. If you are using a Magnetic CardReader, insert a ... -
Page 32: Using External Charging
(Figure 15). External charge-capable printers can be used with various Datamax-O’Neil accessories, such as the truck mount bracket. When an external charge-capable printer is mounted to one of these accessories, the printer's batteries are automatically charged. - Page 33 PRINTPAD MC70 USER'S GUIDE Warning: Use of any product not approved by Datamax-O’Neil for use with their printers could cause damage to the batteries and/or printer and will void the warranty. Failure to observe the instructions and/or warnings specified in the documentation may result in damage to your printer.
-
Page 34: Agency Approvals
PRINTPAD MC70 USER'S GUIDE Agency Approvals FCC Notice This equipment has been tested and found to comply with the limits for a Class B digital device, pursuant to Part 15 of the FCC Rules. These limits are designed to provide reasonable protection against harmful interference in a residential installation. - Page 35 Copyright This manual and any examples contained herein are provided “as is” and are subject to change without notice. Datamax-O’Neil makes no warranty of any kind with regard to this manual, including, but not limited to, the implied warranties of merchantability and fitness for a particular purpose.
-
Page 36: Media Supplies
PRINTPAD MC70 USER'S GUIDE Media Supplies Datamax-O’Neil offers seven certified grades of paper for use in the PrintPAD series of printers. Our certified supplies are guaranteed compatible — this important qualification means that rigorous performance and image life testing have been performed. Quality supplies are key to obtaining optimal image quality and print performance. - Page 37 110244 003 PrintPAD CN3/4/3e/4e User Guide...
- Page 38 ABLE OF ONTENTS PrintPAD CN3/4 & PrintPAD CN3e/4e Printer Views ...............1 Open View..........................1 Closed View..........................1 Using Batteries: General Guidelines ..................1 Installing and/or Replacing Batteries ..................2 Charging the Batteries and Handheld Computer ..............2 Determining Battery Condition ....................3 Installing the Driver ........................
-
Page 39: Printpad Cn3/4 & Printpad Cn3E/4E Printer Views
PrintPAD CN3/4 & PrintPAD CN3e/4e USER'S GUIDE PrintPAD CN3/4 & PrintPAD CN3e/4e Printer Views Open View Paper/paper cavity Roller 2.5 mm DC jack port Data port Radio LED Reset button Battery Status LED Self-test/paper feed button Power LED Bluetooth button Battery clip Battery/battery cavity Closed View... -
Page 40: Installing And/Or Replacing Batteries
PrintPAD CN3/4 & PrintPAD CN3e/4e USER'S GUIDE Installing and/or Replacing Batteries 1. Open the printer by unsnapping the latch on the front of the case (Figure 1). 2. Lift the battery cover up by pushing the retainer clip inward with your finger (Figure 2). Figure 1 Figure 2 3. -
Page 41: Determining Battery Condition
The operating temperature of this portable printer is 50° C. However, the operating temperature when used with Datamax-O’Neil power supply for charging the portable printer is limited to 40° C. Charge the printer in a suitable location that meets this temperature requirement. - Page 42 PrintPAD CN3/4 & PrintPAD CN3e/4e USER'S GUIDE Compatible Handheld Computers Note: The PrintPAD CN3/4 & PrintPAD CN3e/4e are intended for use with UL Listed Accessory Handheld Computer Intermec CN3, CN3e, CN4, and CN4e. Installing the Battery Spacers Note: If the extended battery is not being used, the battery spacers must be installed. The battery spacers do not come installed.
- Page 43 PrintPAD CN3/4 & PrintPAD CN3e/4e USER'S GUIDE Loading Paper 1. Press a new roll of paper into the paper cavity. The end of the roll should exit from the bottom of the paper cavity and face the printer's roller (Figure 8). When properly installed, the roll of paper “latches” into place. Roller End of paper roll Paper latch...
- Page 44 PrintPAD CN3/4 & PrintPAD CN3e/4e USER'S GUIDE Printing a Self-Test 1. Open the printer's cover. 2. Press and hold the red self-test button for 4-5 seconds, until the printer starts to print (Figure 13). Figure 13 3. After printing starts, release the red self-test button. Configuring the Printer The printer has many configurable settings.
- Page 45 PrintPAD CN3/4 & PrintPAD CN3e/4e USER'S GUIDE Using Bluetooth Note: The following information applies to printers with Bluetooth capabilities. Radio printers are configured with default factory settings. To determine your printer's radio configuration, print a Printing a Self-Test on page 6 self-test.
- Page 46 DEX/UCS port Figure 15 The direct exchange (DEX)/UCS port can only be used with the Datamax-O’Neil approved DEX cable (P/N 210237- xxx). When the DEX cable is plugged into the data port, the printer automatically turns off to allow data transfer between the CN3/3e and the DEX port.
- Page 47 PrintPAD CN3/4 & PrintPAD CN3e/4e USER'S GUIDE Using a CardReader Note: The following information applies to printers with the CardReader option. Figure 16 General Guidelines To wake up the CardReader, insert a card into the CardReader slot. One short beep indicates the CardReader/ ...
- Page 48 For more information, see the instruction sheet(s) included with the accessories. Warning: Use of any product not approved by Datamax-O’Neil for use with their printers could cause damage to the batteries and/or printer and will void the warranty.
- Page 49 PrintPAD CN3/4 & PrintPAD CN3e/4e USER'S GUIDE Agency Approvals FCC Notice This equipment has been tested and found to comply with the limits for a Class B digital device, pursuant to Part 15 of the FCC Rules. These limits are designed to provide reasonable protection against harmful interference in a residential installation.
- Page 50 This manual and any examples contained herein are provided “as is” and are subject to change without notice. Datamax-O’Neil makes no warranty of any kind with regard to this manual, including, but not limited to, the implied warranties of merchantability and fitness for a particular purpose. Datamax-O’Neil shall not be liable for any errors or for incidental or consequential damages in connection with the furnishing, performance, or use of this manual or the examples herein.
- Page 51 PRINTPAD 7900 User Guide...
- Page 52 TABLE OF CONTENTS PrintPAD Printer Views ......... 1 Open View........... 1 Closed View..........1 Using Batteries ..........2 Charging Batteries ........2 Using a Handheld Computer (HHC) ....4 Compatible Handheld Computers ....4 Loading Paper ..........5 Printing a Self-Test........6 Using Bluetooth ..........
- Page 53 PRINTPAD 7900 USER'S GUIDE PrintPAD Printer Views Open View Paper/paper cavity Data port Power port Printhead lever Roller Charge LED Self-test button Battery clip Battery/ battery cavity Closed View Locking lever Handheld cavity Hand strap Paper opening Latch...
- Page 54 PRINTPAD 7900 USER'S GUIDE Using Batteries The printer ships with two batteries installed. Before operating the printer, remove the two red, isolator labels either by gently pulling the labels out, or by lifting the batteries up. Charging Batteries 1. Plug the power supply connector into the printer's power port.
- Page 55 Caution: The operating temperature of this portable printer is 50° C. However, the operating temperature when used with Datamax-O’Neil power supply for charging the portable printer is limited to 40° C. Please charge the printer in a suitable location that meets this temperature requirement.
-
Page 56: Using A Handheld Computer (Hhc)
PRINTPAD 7900 USER'S GUIDE Using a Handheld Computer (HHC) 1. Insert the handheld into the cavity. 2. Press down until the handheld is fully seated (Figure 2). The locking lever “clicks” into place. If the locking lever fails to “click” into place, carefully lift the lever toward the handheld (Figure 3). -
Page 57: Loading Paper
PRINTPAD 7900 USER'S GUIDE Loading Paper 1. Press a new roll of paper into the paper cavity. The end of the roll should exit from the bottom of the paper cavity and face the printer's roller (Figure 4). When properly installed, the roll of paper “latches” into place. -
Page 58: Printing A Self-Test
PRINTPAD 7900 USER'S GUIDE 5. Lower the printhead release lever (Figure 8). Roller Figure 7 Figure 8 6. Feed the end of paper through opening in the printer's cover. 7. Remove any excess paper by grasping the top corner of the paper and pulling it up and away. 8. - Page 59 PRINTPAD 7900 USER'S GUIDE Using Bluetooth Note: The following information applies to printers with Bluetooth capabilities. Radio printers are configured with default factory settings. To determine your printer's radio configuration, print a self-test. (For more information, Printing a Self-Test on page 6 .) If you have multiple printers, configure them specifically for use in your environment.
- Page 60 PRINTPAD 7900 USER'S GUIDE Using PrintPAD LEDs, Buttons, and Audio Indicators Charge LED Indicators State of Charge Action Solid red Charge in progress. Wait for green LED. Green Charge completed. None. Red flash-slow Battery is too cold. Change environment. Battery is disconnected. Connect battery.
-
Page 61: Audio Indicators
PRINTPAD 7900 USER'S GUIDE Button Functions Blue RF (Radio-frequency) Power Button Short press If printer is asleep and RF power is off; printer wakes up and RF power is turned If printer is asleep and RF power is on; printer wakes up and RF power is turned off. - Page 62 PRINTPAD 7900 USER'S GUIDE Using Batteries 1. Open the printer by unsnapping the latch on the front of the case. 2. Remove the batteries by pressing the retainer clip outward with your thumb. While pressing the retainer clip, lift the outside end of the battery past the retainer clip (Figure 10).
- Page 63 DEX Port Figure 12 The direct exchange (DEX) port can only used with the Datamax-O’Neil approved DEX cable (P/N 210237-000). When the DEX cable is plugged into both the printer and into a data source, the printer automatically turns off to allow data transfer between devices.
-
Page 64: Using A Cardreader
PRINTPAD 7900 USER'S GUIDE Using a CardReader Note: The following information applies to printers with the CardReader option. CardReader CardReader Slot Figure 13 General Guidelines To wake up the CardReader, insert a card into the CardReader slot. One short beep indicates the CardReader/printer is awake. - Page 65 PRINTPAD 7900 USER'S GUIDE CardReader Indicators Audio Indicators Beep Description Action 1 long Bad read. None. 2 short Good read. None. Magnetic LED Indicators Description Green flash Good read. Red flash Bad read.
- Page 66 PRINTPAD 7900 USER'S GUIDE Agency Approvals FCC Notice This equipment has been tested and found to comply with the limits for a Class B digital device, pursuant to Part 15 of the FCC Rules. These limits are designed to provide reasonable protection against harmful interference in a residential installation.
- Page 67 Copyright This manual and any examples contained herein are provided “as is” and are subject to change without notice. Datamax-O’Neil makes no warranty of any kind with regard to this manual, including, but not limited to, the implied warranties of merchantability and fitness for a particular purpose.
- Page 68 PRINTPAD 7900 USER'S GUIDE Media Supplies Datamax-O’Neil offers seven certified grades of paper for use in the PrintPAD 7900 series of printers. Our certified supplies are guaranteed compatible — this important qualification means that rigorous performance and image life testing have been performed.
- Page 69 110280 001 PrintPAD Dolphin 99EX User Guide...
- Page 70 ABLE OF ONTENTS PrintPAD Dolphin 99EX Printer Views ..................1 Open View..........................1 Closed View..........................1 Using Batteries: General Guidelines ..................1 Installing and/or Replacing Batteries ..................2 Charging the Batteries and Handheld Computer ..............2 Determining Battery Condition ....................3 Using a Handheld Computer (HHC) ...................
- Page 71 PrintPAD Dolphin 99EX USER GUIDE PrintPAD Dolphin 99EX Printer Views Open View Paper/paper cavity Roller 2.5 mm DC jack port Data port Radio LED Reset button Battery Status LED Self-test/paper feed button Power LED Bluetooth button Battery clip Battery/battery cavity Closed View Power LED Handheld cavity...
- Page 72 PrintPAD Dolphin 99EX USER GUIDE Installing and/or Replacing Batteries 1. Open the printer by unsnapping the latch on the front of the case (Figure 1). 2. Lift the battery cover up by pushing the retainer clip inward with your finger (Figure 2). Figure 1 Figure 2 3.
- Page 73 The operating temperature of this portable printer is 50° C. However, the operating temperature when used with Datamax-O’Neil power supply for charging the portable printer is limited to 40° C. Charge the printer in a suitable location that meets this temperature requirement.
- Page 74 PrintPAD Dolphin 99EX USER GUIDE Figure 6 If using the Standard Battery, install the Battery Spacers using a screwdriver. Figure 7 Caution: Over-torquing the screws will strip the screw holes. It is recommended that the screws be tightened by hand.
- Page 75 PrintPAD Dolphin 99EX USER GUIDE Loading Paper 1. Press a new roll of paper into the paper cavity. The end of the roll should exit from the bottom of the paper cavity and face the printer's roller (Figure 8). When properly installed, the roll of paper “latches” into place. Roller End of paper roll Paper latch...
- Page 76 PrintPAD Dolphin 99EX USER GUIDE Printing a Self-Test 1. Open the printer's cover. 2. Press and hold the red self-test button for 4-5 seconds, until the printer starts to print (Figure 13). Figure 13 3. After printing starts, release the red self-test button. Configuring the Printer The printer has many configurable settings.
- Page 77 PrintPAD Dolphin 99EX USER GUIDE Using Bluetooth Note: The following information applies to printers with Bluetooth capabilities. Radio printers are configured with default factory settings. To determine your printer's radio configuration, print a Printing a Self-Test on page 6 self-test. (For more information, see .) If you have multiple printers, configure them specifically for use in your environment.
- Page 78 DEX/UCS port Figure 15 The direct exchange DEX/UCS port can only be used with the Datamax-O’Neil approved DEX cable (P/N 210237-xxx). When the DEX cable is plugged into the data port, the printer automatically turns off to allow data transfer. Remove the DEX cable to resume connection to the printer.
- Page 79 PrintPAD Dolphin 99EX USER GUIDE Using a CardReader Note: The following information applies to printers with the CardReader option. Figure 16 General Guidelines To wake up the CardReader, insert a card into the CardReader slot. One short beep indicates the CardReader/ ...
- Page 80 For more information, see the instruction sheet(s) included with the accessories. Warning: Use of any product not approved by Datamax-O’Neil for use with their printers could cause damage to the batteries and/or printer and will void the warranty.
- Page 81 PrintPAD Dolphin 99EX USER GUIDE Agency Approvals FCC Notice This equipment has been tested and found to comply with the limits for a Class B digital device, pursuant to Part 15 of the FCC Rules. These limits are designed to provide reasonable protection against harmful interference in a residential installation.
- Page 82 This manual and any examples contained herein are provided “as is” and are subject to change without notice. Datamax-O’Neil makes no warranty of any kind with regard to this manual, including, but not limited to, the implied warranties of merchantability and fitness for a particular purpose. Datamax-O’Neil shall not be liable for any errors or for incidental or consequential damages in connection with the furnishing, performance, or use of this manual or the examples herein.
- Page 83 110287 001 PrintPAD CN70/70e User Guide...
- Page 84 ABLE OF ONTENTS PrintPAD CN70 Printer Views.....................1 Open View..........................1 Closed View..........................1 Using Batteries: General Guidelines ..................1 Installing and/or Replacing Batteries ..................2 Charging the Batteries and Handheld Computer ..............2 Determining Battery Condition ....................3 Installing the Driver ........................3 Using a Handheld Computer (HHC) ...................
-
Page 85: Closed View
PrintPAD CN70/70e USER'S GUIDE PrintPAD CN70/70e Printer Views Open View Paper/paper cavity Roller 2.5 mm DC jack port Data port Radio LED Reset button Battery Status LED Self-test/paper feed button Power LED Bluetooth button Battery clip Battery/battery cavity Closed View Power LED Radio LED Handheld cavity... -
Page 86: Installing And/Or Replacing Batteries
PrintPAD CN70/70e USER'S GUIDE Installing and/or Replacing Batteries 1. Open the printer by unsnapping the latch on the front of the case (Figure 1). 2. Lift the battery cover up by pushing the retainer clip inward with your finger (Figure 2). Figure 1 Figure 2 3. -
Page 87: Determining Battery Condition
The operating temperature of this portable printer is 50° C. However, the operating temperature when used with Datamax-O’Neil power supply for charging the portable printer is limited to 40° C. Charge the printer in a suitable location that meets this temperature requirement. -
Page 88: Loading Paper
PrintPAD CN70/70e USER'S GUIDE Loading Paper 1. Press a new roll of paper into the paper cavity. The end of the roll should exit from the bottom of the paper cavity and face the printer's roller (Figure 8). When properly installed, the roll of paper “latches” into place. Roller End of paper roll Paper latch... -
Page 89: Printing A Self-Test
PrintPAD CN70/70e USER'S GUIDE Printing a Self-Test 1. Open the printer's cover. 2. Press and hold the red self-test button for 4-5 seconds, until the printer starts to print (Figure 13). Figure 13 3. After printing starts, release the red self-test button. Configuring the Printer The printer has many configurable settings. -
Page 90: Using Bluetooth
PrintPAD CN70/70e USER'S GUIDE Using Bluetooth Note: The following information applies to printers with Bluetooth capabilities. Radio printers are configured with default factory settings. To determine your printer's radio configuration, print a Printing a Self-Test on page 5 self-test. (For more information, see .) If you have multiple printers, configure them specifically for use in your environment. -
Page 91: Audio Indicators
DEX/UCS port Figure 15 The direct exchange (DEX)/UCS port can only be used with the Datamax-O’Neil approved DEX cable (P/N 210237- xxx). When the DEX cable is plugged into the data port, the printer automatically turns off to allow data transfer between the handheld and the DEX port. -
Page 92: Using A Cardreader
PrintPAD CN70/70e USER'S GUIDE Using a CardReader Note: The following information applies to printers with the CardReader option. Figure 16 General Guidelines To wake up the CardReader, insert a card into the CardReader slot. One short beep indicates the CardReader/ ... - Page 93 For more information, see the instruction sheet(s) included with the accessories. Warning: Use of any product not approved by Datamax-O’Neil for use with their printers could cause damage to the batteries and/or printer and will void the warranty.
- Page 94 PrintPAD CN70/70e USER'S GUIDE Agency Approvals FCC Notice This equipment has been tested and found to comply with the limits for a Class B digital device, pursuant to Part 15 of the FCC Rules. These limits are designed to provide reasonable protection against harmful interference in a residential installation.
-
Page 95: Trademarks
This manual and any examples contained herein are provided “as is” and are subject to change without notice. Datamax-O’Neil makes no warranty of any kind with regard to this manual, including, but not limited to, the implied warranties of merchantability and fitness for a particular purpose. Datamax-O’Neil shall not be liable for any errors or for incidental or consequential damages in connection with the furnishing, performance, or use of this manual or the examples herein. - Page 96 Optional CN51 PrintPAD ™ Caution: See regulatory sheet for use restrictions associated with this product. Feed Paper (short press) Print Self Test (press and hold 4s) Toggle RF ON and OFF Quick Start Guide Green - Printer is awake Blue, Flashing - RF power is on - The battery has less than 5% power Red/Orange, Flashing - Replace battery Off - Printer is asleep...
- Page 97 CN51 PrintPAD ™ Green Power Supply sold separately Batteries Install Datamax-O’Neil by Honeywell Windows CE USB Drivers to Handheld Card reader optional, not available in all models.
- Page 98 PrintPAD Series ™ CN70/70e & CN51...
- Page 99 Setup Bluetooth Parameters ......... 20 PrintPAD Series CN70/70e & CN51 User Guide...
- Page 100 PrintPAD Series ........
-
Page 101: Safety Information
Safety Information Please read the following safety information prior to setting up or operating your printer. -
Page 102: Important Safety Requirements
Do not place the power cord where it can be stepped on and, if the power cord becomes damaged, immediately replace it. • If service is required, use only qualified trained technicians to repair your printer. PrintPAD Series CN70/70e & CN51 User Guide... -
Page 103: Printer Basics
Printer Basics Learn to use the printer basic features, including how to load the media; install, replace and charge the batteries; and perform a test to ensure the printer is operating properly. Also in this chapter, refer to the printer status LEDs and indicators for proper usage and functionality. -
Page 104: Printer Component Identification
Mobile computer cavity LEDs Battery Status Card Reader slot Paper opening Latch DC power port DEX/UCS port Closed View: Use this illustration to familiarize yourself with the printer components in the closed position. PrintPAD Series CN70/70e & CN51 User Guide... -
Page 105: Status Leds And Indicators
RF power is on (when blue, RF power button is pressed None. and power was turned off). 2 short RF power is off (when blue, RF power button is pressed None. and power was turned on). PrintPAD Series CN70/70e & CN51 User Guide... - Page 106 Description Printer is asleep. Red flash Out of paper. Green Printer is awake. CardReader Audio Indicators Magnetic – Beeps Description Action 1 long Bad read. Swipe card again. 2 short Good read. None. PrintPAD Series CN70/70e & CN51 User Guide...
-
Page 107: How To Use The Batteries
3 Lift up the outside end of the battery to remove it. 4 Insert the new batteries. Verify the battery contacts are facing down and are facing the outside edge of the printer. Contacts 5 Close the battery cover by snapping it into place. PrintPAD Series CN70/70e & CN51 User Guide... -
Page 108: Charge The Batteries And Mobile Computer
Do not plug DC power into the internal and external power ports at the same time. Do not plug the DC power supply into the printer if the printer is being charged by means of external charge contacts. PrintPAD Series CN70/70e & CN51 User Guide... -
Page 109: Determine Battery Condition
Dispose of the used batteries according to the instructions. The maximum operating temperature of the portable printer is 122 °F (50 °C). However, the operating temperature when used with a Datamax-O’Neil by Honeywell power supply for charging, the portable printer is limited to 104 °F (40 °C). -
Page 110: Load The Media
4 Feed the end of the paper and center it under the roller until the paper exits from the top of the printhead. The printer has an auto - advance feature that will aid moving the paper through the printer. Verify the paper exits straight. PrintPAD Series CN70/70e & CN51 User Guide... -
Page 111: Print A Self-Test
1 Open the printer's cover. 2 Press and hold the red self - test button for 4 to 5 seconds until the printer starts to print. 3 After printing starts, release the red self - test button. PrintPAD Series CN70/70e & CN51 User Guide... -
Page 112: Printer Configuration
Printer Configuration Use this chapter to configure your printer. -
Page 113: Printer Data Cables
2 Insert the plug into the printer’s data port. Note: Do not close the lid or damage will occur to the cable. The data cable is intended for reflashing the printer. Please note that printer data cables are not included. PrintPAD Series CN70/70e & CN51 User Guide... -
Page 114: Update Firmware And Drivers
USB driver is installed. To obtain the appropriate driver for the PrintPAD: To Install the USB Driver: 1 Go to datamax-oneil and select Supports & Download. 2 Select Downloads and Drivers. 3 Select PrintPAD Series. 4 Download the USB-CDC driver that matches the device operating system (OS). -
Page 115: Establish A Printer Connection
Windows Update.” Follow the instructions to complete the installation. Once completed, you should see the PrintPAD as an available printer from your host PC. 3 The default setting will setup as a “CDC Composite” printer type. PrintPAD Series CN70/70e & CN51 User Guide... -
Page 116: Setup Bluetooth Connection
Power on the printer and confirm that the wireless radio is on. Follow your host PC for adding a new Bluetooth device. Once connected and connection is established, proceed to “Setup Bluetooth Parameters” on page 20. PrintPAD Series CN70/70e & CN51 User Guide... -
Page 117: Verify Printer Connection
3 Locate and select a file from the “Select File to Print” dropdown menu. 4 Select “Settings” to set the communication parameters for the communication type selected. 5 Select “Print Demo” to send the file to the printer. PrintPAD Series CN70/70e & CN51 User Guide... -
Page 118: Update Printer Settings
1 Download the Printer Demo program. and select Supports & Download > Downloads and Drivers > PrintPAD Series > Utility > MFlash Configuration. 2 Launch the MFlash Configuration utility. 3 Verify the communication port and query the printer. PrintPAD Series CN70/70e & CN51 User Guide... -
Page 119: Setup Bluetooth Parameters
Authentication (This must be set to “Yes” for Android devices, and Windows 7 and above host PCs) • Bondable • Discoverable • Connectable • Encryption Contact your network administrator to verify the proper radio settings for your environment. PrintPAD Series CN70/70e & CN51 User Guide... -
Page 120: Printer Options
Printer Options Learn to use the optional printer capabilities, including the DEX/UCS port for data transfer, the Magnetic Stripe Card Reader option and the External Charge Contacts option. -
Page 121: Dex/Ucs Port
DEX/UCS port DEX/UCS Port: Use this illustration to locate the DEX/UCS port on the printer. The direct exchange (DEX)/UCS port can only be used with the Datamax - O’Neil by Honeywell - approved DEX cable (P/N: 210237 - xxx). When the DEX cable is plugged into the data port, the printer automatically turns off to allow data transfer between the mobile computer and the DEX port. -
Page 122: Magnetic Stripe Card Reader
For information on Card Reader LED indicators and audio indicators, see the following table. Card Reader Indicators – Audio Indicators Beeps Description Action 1 long Bad read. Swipe card again. 2 short Good read. None. PrintPAD Series CN70/70e & CN51 User Guide... -
Page 123: External Charge Contacts
External Charging: External charge-capable printers have two charging contact points located on the back of the printer’s case. External charge - capable printers can be used with various Datamax - O’Neil by Honeywell accessories, such as the truck mount bracket. When an external charge - capable printer is mounted to one of these accessories, the printer’s... -
Page 124: Printer Specifications
Printer Specifications... -
Page 125: Printpad Series
Linear: Codabar, Code 39, Code 93, Code 128, EAN-8, EAN13, Interleaved 2 of 5, MSI/Plessey, UCC/EAN-128, UPC-A, UPC-E; 2D symbologies: PDF417, AZTEC, QR, GS1, Datamatrix (available on wireless only) Graphics Supports storage of graphics/logos in Flash memory and transient “print once” graphics PrintPAD Series CN70/70e & CN51 User Guide... - Page 126 DEX/UCS standard Software/Firmware Protocol Line Printer Mode, Easy Print® Drivers Windows CE and Desktop Compatible label design NiceLabel, BarTender®, DP Designer software Software development kit C++, Visual Basic, Java, Microsoft Dynamics Configuration Tool PrintPAD Series CN70/70e & CN51 User Guide...
- Page 127 PrintPAD Printers & Accessories CN70/70e Quick Start Guide Green 9hrs Install Datamax-O’Neil USB Drivers to Handheld Out of Paper...
- Page 128 Optional – Card Reader. Reset Feed Paper (short press) Print Self Test (press and hold 4s) *Optional *Wahlfrei *Opcional *Facoltativo Toggle RF ON and OFF - The battery has less than 5% power Red/Orange, Flashing - Replace battery Green - Printer is awake Blue, Flashing - RF power is on Orange - The battery has less than 25% power Red, Flashing - Unit too cold/hot...
- Page 129 PRINTPAD SERIES OF PRINTERS User Guide...
- Page 130 Closed View..........1 Using Batteries ..........2 Charging Batteries ........2 Using a Handheld Computer (HHC) ....4 Using a HHC with Standard PrintPAD Series Print- ers ............... 4 Using a HHC with PrintPAD-9000 Printers ..4 Compatible Handheld Computers ....5 Loading Paper ..........
-
Page 131: Printpad Printer Views
PRINTPAD SERIES OF PRINTERS USER'S GUIDE PrintPAD Printer Views Open View Paper/paper cavity Data port Power port Printhead lever Roller Charge LED Self-test button Battery clip Battery/ battery cavity Closed View Handheld cavity Paper opening Hand strap Latch... -
Page 132: Using Batteries
Charging Batteries 1. Plug the power supply connector into the printer's power port as follows: If you are using a standard PrintPAD series printer, the power port is located next to the paper cavity (Figure 1). - Page 133 PRINTPAD SERIES OF PRINTERS USER'S GUIDE Caution: There is a risk of explosion if the battery is replaced by an incorrect type. Dispose of used batteries according to the instructions. Caution: The operating temperature of this portable printer is 50° C. However, the operating temperature when used with Datamax-O’Neil power supply for...
-
Page 134: Using A Handheld Computer (Hhc)
PRINTPAD SERIES OF PRINTERS USER'S GUIDE Using a Handheld Computer (HHC) Using a HHC with Standard PrintPAD Series Printers 1. Insert the handheld into the cavity and press down until the handheld is firmly seated (Figure 3). Figure 3 Using a HHC with PrintPAD-9000 Printers 1. -
Page 135: Compatible Handheld Computers
PRINTPAD SERIES OF PRINTERS USER'S GUIDE Removing the Handheld 1. Lower the yellow locking lever. 2. Remove the handheld by raising it out of the cavity in an “up and out” motion. The handheld should easily lift out of the cavity; do not use force to remove the handheld. -
Page 136: Loading Paper
PRINTPAD SERIES OF PRINTERS USER'S GUIDE Loading Paper 1. Press a new roll of paper into the paper cavity. The end of the roll should exit from the bottom of the paper cavity and face the printer's roller (Figure 6). -
Page 137: Printing A Self-Test
PRINTPAD SERIES OF PRINTERS USER'S GUIDE 4. Feed the end of the paper under the roller until the paper exits from the top of the printhead (Figure 9). Verify the paper exits straight. 5. Lower the printhead release lever (Figure 10). -
Page 138: Using Bluetooth
PRINTPAD SERIES OF PRINTERS USER'S GUIDE Using Bluetooth Note: The following information applies to printers with Bluetooth capabilities. Radio printers are configured with default factory settings. To determine your printer's radio configuration, print a self-test. (For more information, Printing a Self-Test on page 7 .) If you have multiple... -
Page 139: Using Printpad Charge Leds
PRINTPAD SERIES OF PRINTERS USER'S GUIDE Using PrintPAD Charge LEDs Charge LED State of Charge Action Solid red Charge in progress. Wait for green LED. Green Charge completed. None. Red flash-slow Battery is too cold. Change environment. Battery is disconnected. -
Page 140: Using Dex Capabilities (Printpad-9000 Print- Ers Only)
PRINTPAD SERIES OF PRINTERS USER'S GUIDE Using DEX Capabilities (PrintPAD-9000 Printers Only) DEX port Bottom of printer Figure 14 The direct exchange (DEX) port can only used with the Datamax-O’Neil approved DEX cable (P/N 210237-000). When the DEX cable is plugged into both the printer and into a data source, the printer automatically turns off to allow data transfer between devices. -
Page 141: Using A Cardreader
PRINTPAD SERIES OF PRINTERS USER'S GUIDE Using a CardReader Note: The following information applies to printers with the CardReader option. CardReader CardReader Slot Figure 15 General Guidelines To wake up the CardReader, insert a card into the CardReader slot. One short beep indicates the CardReader/printer is awake. -
Page 142: Cardreader Indicators
PRINTPAD SERIES OF PRINTERS USER'S GUIDE CardReader Indicators Audio Indicators Beep Description Action 1 long Bad read. None. 2 short Good read. None. Magnetic LED Indicators Description Green flash Good read. Red flash Bad read. - Page 143 PRINTPAD SERIES OF PRINTERS USER'S GUIDE Agency Approvals FCC Notice This equipment has been tested and found to comply with the limits for a Class B digital device, pursuant to Part 15 of the FCC Rules. These limits are designed to provide reasonable protection against harmful interference in a residential installation.
- Page 144 Copyright This manual and any examples contained herein are provided “as is” and are subject to change without notice. Datamax-O’Neil makes no warranty of any kind with regard to this manual, including, but not limited to, the implied warranties of merchantability and fitness for a particular purpose.
-
Page 145: Media Supplies
PRINTPAD SERIES OF PRINTERS USER'S GUIDE Media Supplies Datamax-O’Neil offers seven certified grades of paper for use in the PrintPAD series of printers. Our certified supplies are guaranteed compatible — this important qualification means that rigorous performance and image life testing have been performed. Quality supplies are key to obtaining optimal image quality and print performance.
Need help?
Do you have a question about the PrintPAD Series and is the answer not in the manual?
Questions and answers