Arjo Malibu Instructions For Use Manual
Hide thumbs
Also See for Malibu:
- Quick reference manual (2 pages) ,
- Quick reference manual (3 pages) ,
- Instructions for use manual (56 pages)
Table of Contents
Advertisement
Advertisement
Chapters
Table of Contents

Related Manuals for Arjo Malibu


Summary of Contents for Arjo Malibu
- Page 1 INSTRUCTIONS FOR USE Malibu / Sovereign (2021 Edition) 04.AZ6.00_2EN • 06/2021...
- Page 2 © Arjo 2021. As our policy is one of continuous improvement, we reserve the right to modify designs without prior notice. The content of this publication may not be copied either whole or in part without the consent of Arjo.
-
Page 3: Table Of Contents
Connect the Transfer Chair to Lifting Arm ........21 Disconnect the Transfer Chair to Lifting Arm ........22 Assisted Bathing with Transfer Chair ..........24 To the Malibu/Sovereign bathtub ..........24 From the Malibu/Sovereign bathtub ..........28 Home Care Use ................30 Space Requirements in mm. -
Page 4: Foreword
Your Malibu/Sovereign® bathtub is part of a A service routine must be performed on the series of quality products designed especially Malibu/Sovereign bathtub to make sure the safety and for hospitals, nursing homes and other health operating procedures of your product. -
Page 5: Intended Use
Arjo representative. Expected Service Life The Malibu/Sovereign bathtub is intended for The expected service life of Malibu/Sovereign is the assisted bathing and showering of adult patients in maximum period of useful life. care facilities or in home care environment. The... -
Page 6: Safety Instructions
Safety Instructions WARNING WARNING To avoid injury, make sure that the patient is not To avoid the device from tipping and the patient left unattended at any time. from falling, do not use the equipment on floor with recessed drains, holes or slopes exceeding a ratio of 1:50 (1.15°). -
Page 7: Preparations
If any part is missing or damaged - do NOT use Actions Before the First Use (9 steps) the product. Make sure that the Malibu/Sovereign bathtub has WARNING been installed according to the Assembly and To prevent cross-contamination always Installation Instructions. -
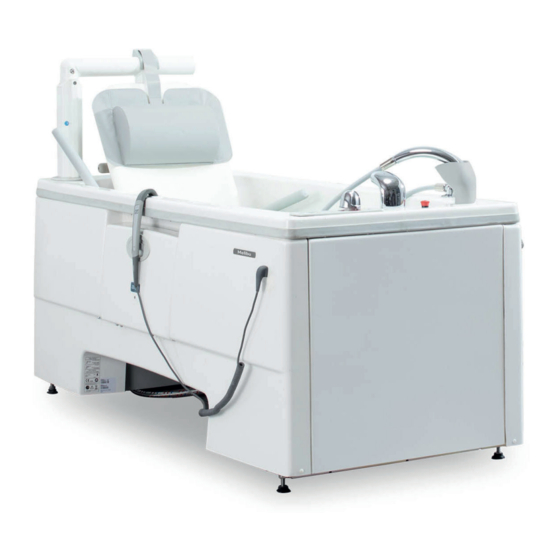
Page 8: Parts Designation
Parts Designation Malibu/Sovereign bathtub 23 Water level sensors 24 Hand control holder Control panel 25 Transfer chair / Commode seat Basic (No integrated disinfection) 26 Neck pillow Assisted (Integrated disinfection with/without Air 27 Driving handles Spa) 28 Transfer Chassis (optional) - Page 9 •3 1 1 1 Basic Assisted 1 1 1 1 Malibu bathtub Sovereign bathtub...
-
Page 10: Product Description/Functions
Fig. 2 Push and hold the Lift in button and the lifting arm will complete a full sequence of movement; from outside the Malibu/Sovereign bathtub, over the bathtub edge and into the bathtub. See Fig. 2 NOTE The Malibu/Sovereign bathtub must be set in its lowest position before the rotation of the chair with the Lift in/ out buttons can be used. -
Page 11: Patient Lock-Out
Battery Back-up (Optional) A battery will work as a back-up if there is a power failure. It is possible to help a patient out of a Malibu/Sovereign bathtub during that time. It will be possible to lower the Malibu/Sovereign bathtub, raise and rotate the lifting arm with the transfer chair out of the bathtub. -
Page 12: Pop-Up Drain Control Knob
NOTE To reset the emergency stop function, turn the red emergency button clockwise until it pops up. NOTE Do not leave the Malibu/Sovereign bathtub with the emergency stop pressed down since it will disable the auto flush function. Armrests Fig. 3... -
Page 13: Attach And Remove The Seat
Attach and Remove the Seat Attach (4 steps) See Fig. 1 With both hands start pushing the front end of the seat against the front frame. Push down the bent part of the seat. Push one side around the armrest and make sure it snaps into place. -
Page 14: Neck Pillow
The auto flush function (which lasts for about 30 s) will start 30 hours after the last use of the Malibu/Sovereign bathtub and then every 24 hours if the bathtub is not used. -
Page 15: Scalding Protection
Scalding Protection The Malibu/Sovereign bathtub is equipped with an electronic scalding protection that shuts off the water to the shower or filling, if a dangerous temperature level is detected. The LED between the displays lights up on the control panel and the water gets shut off if a temperature above or equal to 45 °C is... -
Page 16: Safety Belt
Safety Belt Fig. 1 WARNING To prevent the patient from falling, make sure the safety belts are undamaged. If damaged, do NOT use the safety belts, replace with new ones before use. WARNING Fig. 2 To avoid falling, make sure that the patient is positioned correctly and that the safety belt is being used, properly fastened and tightened. - Page 17 Loosen the safety belt by pulling the inner strap (A) at the Fig. 6 side and at the same time lifting the larger buckle clip (B). See Fig. 6 Fig. 7 Tighten the safety belt by pulling the outer strap (A) at the side and at the same time holding the larger buckle clip (B).
-
Page 18: Disinfection Unit (Optional)
Disinfection Unit (Optional) • WARNING Fig. 1 To prevent cross-contamination, always follow the disinfection instructions in this IFU. • The disinfection unit is located behind the cover of the front panel. • The disinfectant bottle is located behind a key lock inside the disinfection compartment. -
Page 19: Transfer Chair
Transfer Chair Fig. 1 WARNING To avoid entrapment, make sure to keep the patients hair, arms and feet close to the body and use designated grab supports during any movement. WARNING To avoid the patient from falling out of the device, make sure that all catches are in a locked position. -
Page 20: Air Spa System Operation (Option)
Air Spa System Operation (option) Fig. 1 The Malibu/Sovereign bathtub with Air Spa system allows the patient to sit comfortably and enjoy a gentle massage. See Fig. 1 and 2 The massage effect is obtained by injecting air through air jets into the Malibu/Sovereign bathtub water. -
Page 21: Connect The Transfer Chair To Lifting Arm
This is an option when using the transfer Fig. 1 chassis with the transfer chair (5 steps) Set the Malibu/Sovereign bathtub in its lowest position by pushing Lower Malibu/Sovereign bathtub on the control panel. Push the Lift out button on the hand control to have the... -
Page 22: Disconnect The Transfer Chair To Lifting Arm
This is an option when using the transfer Fig. 1 chassis with the transfer chair (11 steps) 1 Set the Malibu/Sovereign bathtub in its lowest position by pushing Lower bathtub button on the control panel. Push the Lift out button on the hand control to have the lifting arm position the transfer chair outside the Malibu/ Sovereign bathtub. -
Page 23: Fig. 5
Wiggle to transfer chassis back and forth to make sure it’s Fig. 4 securely attached. See Fig. 4 Continue lowering the chair. WARNING To avoid falling, the transfer chassis castors must be unlocked when detaching the transfer chair from the lifting arm. Lower the chair by pushing the Lift out button and stop lowering once castors on the transfer chassis touches the Fig. -
Page 24: Assisted Bathing With Transfer Chair
Close the drain plug by turning the pop-up drain control knob. See Fig. 1 Fill the Malibu/Sovereign bathtub with water by pushing the fill button. Auto fill function will shut off the water when it reaches the pre-fill level. See Fig. 2 Fig. -
Page 25: Push The Lift Out Button On The Hand Control To Have The
Make sure the Malibu/Sovereign bathtub is in its lowest position by pushing Lower bathtub button on the control panel (otherwise the power rotation of the lift will not work). - Page 26 Push the Lift in button for the chair to rotate into the Malibu/ Sovereign bathtub. Help the patient to move his or her legs over the edge of the Malibu/Sovereign bathtub.
- Page 27 Intentionally left blank...
-
Page 28: From The Malibu/Sovereign Bathtub
To avoid falling during patient transfer, always make sure that the brakes on the equipment receiving the patient are applied. After bathing, open the drain and lower the Malibu/ Sovereign bathtub to its lowest position by pushing the Lower the bathtub button. - Page 29 IFU. See Fig. 7 Fig. 6 14 Make sure to disinfect and clean the Malibu/Sovereign bathtub after every use. See section Cleaning and Disinfection Instructions on page 35.
-
Page 30: Home Care Use
To prevent scalding, make sure that the transfer chassis from rolling down. thermostatic mixer has been calibrated. • There is room is big enough to use the Malibu/ Confirm that responsible organization has Sovereign bathtub system features. established calibration routines. -
Page 31: Space Requirements In Mm. Around The Bathtub
Space Requirements in mm. around the Malibu/Sovereign Bathtub The Malibu/Sovereign bathtub must always be installed according to recommended space requirements, this to provide optimal working conditions for personnel and patient. NOTE Space for furniture and other personal items are not included in these measurements. - Page 32 Wall Position (measurements depending on Malibu/Sovereign bathtub model) Contact Arjo to order side / back / corner cover if: * Short side is equal or larger measurements than 60 mm ** Long side is equal or larger measurements than 80 mm Fig.
- Page 33 Island Position (measurements depending on Malibu/Sovereign bathtub model) Contact Arjo to order side / back / corner cover if: * Short side is equal or larger measurements than 60 mm ** Long side is equal or larger measurements than 80 mm Fig.
- Page 34 Intentionally left blank...
-
Page 35: Cleaning And Disinfection Instructions
Malibu/Sovereign bathtub equipment. (not included in Malibu/Sovereign This is particularly vital in cases where the Malibu/ bathtub delivery) Sovereign bathtub is in a shared facility. Cleaning and disinfection as outlined below reduces •... - Page 36 Mix hot and cold water as close as possible to the point of use. • Make sure that the water circulates in the Malibu/ Sovereign bath and the shower on a daily basis even if the bathtub is not used; and particular to make sure to remove any water that may be left behind in the hose.
- Page 37 Set the temperature control as low as possible. Grab the disinfection spray handle. 10 Spray disinfection fluid while keeping an eye on the flow Arjo Clean (50) meter. Check the liquid value so it is in accordance with the recommended mix ratio. See Fig. 2 If necessary, adjust the bottle suction cap to get the right mix ratio.
- Page 38 Detach and place the loose parts such as armrests, seat of the transfer chair, neck pillow and other accessories such as safety belts on the bottom of the Malibu/Sovereign bathtub. See Fig. 1 Make sure the transfer chair is in the Malibu/Sovereign bathtub and not outside.
- Page 39 Disinfect (step 19-30) 19 Spray disinfectant in drain. 20 Close the drainage plug. 21 Spray disinfectant on all internal Malibu/Sovereign bathtub surfaces, lifting arm, transfer chair and the loose parts and accessories at the bottom of the bathtub. Turn accessories and spray on other side.
- Page 40 Detach and place the loose parts such as armrests, seat of the transfer chair, the neck pillow and other accessories such as safety belts on the bottom of the Malibu/Sovereign bathtub. See Fig. 1 Make sure the transfer chair is in the Malibu/Sovereign bathtub and not outside.
- Page 41 Turn the loose parts and the accessories and spray on other side. Pay attention to parts and knobs and sensors attached to the Malibu/Sovereign bathtub surface such as drain control knob/surface overflow outlet. See Fig. 6 17 Spray disinfectant into the overflow outlet.
- Page 42 2 minutes before it shuts off. 27 Spray disinfectant into the drain. 28 Close the drainage plug. 29 Spray disinfectant on all internal Malibu/Sovereign bathtub surfaces, lifting arm, transfer chair and the loose parts and accessories at the bottom of the bathtub. Turn accessories and spray on other side.
-
Page 43: Care And Preventive Maintenance
Care and Preventive Maintenance The Malibu/Sovereign bathtub is subject to wear and tear, and the following actions must be performed when specified to make sure that the product remains within its original manufacturing specification. WARNING To avoid malfunction resulting in injury, make sure to conduct regular inspections and follow the recommended maintenance schedule. - Page 44 See Fig. 2 4 Check for corrosion. Visually check hoses, pipes and connections: Visually check for leaks of any kind underneath the Malibu/ Sovereign bathtub. See Fig. 3 Continue with the steps on the next page.
- Page 45 Fig. 4 Check hand control and cable: Visually check the condition of the hand control and its cable. If found cut or damaged, replace it. See Fig. 4 Check castors and brakes on transfer chassis: Fig. 5 Check that the castors are properly fixed and are rolling and swivelling freely, (the function can be affected by soap, hair, dust and chemicals from floor cleaning).
- Page 46 A shut-off valve with a filter is mounted on each of the two water supply hoses. To access these: 1 Make sure the Malibu/Sovereign bathtub is in its highest position. 2 The shut-off valve can be reached under the Malibu/Sovereign bathtub.
- Page 47 Yearly Checks by Qualified Personnel Only The Malibu/Sovereign bathtub must be serviced once a year in accordance with the Maintenance and Repair Manual. Contact your local Arjo service representative to sign for a service agreement. WARNING To avoid injury and/or unsafe product, the maintenance...
-
Page 48: Troubleshooting
Troubleshooting NOTE Before starting the troubleshooting check: Power supply, Water supply and the LEDs on control panel. If the problem can not be solved with the problem solving actions below, please contact an Arjo authorized technician. PROBLEM ACTION Nothing happens when pushing a button. Check that the emergency stop button is not pushed down, reset until it pops-up. - Page 49 Malibu/ Continue Malibu/Sovereign bathtub if started. Sovereign bathtub is operated by battery Wait for mains to return before starting a new Malibu/Sovereign bathtub. With mains on, check battery level LED for a green light indication.
-
Page 50: Technical Specifications
215 l (full, without patient) Total weight of lift (without patient) 35kg Bathtub weight, excluding package, with all panels Malibu 1600, Malibu 1700 and Sovereign 172 kg Maximum floor load 576 kg / 1 m Maximum floor pressure 4.5 N/mm Maximum ambient temperature 40 °C... - Page 51 With Height Adjustable Malibu/Sovereign Bathtub and/or Lifting Arm Voltage 230 V single phase AC Frequency 50 Hz Power consumption 1000 VA Fuses External 230 V 10 A Internal 230 V 6,3 A Power supply cord Only replaced by qualified personnel.
- Page 52 Thermometer Range 10-50 °C Accuracy +/-1 °C Resolution 0.1 °C Operating Conditions Ambient temperature 5 °C – 35 °C Relative humidity 30% - 90% Rh Atmospheric pressure 800 hPa to 1060 hPa Transport and Storage Ambient temperature -20 °C to 70 °C Relative humidity 10% - 80% at 20 °C Atmospheric pressure...
- Page 53 Allowed Product Compatibility Malibu/Sovereign bathtub integrates Maxi Sky Range (All models but MS 1000 and Large hanger with the following Arjo products: bars and stretchers), Maxi Move Range (All hanger bars but Large and Stretchers), Maxi Twin Range (All hanger bars but Large), Sara 3000, Sara Plus, Sara Lite and Stedy.
-
Page 54: Labels
Maximum weight of the patient. Patient Weight etc. Weight Identification States the product identification, Mode of Time span of Malibu/Sovereign Label serial number and year and month operation bathtub lift and Air Spa system of manufacturing. turned ON and OFF MEDICAL —... - Page 55 Data Label for armrest Data Label for Chair seat Data Label for lift Attention Label Attention Label Applied Part Approval Label Data Label for Malibu/Sovereign Bathtub/Lift (EU) Data Label for transfer Chassis...
-
Page 56: List Of Standards And Certificates
List of Standards and Certificates STANDARDS/CERTIFICATES DESCRIPTION EN ISO 10535:2006 Hoist for transfer of disabled persons EN ISO 10993-1:2009 Biological evaluation of medical devices - Part 1 EN 1717:2000 Protection against pollution of potable water in water installations and general requirements of devices to prevent pollution by backflow UL 94 Revision 9 Tests for Flammability of Plastic Materials for Parts in Devices and Appliances... -
Page 57: Electromagnetic Compatibility
(electromagnetic interference) from external sources. Some procedures can help reduce electromagnetic interferences: • Use only Arjo cables and spare parts to avoid increased emissions or decreased immunity which can compromise the correct functioning of the equipment. • Ensure that other devices in patient-monitoring and/or life-support areas comply to accepted emissions standards. - Page 58 Guidance and manufacturer’s declaration – electromagnetic immunity Electromagnetic Immunity test IEC 60601-1-2 test level Compliance level environment – guidance Electrostatic ±2kV, ±4kV, ±8kV, ±15kV air ±2kV, ±4kV, ±8kV, ±15kV air Floors should be wood, discharge concrete or ceramic tile. ±8kV contact ±8kV contact (ESD) If floors are covered with...
- Page 59 Guidance and manufacturer’s declaration – electromagnetic immunity Electromagnetic Immunity test IEC 60601-1-2 test level Compliance level environment – guidance Voltage dips, 0% UT; 0,5 cycle 0% UT; 0,5 cycle short At 0°, 45°, 90°, 135°, 180°, At 0°, 45°, 90°, 135°, 180°, interruptions 225°, 270°...
-
Page 60: Parts And Accessories
Transfer chassis - S8557492 Safety belt Neck Pillow S8664559-03 8350897-031 Battery Kit Side cover - AH1008797 AH1012091 Back cover Malibu 1600 - AH1011993 Back Cover Malibu 1700/Sovereign- AH1011770 Corner cover - AH1006584 Wall Bracket kit Bedpan CDA 1500-07 8547054 bedpan holder AJA-1105-09... - Page 61 Intentionally left blank...
- Page 62 Intentionally left blank...
- Page 63 AUSTRALIA FRANCE Arjo Australia Arjo SAS Arjo Polska Sp. z o.o. Building B, Level 3 2 Avenue Alcide de Gasperi 11 Talavera Road CS 70133 Macquarie Park, NSW, 2113, FR-59436 RONCQ CEDEX Tel: +48 61 662 15 50 Australia Tél: +33 (0) 3 20 28 13 13...
- Page 64 At Arjo, we are committed to improving the everyday lives of people affected by reduced mobility and age-related health challenges. With products and solutions that ensure ergonomic patient handling, personal hygiene, disinfection, diagnostics, and the effective prevention of pressure ulcers and venous thromboembolism, we help professionals across care environments to continually raise the standard of safe and digni¿...
Need help?
Do you have a question about the Malibu and is the answer not in the manual?
Questions and answers