Advertisement
Quick Links
Advertisement

Related Manuals for Bosch DAS 3000


Summary of Contents for Bosch DAS 3000
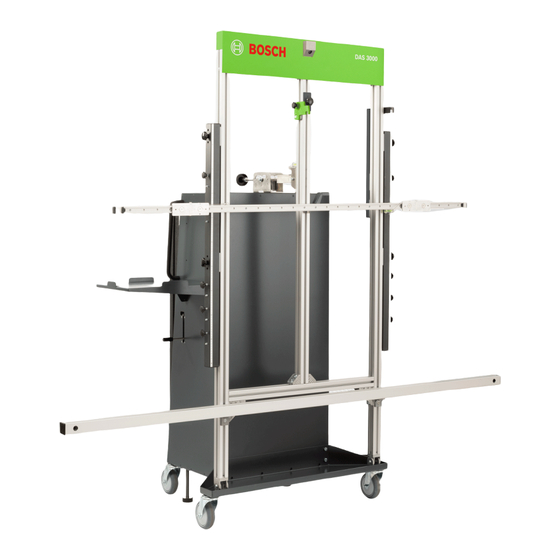
- Page 1 DAS 3000 Unpacking, Assembly, Initializing...
- Page 2 DAS 3000 Unpacking © Robert Bosch GmbH 2016. All rights reserved, also regarding any disposal, exploitation, reproduction, editing, distribution , as well as in the event of applications for industrial property rights.
- Page 3 Tools required: Unpacking: 1. 10mm wrench 2. 13mm wrench 3. T30 Torx © Robert Bosch GmbH 2016. All rights reserved, also regarding any disposal, exploitation, reproduction, editing, distribution , as well as in the event of applications for industrial property rights.
- Page 4 3 Locks 2. Pull open the 3 box locks. © Robert Bosch GmbH 2016. All rights reserved, also regarding any disposal, exploitation, reproduction, editing, distribution , as well as in the event of applications for industrial property rights.
- Page 5 3. Remove the banding. 4. Remove the box cover. Dispose of all trash properly. © Robert Bosch GmbH 2016. All rights reserved, also regarding any disposal, exploitation, reproduction, editing, distribution , as well as in the event of applications for industrial property rights.
- Page 6 5. Remove the outer shell of the box. Dispose of all trash properly. © Robert Bosch GmbH 2016. All rights reserved, also regarding any disposal, exploitation, reproduction, editing, distribution , as well as in the event of applications for industrial property rights.
- Page 7 6. Cut tie wraps that are holding loose components. 7. Remove all the loose components from the Trolley. © Robert Bosch GmbH 2016. All rights reserved, also regarding any disposal, exploitation, reproduction, editing, distribution , as well as in the event of applications for industrial property rights.
- Page 8 13mm wrench. 9. Twist to unlock from the channel. © Robert Bosch GmbH 2016. All rights reserved, also regarding any disposal, exploitation, reproduction, editing, distribution , as well as in the event of applications for industrial property rights.
- Page 9 10. Remove fasteners from the wood wedges. 11. Remove the wood wedges. © Robert Bosch GmbH 2016. All rights reserved, also regarding any disposal, exploitation, reproduction, editing, distribution , as well as in the event of applications for industrial property rights.
- Page 10 2 T30 Torx™ screws. Discard the bracket. © Robert Bosch GmbH 2016. All rights reserved, also regarding any disposal, exploitation, reproduction, editing, distribution , as well as in the event of applications for industrial property rights.
- Page 11 DAS 3000 – Unpacking 13. Remove the T30 Torx™ screw. © Robert Bosch GmbH 2016. All rights reserved, also regarding any disposal, exploitation, reproduction, editing, distribution , as well as in the event of applications for industrial property rights.
- Page 12 16. Using the handles with 2 technicians roll the DAS 3000 off the pallet. © Robert Bosch GmbH 2016. All rights reserved, also regarding any disposal, exploitation, reproduction, editing, distribution , as well as in the event of applications for industrial property rights.
- Page 13 17. Remove Positioning Bar shipping support from the Trolley by loosening the T-Slot Nut fasteners. © Robert Bosch GmbH 2016. All rights reserved, also regarding any disposal, exploitation, reproduction, editing, distribution , as well as in the event of applications for industrial property rights.
- Page 14 19. Remove the 10mm Shipping Support Fastener inside the Trolley. © Robert Bosch GmbH 2016. All rights reserved, also regarding any disposal, exploitation, reproduction, editing, distribution , as well as in the event of applications for industrial property rights.
- Page 15 DAS 3000 Assembly © Robert Bosch GmbH 2016. All rights reserved, also regarding any disposal, exploitation, reproduction, editing, distribution , as well as in the event of applications for industrial property rights.
- Page 16 Assembly: 1. 5mm hex key 2. 13mm wrench 3. 8mm wrench © Robert Bosch GmbH 2016. All rights reserved, also regarding any disposal, exploitation, reproduction, editing, distribution , as well as in the event of applications for industrial property rights.
- Page 17 DAS 3000 holes. Tighten the nuts using an 8mm wrench. © Robert Bosch GmbH 2016. All rights reserved, also regarding any disposal, exploitation, reproduction, editing, distribution , as well as in the event of applications for industrial property rights.
- Page 18 2. Install the washers onto the setscrews. 3. Install the hex nuts onto the setscrews and tighten. © Robert Bosch GmbH 2016. All rights reserved, also regarding any disposal, exploitation, reproduction, editing, distribution , as well as in the event of applications for industrial property rights.
- Page 19 T-Slot Bolts and tighten the nuts with a 5mm hex wrench. © Robert Bosch GmbH 2016. All rights reserved, also regarding any disposal, exploitation, reproduction, editing, distribution , as well as in the event of applications for industrial property rights.
- Page 20 Corner Guard onto the bottom left and right corners of the Calibration Dual Board 1 681 098 011. © Robert Bosch GmbH 2016. All rights reserved, also regarding any disposal, exploitation, reproduction, editing, distribution , as well as in the event of applications for industrial property rights.
- Page 21 Caution: Do not over tighten the knurled knob, overtightening will damage the Multi Target Shop Box. © Robert Bosch GmbH 2016. All rights reserved, also regarding any disposal, exploitation, reproduction, editing, distribution , as well as in the event of applications for industrial property rights.
- Page 22 Alignment Aid 1 681 098 009. © Robert Bosch GmbH 2016. All rights reserved, also regarding any disposal, exploitation, reproduction, editing, distribution , as well as in the event of applications for industrial property rights.
- Page 23 9. Mount the Reference Board assembly onto the Clamp 1 688 120 187. © Robert Bosch GmbH 2016. All rights reserved, also regarding any disposal, exploitation, reproduction, editing, distribution , as well as in the event of applications for industrial property rights.
- Page 24 Store the Reference Board in the Multi Target Shop Box. © Robert Bosch GmbH 2016. All rights reserved, also regarding any disposal, exploitation, reproduction, editing, distribution , as well as in the event of applications for industrial property rights.
- Page 25 Indicator Bar between the hex screw and washer located at the top of the DAS 3000 Trolley. © Robert Bosch GmbH 2016. All rights reserved, also regarding any disposal, exploitation, reproduction, editing, distribution , as well as in the event of applications for industrial property rights.
- Page 26 Adaptors 1 685 720 380 and hang them on the appropriate position of the Positioning Bar A,B,C,D. © Robert Bosch GmbH 2016. All rights reserved, also regarding any disposal, exploitation, reproduction, editing, distribution , as well as in the event of applications for industrial property rights.
- Page 27 Camera Beam Cables Routing © Robert Bosch GmbH 2016. All rights reserved, also regarding any disposal, exploitation, reproduction, editing, distribution , as well as in the event of applications for industrial property rights.
- Page 28 3. Push the cable towards the bottom of the base of the Positioning Bar. © Robert Bosch GmbH 2016. All rights reserved, also regarding any disposal, exploitation, reproduction, editing, distribution , as well as in the event of applications for industrial property rights.
- Page 29 6. Push the cable through the Positioning Bar going up towards the Cross Bar. © Robert Bosch GmbH 2016. All rights reserved, also regarding any disposal, exploitation, reproduction, editing, distribution , as well as in the event of applications for industrial property rights.
- Page 30 Bar to rest on the Tablet Holder. 8. Reinstall the plastic covers into the channel slots. © Robert Bosch GmbH 2016. All rights reserved, also regarding any disposal, exploitation, reproduction, editing, distribution , as well as in the event of applications for industrial property rights.
- Page 31 DAS 3000 Initializing © Robert Bosch GmbH 2016. All rights reserved, also regarding any disposal, exploitation, reproduction, editing, distribution , as well as in the event of applications for industrial property rights.
- Page 32 3. Touch All Other Apps. 4. Touch BAP to complete the Camera pairing process. © Robert Bosch GmbH 2016. All rights reserved, also regarding any disposal, exploitation, reproduction, editing, distribution , as well as in the event of applications for industrial property rights.
- Page 33 QR Code serial number. © Robert Bosch GmbH 2016. All rights reserved, also regarding any disposal, exploitation, reproduction, editing, distribution , as well as in the event of applications for industrial property rights.
- Page 34 Place the serialized QR Code in front the left side camera and press the continue arrow. © Robert Bosch GmbH 2016. All rights reserved, also regarding any disposal, exploitation, reproduction, editing, distribution , as well as in the event of applications for industrial property rights.
- Page 35 QR code in front the matching camera. © Robert Bosch GmbH 2016. All rights reserved, also regarding any disposal, exploitation, reproduction, editing, distribution , as well as in the event of applications for industrial property rights.
- Page 36 9. Press the continue arrow to complete the DAS 3000 camera pairing to the ADS 625. © Robert Bosch GmbH 2016. All rights reserved, also regarding any disposal, exploitation, reproduction, editing, distribution , as well as in the event of applications for industrial property rights.
- Page 37 THANK...
Need help?
Do you have a question about the DAS 3000 and is the answer not in the manual?
Questions and answers