StarTech.com RKCOND17HD Quick Start Manual
1-port vga/dvi rackmount lcd console, 17 in., 1080p, 1u
Hide thumbs
Also See for RKCOND17HD:
- Manual (34 pages) ,
- Quick start manual (2 pages) ,
- User manual (16 pages)
Advertisement
Quick Links
1-Port VGA/DVI Rackmount LCD Console - 17 in. - 1080p - 1U
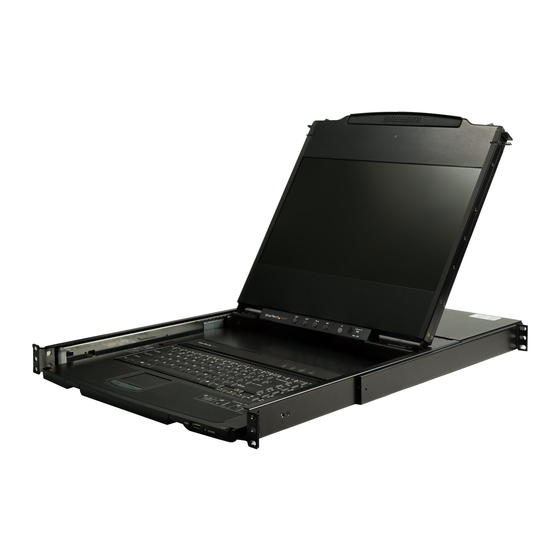
Front View (Open)
LCD
Controls
Keyboard
Touchpad
Front View (Closed)
Front Mounting Brackets
Rear Mounting Brackets
For the latest information, specifications, and support visit www.startech.com/RKCOND17HD.
LCD Module
LCD On / Off
Firmware
Upgrade
Switch
Keyboard
Release
Catches
Upper
USB
Handle
HID
Port
Power
Module Release
Catches
Rear View
Power
Socket
Button
Firmware
Upgrade
Port
Reset Button
Power Switch
Package Contents
• LCD Console x 1
• Rear Mounting Brackets x 2
• KVM Cables (USB/VGA) x 1
• Audio Cable x 1
• M5 Cage Nuts x 8
• M5 Screws x 8
• Power Cords (NA, JP, UK, EU, ANZ) x 5
• Quick-Start Guide x 1
Requirements
Installation:
• 1U of Rack Space
• Phillips Head Screwdriver x 1
• (Optional) Cage Nut Tool x 1
• AC Electrical Outlet
• Two people are required for hardware installation
Hardware Installation
Standard Rack Mounting
Note: Installation of this product requires at least two people. One
person is required to hold the unit in place. A second person is
required to screw in all of the required fasteners.
1. Select the 1U of Rack Space that you intend to use for installing
this product.
2. Install four M5 Cage Nuts into the front of your rack.
3. Repeat Step 2 for the rear side of your rack.
Note: Ensure that your M5 Cage Nuts are installed in the same 1U
of Rack Space in both the front and the rear of your rack.
LED
4. While one person holds the RKCOND17HD unit in place, the
second person must loosely screw the front Rack Mounting
Brackets into place with four M5 Screws using a Phillips Head
Screwdriver (not included).
Note: Do not completely tighten the M5 Screws.
Quick-Start Guide
Console
KVM
VGA Port
VGA
Port
Console
KVM
Console
USB HID
Audio
Audio
Ports
Port
Port
KVM DVI-D
Port
Console
KVM USB Port
DVI-D Port
SKU #: RKCOND17HD
Revision: 07/27/2021
Advertisement

Subscribe to Our Youtube Channel
Related Manuals for StarTech.com RKCOND17HD


Summary of Contents for StarTech.com RKCOND17HD
- Page 1 Note: Ensure that your M5 Cage Nuts are installed in the same 1U Power of Rack Space in both the front and the rear of your rack. 4. While one person holds the RKCOND17HD unit in place, the Module Release second person must loosely screw the front Rack Mounting...
- Page 2 Limitation of Liability électriques sont sous tension. In no event shall the liability of StarTech.com Ltd. and StarTech.com USA LLP (or their officers, • L’installation et/ou le montage du produit doit être réalisé par un professionnel certifié et dans directors, employees or agents) for any damages (whether direct or indirect, special, punitive, le respect des normes locales et du code de construction local.
Need help?
Do you have a question about the RKCOND17HD and is the answer not in the manual?
Questions and answers