Tektronix TDS 310 Instruction Manual
Two channel oscilloscopes
Hide thumbs
Also See for TDS 310:
- Service manual (200 pages) ,
- Service manual (200 pages) ,
- Instruction manual (242 pages)

Related Manuals for Tektronix TDS 310


Summary of Contents for Tektronix TDS 310
- Page 1 Instruction Manual Tektronix TDS 310, TOS 320, & TDS 350 Two Channel Oscilloscopes 070-8568-02...
-
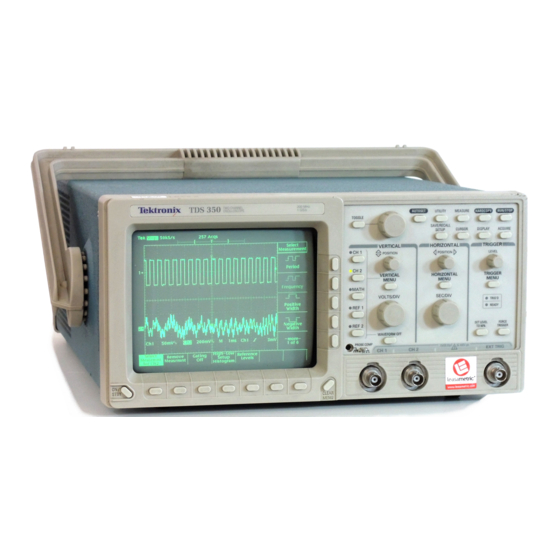
Page 3: Front Panel
The menus are easy to use. For example, to make a change to the vertical operating system, press the VERTICAL MENU button to display the menu choices. This section illustrates each control and connector and contains brief de- scriptions of its use or function. TDS 310, TDS 320, & TDS 350 Instruction Manual... -
Page 4: Display And Power Controls
Front Panel Display and Power Controls ~Tekt*ffon~x .!~. J T DS32O~U~Z~ The Side Menu buttons provide access to side menu selections. See page 2-2 for more information en the user interface. ci . Mt~l1 The ON/STAY button toggles The CLEAR MENU button clears all The Main Menu buttons provide selections. -
Page 5: Vertical Controls
OREF 2 The WAVEFORM OFF button 0B~ COMP turnS off the presently selected Connector to chassis waveform. Probe compensation output. See page 2-7 for instruOt,ons on tO compensate the probes. 110W TDS 310, TDS 320, & TIDS 350 ln~tructionManual... - Page 6 Front Panel Horizontal Controls HORIZONTAL — The HorizOntal POSITION knob controls the horIzontal position of all waveforms. HORIZONTAL MENU The HORIZONTAL MENU button calls up the honzorotal operations menu. For more Information on hori~c’nfal operations see page 3-20. SE C) ID IV The SEC/DIV knob controls the horizontal scale of the active waveforms.
-
Page 7: Trigger Controls
Front Panel Trigger Controls TRIGGER The Trigger LEVEL knob controls the trigger. The TRIGGER MENU bUtton calls up the trigger menu. See page 3-25 for more hlfornJatIOn on triggering. TI~!G’D The Trigger Status Lights Indicate the Status Of the READY iri~gering system. -
Page 8: Miscellaneous Controls
Front Pa~eI Miscellaneous Controls The MEASURE button calls up the automated measurements menu. page for more information 3-29 on autO~flated measurements. The RUN/STOP button starts The UTILITY button calls up the utility and stops acquisition. menu. See page 3-45 far more information on utilities. -
Page 9: Display Map
Display Map The Status Readouts show trigger status (stopped, waiting for trigger, etc.) and The value entered with When the general purpose the general purpose knob is first assigned, the acquisition status (mode and sampling Trigger position (T). knob, knob icon appears here. rate or number of acquisitions). - Page 10 Front Panel Inputs The channel BNC inputs (CHI The EXT TRIG in put accepts and CH2) accept electrical external trigger signals. See signals for display. page 3’26 for more information on external triggering. Operation...
-
Page 11: Rear Panel
You can use the GPIB and RS-232 interfaces to operate and program the oscilloscope from a GPIB controller; see the TOS 310, 320, & 350 Programmer Manual for more in formation. information. TDS 310, TDS 320, & TDS 350 Instruction Manual... - Page 12 Menu Maps Side Menu Side Menu i i , CH 1 CH 2 TRIGGER Main Menu MENU Ext(lO Pop-up Ext~1O AC Line AC Line Source Main Menu Type Trigger On Field 1 Video Field 2 — Lines Left-most Mode TRIGGER HF Reject MENU Pop-up...
- Page 13 T/L Address Levels Gating Measurement — •—~~__~ Hardcopy Histogram Max/mm Formats ______~~~ RS-232C Set Levels In ConI/aural/on High Ret Mid Ref OK Confirm Low Ref Figure 3-3: Secondary Functions Menu Map TDS 310, los 320, & TOS 350 Instruction Manual 3-15...
-
Page 14: Manipulating Waveforms
•.#•qa~ .—.~———~‘-. ..4...V. .a.. .~.~~ .I.~.._a.._.aep.._..,_._~ ..• ... p .11 ..i,~i..., 1 ,fl~.r.,.. Manipulating Waveforms There are four basic ways to manipulate waveforms with TDS 300 Series oscilloscopes. • You can Change their display parameters wfth the Vertical and horizontal systems •... - Page 15 Waveforms Manipulating C~CI~J Figure 3-5: The Vertical Menu Use the vertical menu to perform these tasks. Select Input Coupling Coupling. Use the Press the main menu button — side menu to select AC, or ground (GND) coupling. Waveform invert a Press the main menu button Invert.
- Page 16 — Manipulating Waveforms 10k twIn: 200MS/s Sample RE’ Normal Wave!orm — Waveform inverted — 2SOflS 401,V RQI I 25011$ Source Coupling Level mode Hoidolt Slope Type C112 40111V Auto 5000$ Edge Figure Inverting a 3-6: Waveform Select Bandwidth Bandwidth. Press the main menu button Use the —...
- Page 17 Manipulating Waveforms Horizontal To access horizontal system features, press the HORIZONTAL MENU Operations 3-8 shows the horizontal menu. button, shown in Figure 3-7. Figure 11OR~Z0NTAL~ P051110W HORIZONTAL c:::::~—--—----—-~ MENU H oñzontal Menu SEC/Div Figure 3-7: The HORIZONTAL MENU Button 200MS/s Teic Run: Sample Oela~’...
-
Page 18: Displaying Math Waveforms
To activate the math waveform, press the button, shown in MATH Figure 3-9. VERTICAL o CH I POSITION OCH2 VERTICAL MENU MATH Math VOLTS/DIV OREF 1 WAVEFORM OFF PROBE COUP Figure 3-9: The MATH Button Instruction Manual 3-21 TDS 310, TDS 320, & TDS 350... -
Page 19: Saving And Recalling Waveforms
Manipulating Waveforms Then select a formula from the side menu (Chi Ch2, Chi Ch2, Ch2 — — Ch2). Figure 3-/0 shows a square wave on Channel 2 added Chl, or CH1 to a sine wave on Channel 1. Figure 3-10: A Math Waveform Saving and Recalling TDS 300 Series Oscilloscopes have two reference waveforms. - Page 20 In Independent mode, the selected reference waveform is independently positionable. NOTE If you save a waveform “full” reference waveform, its previous to a contents will be overwritten. TDS 310, TOS 320, & TDS 350 Instruction Manual 3-23...
- Page 21 Manipulating Waveforms 10,,: HorizoI,Ial Posil 1 I~I S/s Sa inple iLlU: Iie~ Save to 11012 Save RefZ Save MATH 11e12 Save Roll 11e12 Figure 3-12: A Reference Waveform Menu The reference waveforms maintain their contents indefinitely, regardless of the power state or setup of the instrument. To remove a selected reference waveform from the display, press WAVEFORM OFF.
-
Page 22: Edge Triggering
Triggering TDS 300 Series oscilloscopes have two triggers: a standard edge trigger and a video trigger. To access trigger settings and features, press the TRIG- GER MENU button, shown in Figure 3-13. TRIGGER~ LEVEL Trigger Menu O TRieD READY FORCE SET LEVEL TO 50% TAICOER... - Page 23 Triggering Figure 3-14: The Edge Trigger Menu Use the edge trigger menu to perform these tasks. Select the Trigger Source Press the main menu button Source. Use — the side menu to select from these options. • Press Chi or Ch2 to set the trigger source to one of the input channels. or Ext(1O to set the trigger source to the EXT TRIG input On •...
- Page 24 TDS 300 Series the knob have a holdoff range of 500 ns to 10 s. Press the side menu button Set to Mm to quickly set the holdoff to 500 ns. TDS 310, TOS 320, & TUS Instruction Manual 3-27...
-
Page 25: Taking Measurements
Taking Measurements TDS 300 Series oscilloscopes have two features that make them easy for you to obtain quantitative data from a displayed waveform: automated measurements and cursors. Automated The Oscilloscope can perform 21 different automated measurements on a waveform (four measurements at any one time). To access these measure- Measurements ments, press the MEASURE button, shown in Figure 3-16. - Page 26 Taking Measurements SpIed Run: 2 OMS/s Sample Meas Li re I Allipi 2.06 Rise Time lUSkflz dli FER /• Fall Time Cli ~1M Pa ~‘ 772111V PoslIlve OLILY Cycle •\ • ~ Fall 3.3S!~S Negative OLity Cycle ~.ThI Clii —more— NI 25j.is S OOfllV Select...
- Page 27 The value used as 100% whenever High Ref, Mid Ref, and Low Ref values are needed (as in fall time and rise time measurements). Measured over the entire waveform or gated region. 3~31 TDS 310, 105 320, & TOg 350 Instruction Manual...
- Page 28 Taking Measurements Table 3-1: Measurement Definitions (Cont.) Name Definition The value used as 0% whenever High Ref, Mid Ref, and Low Ref values are needed as in fall time and rise time measurements. Measured over the entire waveform or gated region. Voltage measurement.
- Page 29 Taking Measurements 7. Press TOGGLE. 8. Use the General Purpose Knob to set the other cursor to the right edge of the gate. All automated measurements now take data only from the portion of the waveform that is within the gate. Press Gate Off to turn gating off.
- Page 30 —— ~Th,!,:... ~-,-•:,a~~ Taking Measurements Cursor RUN/STOP) _________ UTILITY SAVEIRECAI.L DISPLAY ACQUIRE SETUP Figure 3-18: The CURSOR Button Figure 3-19: The Cursor Menu If you want to take a time measurement in Hertz instead of seconds, press the main menu button Time Units and use the side menu to switch between the two.
- Page 31 Measurements Taking 5. Use the General Purpose Knob to move one cursor to a desired mea- surement point. For example, if you wanted to measure both the peak- to-peak voltage and period of a sine wave, you would start by moving one paired Cursor to a trough”...
-
Page 32: Warranted Characteristics
Sec/Div Setting Minimum Pulse Width Envelope Mode 55/div 25 ps/div iOns — 10 ps/div 10 ns/div (TDS 310) The greater of 10 ns or — lOps/div 5 ns/div (TDS 320) .02 >< sec/div setting — 10 ps/div 2.5 ns/div (TDS 350) —. - Page 33 (0.4% >< j Net Offset1 ± + 300 mV div x V/div set- ting) Analog Bandwidth, DC Coupled 50 M1~z (TDS 310) — 100 MHz (lOS 320) — 200 MHz (TDS 350); DC 180 MHz for 2 mV/div — —...
- Page 34 Sensitivity, Edge-Type Trigger, DC Trigger Source Sensitivity Coupled CH1 or CH2 TDS 310; 035 division from DC to 20 MHz, increasing to 1 div at 50 MHz TDS 320: 035 dflvision from DC to 50 MHz, increasing to 1 div at 100 MHz TDS 350: 0.35 division from DC...
- Page 35 FCC Rules and Regulations, 47 CFR, Subpart B, Class A Susceptibility2 TDS 310 and TDS 320: ±0.2division waveform displacement, or 0.4 division increase in p-p noise. TOS 350: ~±0.2 division waveform displacement, or 0.4 division increase in p-p noise below 200 MHz. ~±0.3division waveform dis- placement, or s±0.6 division increase in p-p noise from 200 MHz to...
-
Page 36: Typical Characteristics
4Reference is a 9-div p-p sine wave input sampled at 200 MS/s for the TDS 310, 500 MS/s for the TDS 320, and I GS/s for the TDS 350. 310, TDS 320, & TOS 350 instruction Manual... - Page 37 Typical Characteristics Table 4-7: Typical Characteristics Triggering System — Name Description Trigger~Position Err~r 1’2 Error, Trigger Position, Edge Triggering Acquire Mode ~ (1 WI + 2 ns) Sample, Average ±(2 WI ~ 2 ns) Peak Detect, Envelope Sensitivity, Video-Type Trigger Typical Sensitivity Source CH1 or CH2...
-
Page 38: Nominal Traits
±100 V — Range, Position ±5 divisions Range, Sensitivity2 2 mV/div to 10 V/div Rise Time TDS 310:7 ns ‘lOS 320: 3.5 ns TDS 350: 1.75 ns TekProbe Interface Level one probe coding 1Displayed vertically 25 digitization levels (DLs) per division and 10.24 divisIons dynamic range with zoom off. A DL is the small- with levet change that the 8-bit A-D Convener can resolve, with the input scaled to the volts/division setting of the channel used. - Page 39 TDS 350: 10 Samples/s to 1 GSamplesis in 1—2—5 sequence Range, Seconds/Division TDS 310: 10 ns/divto 5 s/div in a 1 —2.5—5 sequence TOS 320: 5 ns/div to 5 s/div in a 1—2.5—5 sequence TDS 350: 2.5 ns/divto 5 s/div in a 1 —2.5--S sequence Range, Time Base Delay Time 16.5 ns to 50 seconds...
- Page 40 Description Weight Standard Instrument 6.8 kg (15 Ibs) stand-alone instrument; 8.4 kg (18.5 lbs) with front cover, accessories, and accessories pouch installed; 12.7 kg (28 Ibs) when packaged for domestic shipment TDS 310, TDS & TIDS Instruction Manual 4-13 320,...
-
Page 41: Performance Verification
Performance Verification These procedures verify the TDS 310, TDS 320, and TDS 350 two channel oscUloscopes. Depending on what you want to accomplish, you may only need to perform a few of these procedures. To rapidly confirm that this oscilloscope functions, just do the proce- •... - Page 42 Performance Verification • Where instructed to use a front-panel button or knob, select from a main or side menu, or verify a readout or status message, the name of the button or knob appears in boldface type. • Instructions for menu selection follow this format: FRONT PANEL BUT- Pop-Up (if necessary) Main Menu Button Side Menu...
-
Page 43: Test Equipment
Mark from 10 ms to iOns; Mark Generator rate and delay-time accuracy within 2 ppm accuracy Probe, lOX, A P6109B (TDS 310 and Tektronix number Signal interconnec- included with TDS 320) or P6111 B P61098 (TDS 310 and tion this instrument... - Page 44 Performance Verification TDS 310, TDS 320, and TDS 350 Test Record Certificate Number:_____________________ Instrument Serial Number: %:________________________________ Temperature: Date of Calibration: Technicians Minimum Incoming Outgoing Maximum Pertormance Test DC Voltage Measurement Accuracy +98.9 V CH1 VOLTS/DIV ±97.1V +8.52 V 200 mV +8.28 V...
- Page 45 Self Test This procedure uses internal routines to verify that the oscilloscope functions and passes its internal self tests and signal path compensations. It also confirms that the oscilloscope was adjusted properly at the time it was last adjusted. No test equipment or hookups are required. Equipment Required: None.
- Page 46 Pass or Fail in the main Check that the word Pass appears under Signal Path in the main menu. (See Figure 6-2.) If Pass does not appear, the instrument has failed the performance verification; return it to Tektronix for servicing Performance Verification...
-
Page 47: Functional Test
Time Required: Approximately 5 minutes. Prerequisites: None. Procedure: 1. Install the probe on CH 1. Connect the probe tip to PROBE COMP on the front panel; leave the probe ground unconnected. (See Figure 6-3.) & TOS 350 Instruction Manual TDS 310, TOS 320,... - Page 48 Functional Test Figure 6-3: Hookup for Functional Test Press SAVE/RECALL SETUP Recall Factory Setup OK Confirm —~ —* mit. Factory 3~ Press AUTOSET Set the VOLTS/DIV to 1 V. Use the vertical POSITION knob to center the waveform vertically on screen. Set the SEC/DIV to 250 F 15•...
- Page 49 Functional Test 16. Press the side menu button Envelope. Check that the instrument dis- plays an actively acquiring waveform on screen with the noise dis- played. 17. Press the side menu button Average. Check that the instrument dis- plays an actively acquiring waveform on screen with the noise reduced. 18.
-
Page 50: Signal Acquisition System Checks
Performance Tests The procedures are in three groupings: SignalAcquis/tion System Checks, Time Base System Checks, and Triggering System Checks. They check all the characteristics that appear in boldface type under Warranted Characteristics on page 4-3. Prerequisites The tests in this subsection comprise an extensive, valid confirmation of performance and functionality when the following requirements are met: •... - Page 51 Pertormance Tests Connect the output of a DC calibration generator through a dual-banana connector followed by a 50 0 precision coaxial cable to CH 1, as shown in Figure 6-4 Dual Banana to BNC Adaptec Coaxial Cable Figure 6-4: Hookup for DC Voltage Measurement Accuracy Check Press SAVE/RECALL SETUP Recall Factory Setup OK Confirm...
- Page 52 Equipment Required: One medium-frequency leveled sine wave generator (Item 7), one 500 precision cable (Item 2), and one 50 0 termination (Item 1). Time Required: Approximately 20 minutes. Prerequisites: See page 6-11. TDS 310, TDS 320, & TOS 350 Instruction Manual 6-13...
- Page 53 10. Increase the frequency of the generator output to 50 MHz (TDS 310), 100 MHz (TDS 320), or 200 MHz (109 350). 11. Set the SEC/DIV to iOns (TDS 310), 5 ns (TDS 320), or 2.5 ns (TEDS 350). 12. Press SET LEVEL TO 50% a~ necessary to trigger the display.
- Page 54 Check Long-Term Sample Rate and Delay Time Accuracy Equipment Required: One time-marker generator (Item 8), one precis. ~n coaxial cable, (Item 2) and one 500 termination (Item 1). Time Required: Approximately 5 minutes. Prerequisites: Seepage 6-11. TDS 310, Instruction Manual 320, & TDS 350...
- Page 55 Tests Performance Procedure: Connect, through a 50 0 precision coaxial a 50 C) termination, cable and the time-mark output of a time-marker generator to 1, as Shown in Figure 6-7. Set the output of the generator for 10 ms markers, —...
-
Page 56: Trigger System Checks
Performance Tests Set the SEC/DIV of the 0 (delayed) time base to 1 ma. Then use the General Purpose knob to set delay time to 10 ms. 10. Set the SEC/DIV of the D (delayed) time base to 500 ns. NOTE When you change the SEC/DIV in step 10, the delay time readout 10.00001... - Page 57 Performance Tests 7, Connect the BNC I connector to CII 1; connect the cable to the EXT TRIG input through a 500 termination as shown Figure 6-8. To Ext Trigger 50 C~T~rrnin~tI~n Figure 6-8; Hookup for Trigger Sensitivity Check 8. Set the generator frequency to 50 MHz (lOS 310), 100 MHz (IDS 320), or 200 MHz (lOS 350~.
- Page 58 Performance Tests First, set a signal with an amplitude at the minimum trigger sensitivity. Second, check for a stable trigger at both the positive and negative slope settings. Figure 6-9: Measuring Trigger Sensitivity 16. Press WAVEFORM OFF 17. Press CH 2. 18.
Need help?
Do you have a question about the TDS 310 and is the answer not in the manual?
Questions and answers