Advertisement
Available languages
Available languages
OUTDOOR USE ONLY
DOM ETRE INSTALLE A L'EXTERIEUR
FOR USE WITH LANDSCAPE LIGHTING SYSTEMS ONLY.
1) The device is accepted as a component of a landscape lighting system
where the suitability of the CSA or UL labeled combination shall be deter
mined by CSA, UL respectively or the local inspection authorities having
jurisdiction.
2) Fixture shall be connected to an extra low voltage transformer approved for
use with landscape lighting systems.
3) This fixture is to be connected to a secondary wiring of the following type:
12 GA 60°C minimum type;
SPT-3 suitable for outdoor use; or
approved landscape lighting cable.
INSTRUCTIONS PERTAINING TO A RISK OF FIRE,OR INJURY TO
IMPORTANT SAFETY INSTRUCTIONS
Lighted lamp is HOT!
WARNING — To reduce the risk of FIRE OR INJURY TO PERSONS.
1) Turn off / unplug and allow to cool before replacing lamp.
2) Lamp gets HOT quickly! Contact only switch / plug when turning on.
3) Do not touch hot lens or cowl.
4) Do not remain in light if skin feels warm. (Light is intense, it may cause
"sunburn".)
5) Do not look directly at lighted lamp.
6) Keep lamp away from materials that may burn.
7) Use only with wattage and lamp marked on fixture.
8) Do not touch the inner glass envelope of the lamp at any time. Use a soft
cloth. Oil from skin may damage lamp.
9) Do not operate the fixture with a damaged or missing lens.
WHEN INSTALLING KICHLER LANDSCAPE LIGHTING (LINE VOLTAGE OR LOW VOLTAGE),
CARE SHOULD BE TAKEN TO KEEP CLEAR OF POTENTIALLY COMBUSTIBLE MATERIALS.
WHEN MAINTAINING THE FIXTURES, BE SURE TO REMOVE LEAVES, PINE NEEDLES,
GRASS CLIPPINGS, MULCH, OR ANY DEBRIS THAT HAS ACCUMULATED ON THE LIGHT
BULB, LENS, OR BODY OF THE FIXTURE.
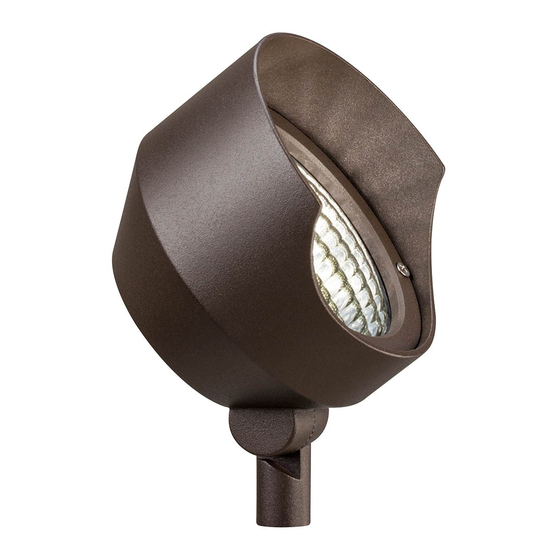
ASSEMBLY AND INSTALLATION
1) Determine desired location for mounting fixture.
2) At desired location, hammer stake (A) into ground. To avoid damage to
stake, place a board on top of stake while hammering. If ground is hard
and stake is difficult to install, make a crosscut in ground using a flat
shovel.
3) Clear away area in ground at wireway slot (B) in top of stake (A).
4) Make lamp connections. Slide spade lugs (C) beneath head of screws on
back of par 36 lamp (not supplied) and tighten screws to secure connection.
NOTE: To ease replacement of lamp and prevent corrosion of connection,
apply 15670, Corrosion Preventative Compound (sold separately) liberally
over spade lugs, par 36 screws and tabs.
5) Carefully place lamp inside cowl (E) and place o-ring (F) on lamp.
6) Align notch (G) in retaining ring with rib (H) inside cowl (E). This will align
screws (J) with holes.
7) Tighten screws (J).
8) Lay 12V cable into wireway slot (B) and screw fixture into stake (A).
9) Once desired direction is achieved run locknut (K) down against stake (A).
10) Adjust angle of fixture by loosening screw (L) in swivel (M).
11) TURN OFF POWER.
12) Make wire connections using supplied Quic Disc
below, or using other approved wiring connection method (not supplied.)
Turn off power.
The full length of the 18 GA fixture wire may be used to connect with the 10 GA or 12 GA cable provided the following conditions are met:
• Wiring is to be protected by routing close to the fixture or accessory or secured to a building structure such as house or deck.
• 18 GA fixture wiring is to be cut off so that it is attached to the connector within 6 inches of the fixture or building structure.
• If it is necessary to make the connections underground, then no more than 6 inches of the 18 GA fixture wire is to be buried.
The Quic Disc
Place the 10 gauge supply wire across the area marked 10 GA on Quic Disc
on Quic Disc
Place the 18 gauge fixture wire across the area marked 18 GA on the Quic Disc
Disc
to the base with supplied screw, making sure that the wires remain flat in the bottom portion of the Quic Disc
™
all the way down.
The copper contacts will automatically pierce the wires' insulation. Excess 18 GA fixture wire that sticks out the end of the Quic Disc
Make no other wiring connections to the 18 GA fixture wire.
Pour de plus amples informations sur la garantie, cliquez sur le lien ci-dessous : http://www.landscapelighting.com/portal/warranty_page
Date Issued: 1/27/12
PERSONS
CAUTION
following instructions
™
connector is designed to install one fixture and accommodates one 18 GA fixture wire and one 10 GA or one 12 GA supply wire.
™
.
™
For warranty information please visit: http://www.landscapelighting.com/portal/warranty_page
For Assembling and Installing Fixtures in Canada
Pour L'assemblage et L'installation Au Canada
F
QUIC DISC
WIRING INSTRUCTIONS
™
or place the 12 gauge supply wire across the area marked 12 GA
™
. After the wires are in place, connecta the top of the Quic
™
INSTRUCTIONS
G
C
D
E
, and the screw is tightened
™
is to be cut off.
™
H
M
L
K
B
A
IS-15390-CB
Advertisement
Table of Contents

Related Manuals for Kichler Lighting 15390AZT


Summary of Contents for Kichler Lighting 15390AZT
- Page 1 INSTRUCTIONS OUTDOOR USE ONLY For Assembling and Installing Fixtures in Canada DOM ETRE INSTALLE A L’EXTERIEUR Pour L’assemblage et L’installation Au Canada FOR USE WITH LANDSCAPE LIGHTING SYSTEMS ONLY. 1) The device is accepted as a component of a landscape lighting system where the suitability of the CSA or UL labeled combination shall be deter mined by CSA, UL respectively or the local inspection authorities having jurisdiction.
- Page 2 INSTRUCTIONS OUTDOOR USE ONLY For Assembling and Installing Fixtures in Canada DOM ETRE INSTALLE A L’EXTERIEUR Pour L’assemblage et L’installation Au Canada A UTILISER UNIQUEMENT POUR LES SYSTÈMES D’ÉCLAIRAG PAYSAGER 1) Le dispositif est accepté en tant que composant d’un système d’é clairage paysager lorsque la compatibilité...
Need help?
Do you have a question about the 15390AZT and is the answer not in the manual?
Questions and answers