Table of Contents
Advertisement
Available languages
Available languages
Quick Links
FT312
Model:
Modelo:
Modèle:
4"-5" SURFACE GRINDING DUST SHROUD
CAPOT D'EXTRACTEUR DE POUSSIÈRE POUR LE MEULAGE DE
SURFACES DE 100-125 MM / 4-5 PO
CUBIERTA ANTIPOLVO DE 4-5 PULGADAS PARA AMOLAR SUPERFICIES
For your own safety, read the instruction manual for this dust
WARNING
shroud, the angle grinder, the cup wheel, and the dust extractor
(vacuum cleaner) before use. Failure to heed these warnings may result in personal
injury and property damage.
SPECIAL SAFETY INSTRUCTIONS FOR SURFACE GRINDING
DUST SHROUD
The shroud must be securely attached to the angle grinder and positioned for
maximum safety, so the least amount of the wheel is exposed towards the operator.
The shroud is designed to collect dust in conjunction with a dust extractor and help
protect the operator from accidental contact with the wheel.
Only use dry diamond surface cup wheels with this surface grinding shroud. The
surface grinding shroud is not intended to be used with standard grinding, cut-off, cup
wheels or wire brushes.
Do not use accessories that require liquid coolants. Using water or other liquid
coolants may result in electrocution or shock.
DO NOT use wire brushes with this surface grinding shroud.
DO NOT use abrasive wheels.
DO NOT grind or cut metal with a diamond cup wheel. Fragments could loosen and
fly apart causing injuries and damage.
ALWAYS use with a dust extractor.
Wear eye, dust and ear protection. Always use side handle.
When not in use, place the grinder on a stable surface where it will not move
inadvertently, roll or cause a tripping or falling hazard. Serious personal injury may
result.
INTENDED USE
The dust shroud has been designed for extraction of dust created during grinding,
–
leveling, and polishing of concrete surfaces in conjunction with a suitable dust
extractor / vacuum cleaner (sold separately).
The dust shroud is designed to work only with FLEX angle grinders FX3181,
–
FX3181A, FX3171A, and FX3171.
The dust shroud is designed to work only with diamond cup wheels with maximum
–
diameter of 5" (125mm).
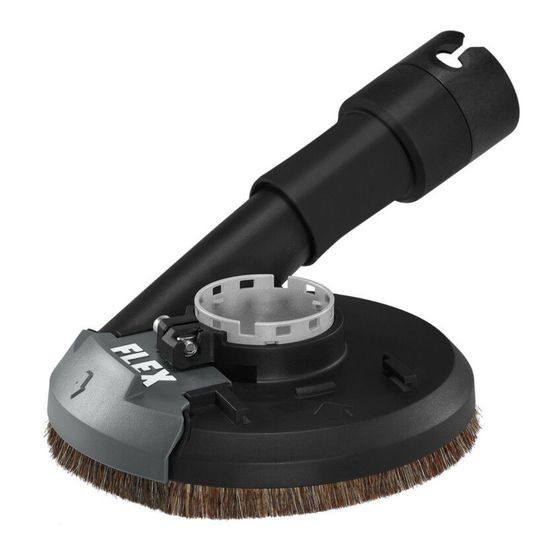
Fig. 1a
Hex Wrench
Adapter Ring
Dust Extractor
Port
Shroud
OPERATOR'S MANUAL
MANUAL DEL OPERADOR
MANUEL DE L'UTILISATEUR
Segment
for Working Against a Wall (removable)
NOTE: * Not included with the dust shroud
Damaged or defective dust shrouds and damaged/defective
WARNING
accessories that are part of the dust shroud must be replaced in
all cases. Not following this instruction presents a high risk of injury!
Use this dust shroud only with FLEX angle grinders FX3181,
WARNING
FX3181A, FX3171A, and FX3171. Using with any other tool may
cause an injury and property damage.
Turn the tool OFF and remove the battery pack before
WARNING
performing any assembly.
ATTACHING DUST SHROUD TO ANGLE GRINDER
a. Follow the chapter "WHEEL GUARD
INSTALLATION" in the angle grinder
manual to remove the grinding (or
cut-off) guard from the angle grinder.
b. Remove the adapter ring from the dust
shroud, align the three raised ribs on
the adapter ring with the three notches
on the collar of the grinder. Put the
adapter ring onto the collar (Fig. 2a).
c. Rotate the adapter ring clockwise to
the desired position (Fig. 2a).
Rotation is possible in one direction
only!
d. Loosen the clamp bolt on the dust
shroud counterclockwise with the
supplied hex wrench. Insert the adapter
ring, attached to the grinder, into the
collar of the dust shroud according to
the desired position (Fig. 2b).
e. Tighten the clamp bolt clockwise with
the wrench (Fig. 2b).
INSTALLING / REMOVING DIAMOND CUP WHEEL (FIG. 3)
Use only diamond
WARNING
cup wheels with
maximum diameter of 5" (125mm).
With the battery pack removed and the dust
shroud properly attached to the grinder,
follow these steps to install a cup wheel:
a. Place the backing flange on the
spindle, making sure that the flat
surfaces on the bottom of the backing
flange are engaged with the flat
surfaces on the spindle.
b. Place the diamond cup wheel (sold
separately) onto the spindle over the
backing flange as shown.
FUNCTIONAL DESCRIPTION
Fig. 1b
Dust
Extractor
Wrench*
Adapter
Lock Nut*
Diamond Cup Wheel*
Collar
Spindle
Backing
Lock*
Flange*
Spindle*
Brush
Ring
ASSEMBLY
Fig. 2a
Rib
b
c
Notch
click
Fig. 2b
d
e
Fig. 3
c
b
b
a
d
c. Thread the lock nut onto the spindle as shown.
Do not reverse the lock nut. If the lock nut is not installed properly,
WARNING
the wheel cannot be properly tightened resulting in possible serious
injury.
d. While pressing the spindle lock, tighten the lock nut by turning it clockwise with the
wrench included with the grinder.
To remove the cup wheel:
a. With the battery pack removed, press the spindle lock.
b. Loosen the lock nut by turning it counterclockwise with the wrench included with
the grinder.
WARNING
Press the spindle lock only when the spindle is at a standstill.
Use protective gloves when removing the wheel from the tool,
WARNING
or first allow the wheel to cool down. Wheels may be hot after
prolonged use.
CONNECTING TO DUST EXTRACTOR (FIG. 4)
NOTE: Read the OSHA regulation on silica
Fig. 4
dust and the related OSHA Silica Table 1
to understand the requirements needed
to reduce exposure to silica dust at the
worksite. Specific rules apply to the drilling,
demolition, cutting and grinding materials
that contain silica. According to OSHA Silica
Table 1, when dry cutting or dry surface
grinding concrete type materials using
hand held grinders, the dust extractor (dust
collector) being used must provide 25 CFM
(cubic feet per minute) or greater air flow
Ø1-1/4"
per inch of wheel diameter. For example,
5" grinding wheel requires a dust extractor
with a rating of at least 125 CFM.
All OSHA requirements can be found at OSHA website: www.osha.gov
Always check OSHA website for the latest regulations.
This dust shroud MUST BE used with a dust extractor suitable for
WARNING
concrete/masonry dust collection. ALWAYS wear certified safety face
or dust mask.
The dust extractor port of the shroud is designed to
connect to Ø1-1/4"
hoses or adapters.
Connect a suitable dust extractor hose to the dust extractor port. Use an adapter
(supplied) if needed. Make sure the connection is tight and secure.
OPERATING INSTRUCTIONS
The angle grinder should ALWAYS be used with a dust extractor vacuum designed for
dust removal.
WORKING AGAINST A WALL
To pull off the
WARNING
Fig. 5a
segment, turn off the
power tool and remove the battery pack.
Only remove the segment when working
against a wall. For all other work, the
segment must be mounted. The open
area of the dust shroud must point in
the direction of the wall and away from
the user.
Removing the segment (Fig. 5a)
Pull out the segment from the side guides
on the dust shroud according to the arrow
Arrow Marks
direction on the segment.
Storing the segment (Fig. 5b)
Fig. 5b
Push the segment into the side guides of
the segment holder according to the arrow
direction on the segment holder, until it
engages audibly.
Open Area
dust extractor
Segment Holder
Advertisement
Table of Contents

Related Manuals for Flex FT312


Summary of Contents for Flex FT312
- Page 1 / vacuum cleaner (sold separately). the user. The dust shroud is designed to work only with FLEX angle grinders FX3181, Removing the segment (Fig. 5a) – FX3181A, FX3171A, and FX3171.
- Page 2 – contraire des aiguilles d’une montre au avec un extracteur de poussière approprié pour la meuleuses d’angles FLEX FX3181, FX3181A, FX3171A et FX3171. moyen de la clé hexagonale fournie. collecte de poussière de béton/maçonnerie. Portez TOUJOURS un masque de protection Insérez la bague de verrouillage de...
- Page 3 ADVERTENCIA segment. los requisitos necesarios para reducir la angulares FLEX FX3181, FX3181A, FX3171A y FX3171. Es exposición al polvo de sílice en el lugar c. Insérez une nouvelle bague pour la posible que la utilización de cualquier otra herramienta cause una lesión y daños de trabajo.
- Page 4 Inserte un anillo con cepillo nuevo en la guía de la cubierta antipolvo y en el segmento. © Chervon North America 1203 E. Warrenville Rd., Naperville, IL 60563 www.flexpowertools.com www.registermyflex.com 1-833-FLEX-496 (1-833-353-9496) 03/21...
Need help?
Do you have a question about the FT312 and is the answer not in the manual?
Questions and answers