
Related Manuals for UBTECH ADIBOT-A


Summary of Contents for UBTECH ADIBOT-A
- Page 1 User Manual for ADIBOT-A USER MANUAL AI Fearless | Clean Endless Shenzhen UBTECH Robotics Corp Ltd. 1 / 50...
-
Page 2: Table Of Contents
User Manual for ADIBOT-A CONTENTS CONTENTS ............................2 Preface............................... 4 Part I Product Overview ........................6 1.1 Packing List......................... 6 1.2 Product Overview ....................... 7 1.3 Product Specifications ....................... 10 Part II Safety ........................... 13 2.1 General Rules ........................13 2.2 Safety Precautions ...................... - Page 3 User Manual for ADIBOT-A 5.2.2 Installing UVC Lamp ..................... 43 5.3 Maintenance and Cleaning ....................44 5.3.1 Cleaning the Robot ....................44 5.3.2 Cleaning the Adapter ....................45 5.3.3 Cleaning the Lamp Tubes ..................45 5.4 Storage Instructions ......................45 Part VI Application Scenarios ......................
-
Page 4: Preface
◆ Thank you for purchasing ADIBOT-A equipment from UBTECH Robotics Corp. This user manual is only applicable to the operation of ADIBOT-A. ◆ In order to ensure safe use of ADIBOT-A and quickly grasp the usage method,please read this manual carefully. - Page 5 User Manual for ADIBOT-A Disclaimer ⚫ Failure or damage caused by the user not following the method described in the operating ins tructions. ⚫ Failure or damage caused by the repair being operated by a non designated service organization. ⚫...
-
Page 6: Part I Product Overview
User Manual for ADIBOT-A Part I Product Overview 1.1 Packing List Packing list Robot Body*1 Protective Cover*1 Safety Sign*1 Charging Dock*1 Power Adapter (d) User Manual*1 (c) (b) (a) Dosimeter card*10 UVC goggle*1 USB Dongle(4G)*1 (g) (f) (h) (e) Tablet PC*1... -
Page 7: Product Overview
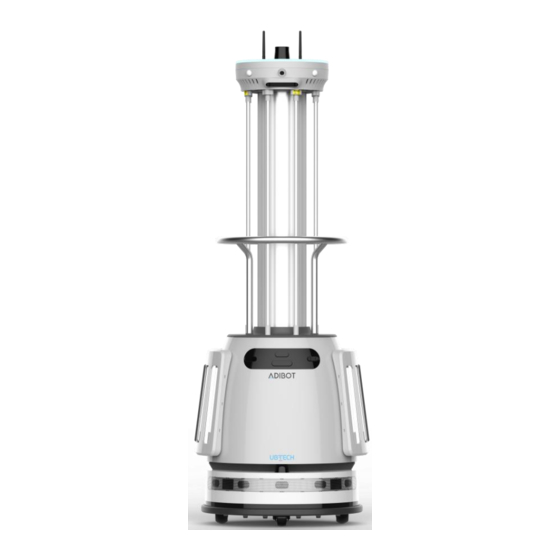
User Manual for ADIBOT-A 1.2 Product Overview ADIBOT-A adopts the strongest ultraviolet sterilization band 253.7nm. It destroys the gene structure of pathogens to deprive their reproductive capacity and make them lose infectivity. Strong irradiation can eliminate more than 99.99% of harmful pathogens, including COVID-19 virus, SARS virus, fungi, and bacteria. - Page 8 User Manual for ADIBOT-A 1. Front View Lidar Sensor Sensor Indicator RGBD TOF Camera HD Camera UVC Lamp Reflector Hand Pusher UVC Lamp LIDAR Sensor Speaker Ultrasonic sensor Anti-Collision Bar 2. Rear View Antenna PIR Sensor ON/OFF Emergency Button Debug Interface...
- Page 9 User Manual for ADIBOT-A 3. Bottom View Infrared Sensor Charging Copper Sheet Hub Motor Omni-Directional Wheel Magnetmeter 4. Charging Dock LED Indicator Radar Identification Board Infrared Transmitter HALL Sensor Electrode Contactor Front View Charging Port Back Elevation Shenzhen UBTECH Robotics Corp Ltd.
-
Page 10: Product Specifications
User Manual for ADIBOT-A 1.3 Product Specifications Basic Parameters Chinese Abbreviation ADIBOT 净巡士 (智能版) English Abbreviation ADIBOT-A Product Model ADAA201 Product Design Mobile tower-type robot, with lamp Set on the flanks Product Color Grey lower body and stainless steel armrest... - Page 11 User Manual for ADIBOT-A Length of Lamp 1 851mm Life of Lamp 1 12000h Power of Single Lamp 2 Irradiation Intensity of Lamp 2 40μW/cm² Length of Lamp 2 295mm Life of Lamp 2 12000h Total Power of Lamps 440W...
- Page 12 User Manual for ADIBOT-A Ditch Crossing Capability ≤2cm Climbing Height ≤5° Ground Friction Coefficient ≥ 0.5 Shenzhen UBTECH Robotics Corp Ltd. 12 / 50...
-
Page 13: Part Ii Safety
◆ We do not guarantee that the manual covers all the possible circumstances. ◆ Please operate the product carefully and ask UBTECH technical suport for help if not familiar with the operation. ◆ ADIBOT-A is equipped with multiple safety sensors that can ensure safe operation. They work in parallel to minimize risks to r others ◆... - Page 14 ◆ Do not touch ADIBOT-A when it is working, unless emergency circumstances. ◆ Do not put your toes into the chassis of ADIBOT-A, which may damage your toes. ◆ Do not stare at a turned-on UVC lamp for a long time,for the UV light may burn your skin and eyes, which may cause temporary blindness.
-
Page 15: Warning Sign
◆ Please dispose any broken lamp according to the local laws and regulations based on mercury which is in the lamps. ◆ If ADIBOT-A failed to operate normally, especially when you detect unusual sound, smell, or smoke. Please take protection measures, and immediately press the emergency button, turn off the power supply of the robot, unplug the power cord, and contact the ADIBOT-A technical support for help. -
Page 16: Charging Indicator
User Manual for ADIBOT-A 2.4 Charging Indicator The lamp signals of different colors provide the operator effective status indication of the robot. You can indicate the various states of the robot through the indicator light. Body Lights Status Status Normal operation... -
Page 17: Part Iii Device Operations
User Manual for ADIBOT-A Part III Device Operations 3.1 Power on/off 3.1.1 Power-on Steps: Step 1. Press the power button (Figure 3.1.1.a) on the chassis; Step 2. Press and hold the On/Off button (Figure 3.1.1.b) on the back for 3 seconds to start the robot. -
Page 18: Power-Off
User Manual for ADIBOT-A 3.1.2 Power-off Steps: Step 1: Press and hold the On/Off button (Figure 3.1.1.b) on the back for 3 seconds to shut down the robot; Step 2: (If the product will be used in a long time) Press the power button (Figure 3.1.1.a) on the chassis to turn off the power supply. - Page 19 User Manual for ADIBOT-A Figure 3.3.a Method 2: You can insert the adapter into the charging dock (with the alignment of the positive and negative poles), which allowing the robot to be charged on the dock (Figure 3.3.b). Figure 3.3.b Figure 3.3.c...
-
Page 20: Hand Push Function
Figure 3.4 3.5 Disinfecting Process ADIBOT-A is intended to function as a supplement of routine disinfection and should not be considered as a substitute for usual disinfection equipment. Standard processures need to be carried out simultaneously with the deployment of ADIBOT-A and also ensure that ADIBOT-A has been set correctly before use to maximize the disinfection effect. - Page 21 Step 4 Select the in-place disinfection/auto-exploration disinfection solution (Refer to section 4.3.1 for details). Step 5 After you tap to start disinfection on the tablet, ADIBOT-A will notify that ready for disinfection, please leave as soon as possible and counting down in seconds. Be sure to leave the disinfection site within the specified time to avoid being injured.
- Page 22 User Manual for ADIBOT-A Figure 3.5.a ① If the robot automatically starts the safe disinfection mode: Both the PIR sensor and the safety sign will be working. ② To suspend disinfection halfway, tap Suspend task, the robot will turn off the UV lamp and stop the disinfection task.If someone breaks into the room, the safety sign and PIR sensor will...
- Page 23 User Manual for ADIBOT-A Figure 3.5.c Step 6 After disinfection, use the hand pusher (Refer to section 3.4 for details) to move to the next target room; or to shut down the robot, perform the power-off operation (Refer to section 3.1.2 for details), and then store the robot..
-
Page 24: Disinfecting Process
User Manual for ADIBOT-A Part IV Functions of Tablet PC Software 4.1 User Login The tablet PC software is a system for the administrator to check and operate the robot after the robot is connected. It is used by the robot administrator. The table below shows the basic functions... -
Page 25: Login
User Manual for ADIBOT-A Task list The latest task and historical task record Intrusion detection Detect intrusion once the safety sign is by the safety sign moved Security policy PIR intrusion Detect human intrusion in the static detection disinfection status... -
Page 26: Robot Settings
User Manual for ADIBOT-A Figure 4.1.1b 4.2 Robot Settings 4.2.1 Network Settings Tap the setting button in the upper right corner to enter the setting interface, then tap Network to set the network. Figure 4.2.1a Shenzhen UBTECH Robotics Corp Ltd. - Page 27 User Manual for ADIBOT-A Turn on the robot. About more details, please refer to section 3.1.1. 4G network mode (A 4G card that can access Internet need to be prepared ) 4G first if the robot needs the 4G. Figure 4.2.1b...
- Page 28 User Manual for ADIBOT-A USB 4G Card Slot Figure 4.2.1d WiFi network mode ◆ If the robot has no 4G network, select WiFi first, tap Connect/Switch WiFi, turn on the mobile phone/tablet Bluetooth, power on the robot as prompted, and long press the network settings button for 3 seconds to set the network.
- Page 29 User Manual for ADIBOT-A 图 4.2.1f 图 4.2.1g The App sends the WiFi SSID and password, and the robot connects to the network. If the WiFi connection fails, check whether the WiFi information is correct and keep the WiFi device close enough to the robot.
-
Page 30: Volume Settings
User Manual for ADIBOT-A Figure 4.2.1g Cautions If Bluetooth pairing recognition fails, please check the following items: 1. Check whether the tablet PC/mobile phone Bluetooth is turned on; 2. Check whether the positioning switch is turned on. 4.2.2 Volume Settings Tap the setting button and select Voice announcement volume to adjust the volume. -
Page 31: Language Settings
User Manual for ADIBOT-A 4.2.3 Language Settings Set the language for the robot’s voice announcement. Chinese and English are available. Figure 4.2.3 4.2.4 Safety Sign Settings To bind/replace a safety sign, you can bind the target/new safety sign. When the robot is delivered from the factory, the matched safety sign will be bound by default. To replace the safety sign, first tap Unbind, tap Add to turn on the safety sign switch, and then enter the serial number of the safety sign. -
Page 32: Server Settings
User Manual for ADIBOT-A Figure 4.2.4b 4.2.5 Server Settings Tap server, turn on the tablet PC/mobile phone Bluetooth, press the network settings button of the robot and hold it above 3s for Bluetooth pairing. After the Bluetooth is paired successfully, it will automatically connect to the server. -
Page 33: Version Information Display
User Manual for ADIBOT-A Figure 4.2.5b 4.2.6 Version Information Display Tap Version number to view the software version information of the current robot. Figure 4.2.6 4.2.7 Reset to Factory Settings Tapping Reset to factory settings and restore to the system status before delivery. -
Page 34: Disinfection Task
User Manual for ADIBOT-A Figure 4.2.7 4.3 Disinfection Task 4.3.1 Creating Disinfection Task A. In-place disinfection solution: Advised disinfection time: Area≤ 50m³ Disinfection time:5min 50m³≤Area≤90 m³ Disinfection time:10min (it is preferred to place the robot in the center of the disinfection space.) ④... - Page 35 User Manual for ADIBOT-A Auto-exploration disinfection: Advised disinfection time: Area≤ 50m³ Disinfection time:5min 50m³≤Area≤90 m³ Disinfection time:10min (it is preferred to place the robot in the center of the disinfection space) ⑤ Tap Robot→Create disinfection task →”+”, and then select Auto-exploration disinfection.
-
Page 36: Disinfection Detailed Information
User Manual for ADIBOT-A Figure 4.3.1c 4.3.2 Disinfection Detailed Information After a disinfection starts, the page will display details of the disinfection task. Figure 4.3.2 4.3.3 Executing Disinfection Task You can start a task, suspend a task (active or passive), or end a task. -
Page 37: Aoubt Me
User Manual for ADIBOT-A Figure 4.3.3a Figure 4.3.3b 4.4 About Me Tap Me to enter the Me page of the App. Shenzhen UBTECH Robotics Corp Ltd. 37 / 50... -
Page 38: Room Manegement
User Manual for ADIBOT-A Figure 4.4 4.4.1 Room Management Tap Room Management→”+” in turn to create a new area name. Figure 4.4.1a To change the room name, tap the changing sign. Shenzhen UBTECH Robotics Corp Ltd. 38 / 50... - Page 39 User Manual for ADIBOT-A Figure 4.4.1b To delete a single room, slide leftward on the room number to delete and tap Delete. Figure 4.4.1c To batch delete multiple rooms, directly tap Delete in the upper right corner, tap to check the rooms that need to be deleted, then tap Select All and tap OK to delete the selected room numbers.
-
Page 40: System Settings
User Manual for ADIBOT-A Figure 4.4.1d 4.4.2 System Settings Tap System Settings to enter the system settings interface of the App to complete relevant settings. Figure 4.4.2a After entering System Settings, you can select 中文 or English as a system language. - Page 41 User Manual for ADIBOT-A Figure 4.4.2b After entering System Settings, you can view the version number of the current App. Figure 4.4.2c Shenzhen UBTECH Robotics Corp Ltd. 41 / 50...
-
Page 42: Part V Transportation, Unpacking, Cleaning, And Storage
Storage 5.1 Packing and Transportation If you need to transport ADIBOT-A, disassemble the lamps from the robot, put them into the special cylindrical packing box provided in the sale package, and then put ADIBOT-A into the packing box for transportation. -
Page 43: Installing Uvc Lamp
Please make sure the power is off and the charging cable is unplugged before installing the UVC lamps. Insert the lamp holder (for the end without pins) into the top socket of the ADIBOT-A frame. Press down the lamp holder (for the end with four pins) by aligning it with the four pin holes on the ADIBOT-A base, ensuring that the four pins are fully inserted into the socket. -
Page 44: Maintenance And Cleaning
A because of the uncertainty that whether the liquids contain flammable substances that may damage the plastic cover of ADIBOT-A. Do not use water or any other liquids to spray or drench ADIBOT-A. Keep it dry because of the self-cleanning function of the product. Do not use irritating detergent or organic solvent to wipe the camera lens. -
Page 45: Cleaning The Adapter
2. Use the hand pusher to push ADIBOT-A to the storage area. 3. Please let the ADIBOT-A keep a best safe posture. 4. Please store the ADIBOT-A in a dry place without dust at a temperature of 0 to 40°C (32°F to 104°F). -
Page 46: Part Vi Application Scenarios
User Manual for ADIBOT-A Part VI Application Scenarios The ADIBOT-A robot has been on duty in public scenarios such as hospitals, schools, libraries, star hotels, and metro stations, ect. Which is suitable for all surface disinfection and air disinfection. School Scenario... -
Page 47: Part Vii Faqs/Troubleshooting
ADIBOT-A failed to ◆ Check whether the power button on the chassis is turned on. start. ◆ If the problem persists, contact the ADIBOT-A Technical Support Center. ◆ Stop the disinfection task first, and check whether the lamps are Partial of none of installed properly. - Page 48 User Manual for ADIBOT-A The robot failed to ◆ Check whether the network connected to robot is normal. execute the task ◆ Check whether the network of the tablet PC is normal. commands by the tablet. Shenzhen UBTECH Robotics Corp Ltd.
-
Page 49: Part Viii Declaration Of Conformity
User Manual for ADIBOT-A Part VIII Declaration of Conformity 7.1 FCC compliance statement This device complies with Part 15 of the FCC Rules. Operation is subject to the f ollo wing two conditions: (1) this device may not cause harmful interference, and (2) t his device must accept any interference received, including interference that may caus e undesired operation. - Page 50 User Manual for ADIBOT-A Shenzhen UBTECH Robotics Corp. HQ in China: Floors 16 and 22, Building C1, Nanshan Wisdom Park, 1001, Xueyuan Avenue, Nanshan District, Shenzhen USA Branch: 767 S.Alameda Street, Suite 250, Los Angeles, CA 90021 Manufacturer: UBTECH (Shenzhen) Robotics Corp.
Need help?
Do you have a question about the ADIBOT-A and is the answer not in the manual?
Questions and answers