Advertisement
Quick Links
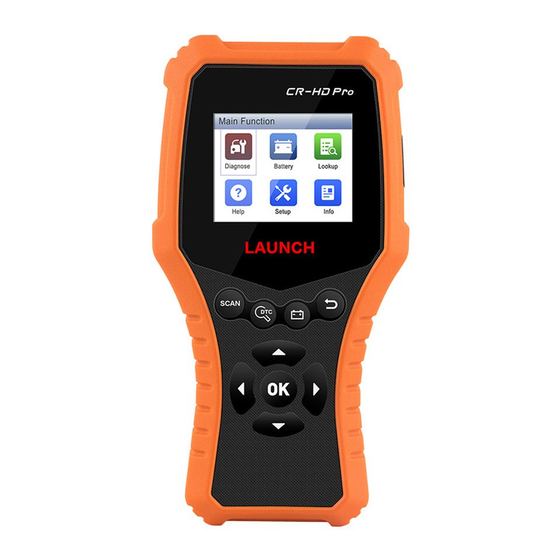
Product Profile
DB15 Connector
(
Connects the diagnostic cable.
)
Display Screen
(
Indicates the test results.
)
DTC LED
(
Illuminates RED when DTCs
are found.)
SCAN Button*
(
Quick access to Auto Scan.
)
DTC Retrieval Button*
(
Quick access to DTC Lookup.
)
Selection Buttons
Accessory Checklist
OBD-6 Adaptor Cable
Standard 6-pin Deutsch
Diagnostic Cable
adaptor for most heavy-
To connect the CR-HD
duty vehicles. Covers
PRO to vehicle's OBD2
1995 to present Class 4-
diagnostic socket.
8 heavy-duty OEM.
Quick Start Guide
*Note:The buttons marked with *
indicate the function hot keys.
Data I/O Port
(
Connects to PC for update via data cable.
NO DTC LED
(
Illuminates GREEN if no DTCs
are found.)
BACK Button
(
Returns to the previous screen.
Battery Voltage Button*
(
Quick access to check battery voltage.
OK Button
(
Confirms an selection or action from a
menu list.)
OBD-9 Adaptor Cable
9-pin Deutsch adaptor
Data Cable
for use with vehicles
covering 1998 to present
Connects the CR-HD
Class 4-8 heavy-duty
PRO to PC to make
OEM.
update.
*Note: All pictures herein are only for reference purpose and this Quick Start Guide is subject to change
without written notice.
Preparation & Connection
1. Preparation
1) Switch the ignition on.
2) The vehicle battery voltage should be 11-14V or 18V-30V.
3) Throttle should be in a closed position.
2.Locate vehicle's DLC
The DLC(Data Link Connector) is typically a connector where diagnostic code readers interface
with the vehicle's on-board computer. For heavy-duty vehicles, it is generally located in driver's
)
cab. If the DLC cannot be found, refer to the vehicle's Repair Manual for the exact location.
3.Connection
Select the desired diagnostic connector according to the vehicle DLC type and then follow the
steps below to proceed:
1.For vehicles equipped with an OBD II management system, plug one end of the diagnostic
cable into the vehicle's DLC, and the other end into the DB15 connector of the tool and tighten
)
the captive screws.
2.For vehicles not equipped with an OBD II management system, do the following:
1). Select the corresponding non-16pin adaptor cable.
)
2). Plug the non-16pin end of the adaptor cable into the DLC socket, and the other end to the
diagnostic cable.
3). Plug the other end of the diagnostic cable into the DB15 connector of the tool and tighten
the captive screws.
Start Diagnostics
CR-HD PRO features two kinds of diagnostic approaches: Auto scan and Manual diagnosis.
1.Manual Diagnosis
In this mode, you have to diagnose a vehicle by
performing the menu-driven command manually.
For new users, please follow the operation chart
shown below to get familiar with and start using
this tool.
Follow on-screen
Select "Manual Scan"
prompts to proceed
Select vehicle
2.Auto Scan
This function allows you to scan the HD-
OBD or EOBD II.
Statement: LAUNCH owns the complete
intellectual property rights for the software
used by this product. For any reverse
engineering or cracking actions against the
software, LAUNCH will block the use of this
product and reserve the right to pursue their
Select software
version
legal liabilities.
EN
Advertisement

Related Manuals for Launch CR-HD Pro


Summary of Contents for Launch CR-HD Pro
- Page 1 OK Button Confirms an selection or action from a Start Diagnostics menu list.) CR-HD PRO features two kinds of diagnostic approaches: Auto scan and Manual diagnosis. Accessory Checklist 1.Manual Diagnosis 2.Auto Scan In this mode, you have to diagnose a vehicle by This function allows you to scan the HD- performing the menu-driven command manually.
- Page 2 Otherwise, the red LED illuminates and the green LED lights off. Info: Includes the tool information, including 4. Launch the update tool on your PC, the system starts reading the tool. Once it obtains the tool software & hardware version, and Serial Number The icons in black at the bottom of the information, it will directly navigate to the update center.
Need help?
Do you have a question about the CR-HD Pro and is the answer not in the manual?
Questions and answers