Table of Contents
Advertisement
Quick Links
LAUNCH
Copyright Information
Copyright © 2022 by LAUNCH TECH CO., LTD. All rights reserved. No part of
this publication may be reproduced, stored in a retrieval system, or transmitted
in any form or by any means, electronic, mechanical, photocopying and
recording or otherwise, without the prior written permission of LAUNCH. The
information contained herein is designed only for the use of this unit. LAUNCH
is not responsible for any use of this information as applied to other units.
Statement: LAUNCH owns the complete intellectual property rights for the software
used by this product. For any reverse engineering or cracking actions against the
software, LAUNCH will block the use of this product and reserve the right to pursue
their legal liabilities.
Trademark Information
LAUNCH is a registered trademark of LAUNCH TECH CO., LTD. (also
called LAUNCH for short) in China and other countries. All other LAUNCH
trademarks, service marks, domain names, logos, and company names
referred to in this manual are either trademarks, registered trademarks,
service marks, domain names, logos, company names of or are otherwise
the property of LAUNCH or its affiliates. In countries where any of the
LAUNCH trademarks, service marks, domain names, logos and company
names are not registered, LAUNCH claims other rights associated with
unregistered trademarks, service marks, domain names, logos, and company
names. Other products or company names referred to in this manual may
be trademarks of their respective owners. You may not use any trademark,
service mark, domain name, logo, or company name of LAUNCH or any third
party without permission from the owner of the applicable trademark, service
mark, domain name, logo, or company name. You may contact LAUNCH by
visiting the website at www.cnlaunch.com, or writing to LAUNCH TECH. CO.,
LTD., Launch Industrial Park, North of Wuhe Avenue, Banxuegang, Bantian,
Longgang, Shenzhen, Guangdong, P.R.China, to request written permission to
use Materials on this manual for purposes or for all other questions relating to
this manual.
SAFETY PRECAUTIONS AND WARNINGS
To prevent personal injury or damage to vehicles and/or the test equipment,
please read this user's manual first carefully and observe the following safety
precautions at a minimum whenever working on a vehicle:
• There are no user serviceable parts. Have the device serviced by a qualified
repair person using only identical replacement parts. This will ensure that
the safety of the device is maintained. Disassembling the device will void
II
www.diagtools.eu; info@diagtools.eu; Pernavas 43A-9, Riga, Latvia, LV-1009; +37129416069
CRT 511S User Manual
Advertisement
Table of Contents

Related Manuals for Launch CRT 511S


Summary of Contents for Launch CRT 511S
- Page 1 Statement: LAUNCH owns the complete intellectual property rights for the software used by this product. For any reverse engineering or cracking actions against the software, LAUNCH will block the use of this product and reserve the right to pursue their legal liabilities.
- Page 2 LAUNCH CRT 511S User Manual the warranty right. • Caution: This tool contains an internal Lithium Polymer battery. The battery can burst or explode, releasing hazardous chemicals. To reduce the risk of fire or burns, do not disassemble, crush, pierce or dispose of the battery in fire or water.
- Page 3 LAUNCH CRT 511S User Manual nearby. • Don’t connect or disconnect any test equipment while the ignition is on or the engine is running. FCC Statement Any changes or modifications not expressly approved by the party responsible for compliance could void the user’s authority to operate the equipment.
-
Page 4: Table Of Contents
LAUNCH CRT 511S User Manual Table of Contents 1 Introduction ....................1 2 General Information ..................3 2.1 On-Board Diagnostics (OBD) I ..............3 2.2 On-Board Diagnostics (OBD) II ..............3 2.3 Diagnostic Trouble Codes (DTCs) .............. 5 2.4 Location of the Data Link Connector (DLC) ..........6 3 Product Descriptions ................... - Page 5 LAUNCH CRT 511S User Manual 4.3.14 Screen Capture ................14 4.3.15 Data ....................14 5 TPMS Operations ..................16 5.1 Activate Sensor ..................18 5.2 Program Sensor ..................22 5.2.1 Auto create ..................22 5.2.2 Manual input ..................23 5.2.3 Copy by Activation ................24 5.2.4 Copy by OBD ..................
-
Page 6: Introduction
LAUNCH CRT 511S User Manual 1 Introduction This tool provides the following functions: TPMS: • Trigger the TPMS sensor • Program the TPMS sensor • Provide TPMS relearning procedures and sensor OE number lookup OBD II Diagnosis: Check for DTCs, isolate the cause of the illuminated Malfunction Indicator Lamp (MIL), check monitor status before emissions certification testing, verify repairs, and perform other services that are emission-related. - Page 7 LAUNCH CRT 511S User Manual 2. Government regulations mandate that all OBD II compliant vehicles must have a “common” 16-pin Data Link Connector (DLC). Note: Some 1994 and 1995 vehicles have 16-pin connectors but are not OBD II compliant. Only those vehicles with a Vehicle Emissions Control Label stating OBD II Certified are OBD II compliant.
-
Page 8: General Information
LAUNCH CRT 511S User Manual 2 General Information 2.1 On-Board Diagnostics (OBD) I Note: With the exception of some 1994 and 1995 vehicles, most vehicles from 1982 to 1995 are equipped with some type of first generation On-Board Diagnostics. Beginning in 1988, California’s Air Resources Board (CARB), and later the Environmental Protection Agency (EPA) required vehicle manufacturers to include a self-diagnostic program in their on-board computers. - Page 9 LAUNCH CRT 511S User Manual showed the following: • A large number of vehicles had deteriorating or degraded emissions-related components. These components were causing an increase in emissions. • Because OBD I systems only detect failed components, the degraded components were not setting codes.
-
Page 10: Diagnostic Trouble Codes (Dtcs)
LAUNCH CRT 511S User Manual • To standardize communication procedures and protocols between the diagnostic equipment (Diagnostic Tools, Code Readers, etc.) and the vehicle’s on-board computer. 2.3 Diagnostic Trouble Codes (DTCs) OBD II Diagnostic Trouble Codes are codes that are stored by the on-board computer diagnostic system in response to a problem found in the vehicle. -
Page 11: Location Of The Data Link Connector (Dlc)
LAUNCH CRT 511S User Manual P0201 - Injector circuit malfunction, Cylinder 1 2.4 Location of the Data Link Connector (DLC) The DLC (Data Link Connector or Diagnostic Link Connector) is typically a 16-pin connector where diagnostic code readers interface with the vehicle’s on-board computer. - Page 12 LAUNCH CRT 511S User Manual instrument panel, under or around the driver’s side for most vehicles. For some vehicles with special designs, the DLC location may vary. Refer to the following figure for location. Opel, Volkswagen, Audi Honda Volkswagen Opel, Volkswagen, Citroen...
-
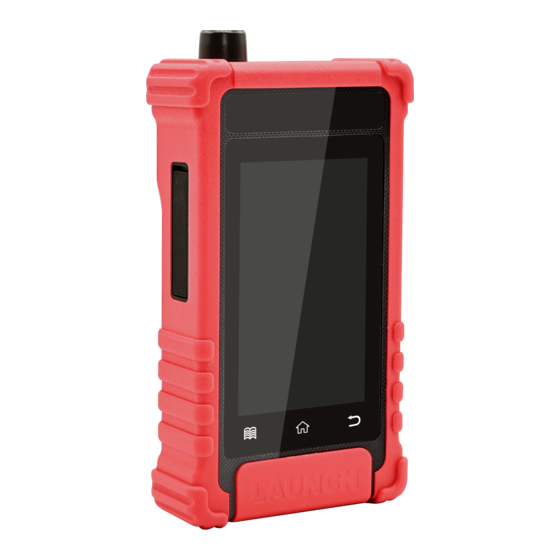
Page 13: Product Descriptions
LAUNCH CRT 511S User Manual 3 Product Descriptions 3.1 General Controls 1. TPMS Antenna 2. TF Card Slot 3. Charging Port Connect the power adaptor charge the tool. 4. DB15 Diagnostic Connector Connects the tool to the vehicle’s Data Link Connector (DLC). -
Page 14: Specifications
LAUNCH CRT 511S User Manual Navigate to the Job Menu screen. Button Returns to previous menu. 3.2 Specifications • Screen: 4” LCD display with a resolution of 400*800 dpi • Input voltage: 9 ~ 18V via OBD diagnostic port / 5V via USB cable •... -
Page 15: Initial Use
LAUNCH CRT 511S User Manual 4 Initial Use 4.1 Charging & Turning On/Off 4.1.1 Charging There are three methods available for charging the tool. 1. Via AC outlet Connect one end of the charging cable to the charging port of the tool, and other end to the power adaptor. -
Page 16: Job Menu
LAUNCH CRT 511S User Manual LANs. Choose the desired WLAN access point / network, • If the network you chose is open, you can connect directly. • If the selected network is encrypted, you have to enter the right security key (network password). -
Page 17: Settings
LAUNCH CRT 511S User Manual Modules Descriptions Perform various TPMS operations. It mainly TPMS includes TPMS sensor activation, programming, relearning and TPMS diagnostics functions. This function presents a quick way to check for DTCs, isolate the cause of the illuminated... -
Page 18: Report
LAUNCH CRT 511S User Manual 4.3.4 Report This option allows you to manage diagnostic report. 4.3.5 Display/Brightness This item allows you to set the standby time and screen brightness. Note: Reducing the brightness of the screen is helpful to conserve the power of the tool. -
Page 19: Recovery
LAUNCH CRT 511S User Manual 4.3.12 Recovery Use this item to reset this tool to the default factory setting. Warning: Resetting may cause data loss. Before doing so, please be careful to perform this operation. 4.3.13 Clean Up This option allows user to clear some cache files and free up some storage space. - Page 20 LAUNCH CRT 511S User Manual 5. FAQ The option collects some frequently asked questions and solutions. 6. Product Manual The user manual is integrated on the tool for your easier check and reference. 4.16 About This option displays the hardware configuration information of the tool and license agreement.
-
Page 21: Tpms Operations
LAUNCH CRT 511S User Manual 5 TPMS Operations For initial use, please follow the flow chart below to start using it. Enter TPMS Select vehicle manufacturer Select vehicle model Select vehicle year Select the TPMS function (See *Note) Note: For indirect TPMS vehicle, only the Relearning function is supported. - Page 22 LAUNCH CRT 511S User Manual 2. Tap BMW to enter the vehicle model selection screen. 3. Tap 5 Series to enter the following year selection screen. www.diagtools.eu; info@diagtools.eu; Pernavas 43A-9, Riga, Latvia, LV-1009; +37129416069...
-
Page 23: Activate Sensor
LAUNCH CRT 511S User Manual 4. Tap the desired option to enter the TPMS function selection screen. Note: For indirect TPMS vehicle, only the Learning function is supported. For vehicle using Direct TPMS, it generally includes: Activation, Programming and Relearning. The available TPMS functions may vary for different vehicles being serviced. - Page 24 LAUNCH CRT 511S User Manual 2. For universal sensors, place the TPMS antenna of the tool alongside the valve stem, point toward the sensor location, and tap Activate on the screen. Notes: 1. For early magnet-activated sensors, place the magnet over the stem and then place the tool alongside the valve stem.
- Page 25 LAUNCH CRT 511S User Manual Once the sensor information is successfully retrieved, the tool will sound a series of beep and the screen will display the sensor data in the Ac ID field. Notes: 1. The tool will do TPMS test in a sequence of FL (Front Left), FR (Front Right), RR (Rear Right), LR (Rear Left) and SPARE, if the vehicle has the option for the spare.
- Page 26 LAUNCH CRT 511S User Manual If the users intend to read the original sensor ID stored in the ECU, connect the tool to the vehicle’s DLC via the diagnostic cable and tap Read ECU ID to read the information of the four TPMS sensors. After the sensor information is successfully decoded, tap OK, it will be displayed in the OBD ID field.
-
Page 27: Program Sensor
BAT: indicates the battery power level. 5.2 Program Sensor This function allows users to program the sensor data to the LAUNCH-sensor and replace faulty sensor with low battery life or one that is not functioning. The following options are available for programming LAUNCH-sensor: Auto Create, Manual Create, Copy ID by Activation and Copy ID by OBD. -
Page 28: Manual Input
ID. Select the wheel which needs to be programmed on the tool, place a LAUNCH-sensor close to the TPMS antenna of the tool, and tap Auto to create a new random sensor ID. Tap Programming to start detecting the sensor and writing the new created sensor ID to the LAUNCH-sensor. -
Page 29: Copy By Activation
Note: Do not enter the same ID for each sensor. Select the wheel which needs to be programmed on the tool, place a LAUNCH-sensor close to the TPMS antenna of the tool. Tap Programming to start writing the new sensor ID to the LAUNCH-sensor. -
Page 30: Copy By Obd
After the information is retrieved, it will be displayed on the screen. Place a LAUNCH-sensor close to the TPMS antenna of the tool, tap Programming to start writing the retrieved sensor information to the LAUNCH- sensor. - Page 31 IDs and positions for viewing. 3. Tap OK to confirm and then tap the Programming tab to enter. 4. Place a LAUNCH-sensor close to the TPMS antenna of the tool, select the desired wheel position and tap Copy by OBD.
-
Page 32: Learning Service
LAUNCH CRT 511S User Manual 5. Tap Programming to start writing the copied sensor information to the LAUNCH-sensor. 5.3 Learning Service This function allows you to check and view the detailed TPMS sensor relearn procedures. Relearn operation applies only when the newly programmed sensor IDs are different from the original sensor IDs stored in the vehicle’s ECU. -
Page 33: Oe Inquiry
LAUNCH CRT 511S User Manual On-screen Buttons: Read DTC: Tap to read the TPMS diagnostic trouble codes stored in the vehicle’s ECU. Clear DTC: Tap to clear the existing TPMS diagnostic trouble codes. Note: • This function requires the tool to connect with the vehicle’s OBD socket. - Page 34 LAUNCH CRT 511S User Manual Tap the target sensor manufacturer to enter the following screen. Check the original manufacturer number on the body of the sensor, and tap the corresponding OE number on the screen to enter the following screen.
- Page 35 LAUNCH CRT 511S User Manual Tap Activate to trigger and check the sensor data. Tap Programming to write the sensor data into a new blank LAUNCH-sensor. Tap Technical Support to check which vehicle models the sensor can be applied on.
-
Page 36: Obd Ii Diagnosis
LAUNCH CRT 511S User Manual 6 OBD II Diagnosis 6.1 Connection 1). Turn the ignition off. 2). Locate the vehicle’s 16-pin Data Link Connector (DLC). Refer to Chapter 2.4. 3). Plug one end of the diagnostic cable into the vehicle’s DLC(Data Link Connector) port, and the other end to the DB-15 diagnostic connector of the tool, and then tighten the captive screws. -
Page 37: Start Diagnostics
LAUNCH CRT 511S User Manual Notes: • A plastic DLC cover may be found for some vehicles and you need to remove it before plugging the diagnostic cable. • The cable connector is keyed and will only fit one way. If you have problems... -
Page 38: Read I/M Readiness
LAUNCH CRT 511S User Manual Tap OK, the following OBDII function list appears. 6.2.1 Read I/M Readiness This function checks whether or not the various emissions-related systems on the vehicle are operating properly, and are ready for Inspection and Maintenance testing. -
Page 39: Read Live Data
LAUNCH CRT 511S User Manual repair of a car fault has been performed correctly. 6.2.2 Read Live Data This function retrieves and displays live data and parameters from the vehicle’s ECU. 6.2.3 Read Freeze Frame This function takes the snapshot of the operating conditions when an emission-related fault occurs. -
Page 40: Control Operation Of On-Board Component/System
LAUNCH CRT 511S User Manual 6.2.7 Control Operation of On-Board Component/System This option is used to access vehicle-specific subsystem and component tests. Available tests vary by vehicle manufacturer, year, and model. 6.2.8 Read Vehicle Information This function retrieves a list of information (provided by the vehicle manufacturer) from the vehicle’s on-board computer. -
Page 41: Reset
LAUNCH CRT 511S User Manual 7 Reset In addition to amazing & powerful diagnostic function, the tool also features various service functions. There are two methods to reset service lamp: Manual Reset or Auto Reset. Auto Reset follows the principle of sending command from the tool to vehicle’s ECU to do resetting. -
Page 42: Electronic Parking Brake Reset (Brake Reset)
LAUNCH CRT 511S User Manual After that, reset the driving mileage or driving time, so as to turn off the service lamp, and enable a new driving cycle. • If the service lamp is not on, but you have changed the engine oil or electric appliances that monitor oil life, you need to reset the service lamp. -
Page 43: Throttle Matching (Elec. Throttle Rlrn)
LAUNCH CRT 511S User Manual 7.5 Throttle Matching (ELEC. THROTTLE RLRN) This function can initialize the throttle actuator so that the learning value of the ECU returns to the initial state. By doing so, the movement of the throttle (or idle motor) can be more accurately controlled, thus adjusting the intake volume. -
Page 44: Upgrade
LAUNCH CRT 511S User Manual 8 Upgrade If some new software or APK can be updated, a numeric indicator will display on the Upgrade module on the Job menu. In this case, you may use this option to keep it synchronized with the latest version. -
Page 45: Faq
LAUNCH CRT 511S User Manual 9 FAQ Here we list some frequently asked questions and answers relating to this tool. Question: System halts when reading data stream. What is the reason? Answer: It may be caused by a slackened connector. Please turn off the tool, firmly connect the connector, and switch it on again. -
Page 46: Warranty
The exclusive remedy for any automotive meter found to be defective is repair or replacement, and LAUNCH shall not be liable for any consequential or incidental damages.
Need help?
Do you have a question about the CRT 511S and is the answer not in the manual?
Questions and answers