Advertisement
Quick Links
Advertisement

Subscribe to Our Youtube Channel
Related Manuals for Datavideo LBK-1


Summary of Contents for Datavideo LBK-1
-
Page 2: Warnings And Precautions
AC adapter. If you are not sure of the type of power available, consult your Datavideo dealer or your local power company. 8. Do not allow anything to rest on the power cord. Do not locate this unit where the power cord will be walked on, rolled over, or otherwise stressed. -
Page 3: Warranty
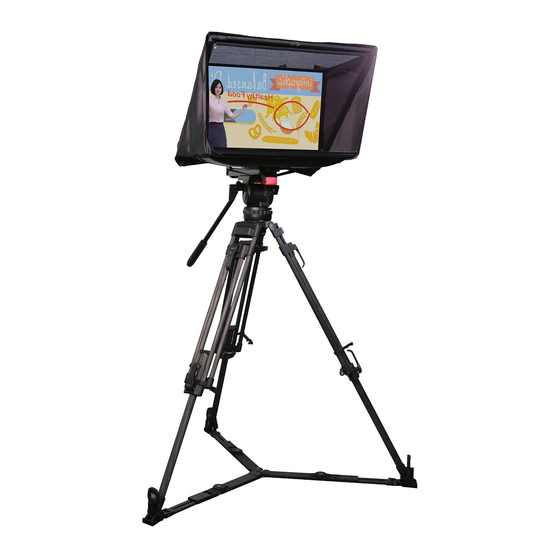
Datavideo within 30 days of purchase. For information on how to register please visit www.datavideo.com or contact your local Datavideo office or authorized Distributors Any second year warranty claims must be made to your local Datavideo office or one of its authorized Distributors before the extended warranty expires. - Page 4 1. Overview The LBK-1 Look Back Kit can be used in any Camera Setup. The kit contains a look back mirror, which allows the user or talent to view his/her mirrored image reflected off from a 22” monitor connected to the Virtual Interactive Board System (MS-VGB1K). Hence, the LBK- 1 can be used as a part of total VGB-1000F or VGB-1000R solution by mounting it to the tripod mount quick release system.
-
Page 5: Parts List
2. Parts List and Look Back Kit Exploded View Parts List Label Name Quantity Main Support Rail Spacer Block Screw (Wing Nut 1/4 20UNC 12.5mm Nickel Plated) Screw (Pan-Head 1/4" 20UNC 12mm Nickel Plated) Riser Block Screw (1/4" 20UNC Hex Head 31mm) Camera Dock Module 1/4 20UNC Screw Anti-Collision Rubber Strip... - Page 6 Look Back Kit Exploded View Look Back Kit Exploded View Enlargement Ratio 2:1 Enlargement Ratio 2:1 Enlargement Ratio 2:1 Look Back Kit Exploded VIew...
- Page 7 LBK1-1-1 Main Support Exploded View...
- Page 8 LBK1-1-2 22” Monitor and LCD Display Mount...
- Page 9 LBK1-1-3 22” Glass Frame Module and Hood Support Wire...
- Page 10 LBK1-2 Exploded view of Main Support, Glass Frame, LCD Display and Tripod...
- Page 11 LBK1-3 Look Back Kit Assembly 1. First remove the two screws located at the two ends of the glass frame module (Location B). 2. Insert the glass into the glass frame module above the tripod. 3. Secure the glass with the screws of step 1. 4.
- Page 12 Dimensions...
-
Page 13: Specifications
4. Specifications Tally Light Color Number Input Interface 3.5mm Phone Jack Dimensions Length 685.33 mm Width 546 mm Height 470.4 mm Product Weight Approximately 5 Kg Remarks Not inclusive of Monitor, Camera, Tripod and Quick Release Plate... - Page 14 安裝注意事項 使用前,請先仔細閱讀本說明書,並請妥善保存本說明書。 請確實遵守產品上所標示的警告標誌及說明指示。 3. 清潔本產品前,請先拔掉電源插頭。勿用液態或腐蝕性清潔劑,使用一般濕布清潔擦拭即可。 4. 請勿在靠近水的地方使用本產品。 5. 請勿將產品置放在不平穩的地方,像是手推車、立架等,以免掉落造成產品嚴重損害。 6. 本產品外殼、背部及底部的開孔是為了散熱用的,請勿覆蓋或塞住這些開孔,以免造成機器過熱。 避免將本產品置放在床、沙發、毯子…等表面類似的物品上,才不會塞住開孔。請勿將本產品置放 在靠近火源、暖氣爐或熱氣口的地方。除非確定有適當的通風口,否則請勿將本產品置放在一個密 閉式的空間裏。 7. 本產品所使用之電源,請依照電源轉換器上的標示。 8. 避免讓任何東西壓到本產品的電源線,也避免將本產品壓在別的電源線上。 9. 使用延長線時,請確認所使用的總電量/總安培數,不得超過延長線所負荷的總安培數。而插入牆 壁插座中所使用的總電量則不得超過15安培的限度。 10. 請勿在機體開孔塞入任何東西,以免觸電或引起短路走火;請勿在本產品上潑濺任何液體。 11. 請勿擅自進行拆解維修。如擅自打開或移動標示有“請勿移動”的蓋殼,將會使你暴露在電壓或其 他的危險下。請向服務人員洽詢所有的服務事項。 12. 如有下列情形發生,請將本產品的插頭拔掉,並向合格的經銷商或服務人員洽詢: 電源線或插頭有損害或散開剝落的情形。 • 有液體滲進本產品中。 • • 如果本產品曾淋到雨或被潑到水。 如已依照本使用說明書之操作規則,仍無法正常使用時。只可調整本使用說明書中所提到可以 • 調整的地方,因為其他地方的調整如果不恰當,有可能會導致本產品受損害,而且會讓合格的 技術人員花更長的時間維修,才能恢復到原來的狀態。 • 如果本產品曾掉落或機體曾受損害。 •...
- Page 15 1. 產品介紹 LBK-1 回看組可用在任何攝影機的架設環境。LBK-1 包含一片回看鏡,可讓使用者看 到他自己在 22 吋螢幕上的鏡像畫面。22 吋螢幕可連接至虛擬互動白板系統(MS- VGB1K),也因此 LBK-1 可透過安裝在具有快速移除裝置的三腳架座上,並成為 VGB-1000F 或 VGB-1000R 解決方案的一部份。 1.1 產品特點 • 可安裝最大到 22 吋 MIS-D/100/C VESA 規格顯示器(螢幕長寬比為 16:9),例 如 ACER KA220HQ • 大尺寸鏡面安裝時將綠貼紙超外 • 大型遮光裝置可覆蓋鏡面兩側 紅色 tally 燈 • 1.2 Tally 燈及訊號輸入孔...
- Page 16 2. 零件表及 LBK-1 回看組爆炸圖 零件表 標號 名稱 數量 主支架模組 載板固定塊 手旋螺絲 三角形 1/4 20UNC 12.5mm 鍍鎳 螺絲 圓頭 1/4 20UNC 12mm 黑 載板增高塊 螺絲 1-4 20unc 內六角皿頭 31mm 載板模組 1/4 20 牙 手旋螺絲 防撞膠條 VP-450 MS-1000 分光鏡玻璃 分光鏡架模組 支撐條 LCD 固定架...
- Page 17 LBK-1 回看組爆炸圖...
- Page 18 LBK1-1-1 本體 爆炸圖...
- Page 19 LBK1-1-2 22吋螢幕 / LCD固定架...
- Page 20 LBK1-1-3 22吋 分光鏡玻璃框架 / 遮光布支撐條...
- Page 21 LBK1-2 本體 / 鏡框 / LCD / 三腳架 爆炸圖...
- Page 22 LBK1-3 總組合件 爆炸圖 1. 如圖LBK1-3所示,首先退出分光鏡架模組兩端的螺絲(位置B)。 2. 將玻璃放入位於三腳架上方之分光鏡架模組。 3. 將步驟1所退出的螺絲鎖回分光鏡架模組兩端以避免玻璃掉落。 4. 把粘黏在遮光布上(位置A1)的毛面魔鬼粘移除。 5. 將毛面魔鬼粘貼在分光鏡架模組上(位置A2)。 6. 固定攝影機在載板模組上。 7. 最後將遮光布黏貼在分光鏡架模組上以完成組裝。...
- Page 23 3. 尺寸圖 Dimensions...
- Page 24 4. 產品規格 Tally 燈 顏色 紅色 編號 輸入介面 3.5mm Phone Jack 產品尺寸 長度 685.33 mm 寬度 546 mm 高度 470.4 mm 產品重量 Approximately 5 Kg 備註 Not inclusive of Monitor, Camera, Tripod and Quick Release Plate...
Need help?
Do you have a question about the LBK-1 and is the answer not in the manual?
Questions and answers