Advertisement
Available languages
Available languages
Quick Links
N.C. - 8/26/2015
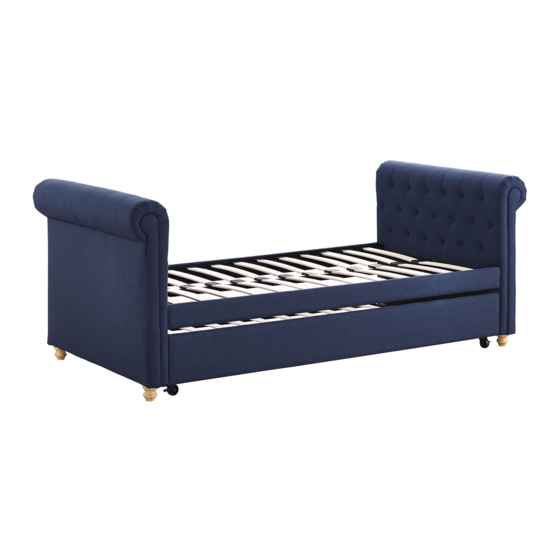
Upholstered Daybed and Trundle
Thank you for purchasing from DHP!
DO NOT RETURN TO THE STORE !
If parts are missing or damaged, we will gladly ship your
replacement parts free of charge.
Visit www.dhpfurniture.com/eng/support-home
or call Toll-Free 1-800-267-1739
Date of Purchase
THIS INSTRUCTION BOOKLET CONTAINS IMPORTANT SAFETY
INFORMATION. PLEASE READ AND KEEP FOR FUTURE REFERENCE.
4032659
Sophia
Lot Number
B34403265900-10125-M
Navy
1
Advertisement

Subscribe to Our Youtube Channel
Related Manuals for DHP Sophia 4032659


Summary of Contents for DHP Sophia 4032659
- Page 1 4032659 Sophia Upholstered Daybed and Trundle Navy Thank you for purchasing from DHP! DO NOT RETURN TO THE STORE ! If parts are missing or damaged, we will gladly ship your replacement parts free of charge. Visit www.dhpfurniture.com/eng/support-home or call Toll-Free 1-800-267-1739...
-
Page 2: Warranty Information
Warranty Information Read Before Beginning Assembly DHP warrants this product to be free from defects in material and workmanship and agrees to remedy any such defect. This warranty covers one year from the date of original purchase. This is solely limited to the repair or replacement of defective 2 (however it is always better parts and assembly labor is not included. - Page 3 B34403265900...
- Page 4 Parts For Daybed Replacement Parts, visit www.dhpfurniture.com/eng/support-home This item is packed in 2 boxes! All parts listed on this page are in Box A. If Box B is missing please contact your Retailer. There are inner box(es) that include components required to complete this assembly.
- Page 5 Parts For Trundle Replacement Parts, visit www.dhpfurniture.com/eng/support-home This item is packed in 2 boxes! All parts listed on this page are in Box B. If Box A is missing please contact your Retailer. There are inner box(es) that include components required to complete this assembly.
- Page 6 Hardware Pack: Daybed Hardware Pack #: T4032359-00 1/4" X 3/4" X 14 1/4" X 1 3/16" X 16 1/4" X 1 9/16" 4 mm X 12 5/16" X 3 1/8" Hardware Note: Please do not completely tighten all the hardware, until the entire assembly is completed, unless otherwise indicated in the step-by-step instructions.
- Page 7 Hardware Pack: Trundle Hardware Pack #: T4019257B-00 1/4" 1/4" X 1 3/8" 1/4" X 1 9/16" 4 mm Wrench Wrench Hardware Note: Please do not completely tighten all the hardware, until the entire assembly is completed, unless otherwise indicated in the step-by-step instructions.
- Page 8 Step 1 NOTE: The following instructions will illustrate how to assemble the Daybed from Step 1 to Step 7. Please use the Daybed Hardware Pack: T4032359-00 Attach (Z) to (C) with BOLT 4. NOTE: To avoid fraying the fabric during the assembly, please lay the armrests(C) on a piece of carboard.
- Page 9 Step 2 2.1 Attach (T) to (B) with BOLTS 1; 2.2 Attach (S) to (B) with BOLTS 1. Note: This step needs to be done twice for remaining parts (B), (S) and (T). Please note the direction of bracket holes. B34403265900...
- Page 10 Step 3 Please make sure narrow holes on part (T), (S) and slat holes on Attach (E) to (B) with BOLT 3. Note: This step needs to be done twice part (E) are facing toward the for remaining parts (E) and (B). same side.
- Page 11 Step 4 4.1 Pre-assemble BOLTS 2 in (C); 4.2 Hang (S) & (T) located on part (B) onto pre-assembled bolts 2, as illustrated below. Do not completely tighten the bolts on this step as you need to assemble the middle stretcher (F) in the next step. B34403265900...
- Page 12 Step 5 5.1 Attach (F) to (C) with BOLTS 2; 5.2 Attach (K) to (E) with BOLTS 1. Completely tighten all bolts in this step. B34403265900...
- Page 13 Step 6 6.1 Insert (X) into (O); 6.2 Press (X) into (E); 6.3 Repeat the same procedure for the opposite side, as illustrated. B34403265900...
- Page 14 Step 7 7.1 Insert ends of slats (O) into (Y); 7.2 Press (Y) onto (F) as illustrated; 7.3 Repeat same procedure for all slats. B34403265900...
- Page 15 Step 8 NOTE: Holes on part (H) should be facing upward. NOTE: The following instructions will illustrate how to assemble the Trundle from Step 8 to Step 12. Please use the Trundle Hardware Pack:T4019257B-00 8.1 Attach (I) to ( H) with BOLT 1 and NUT 3 using WRENCH 6.
- Page 16 Step 9 9.1 Attach (P) to (H) using WRENCH 5. 9.2 Attach (N) to (H) using WRENCH 5. B34403265900...
- Page 17 Step 10 Turn over the frame assembled on STEP 9. Attach (G) to (J) with BOLTS 2. B34403265900...
- Page 18 Step 11 11.1 Insert (X) into (O); 11.2 Press (X) into (E); 11.3 Repeat the same procedure for the opposite side, as illustrated. 11.1 11.2 11.3 B34403265900...
- Page 19 Step 12 12.1 Insert ends of slats (O) into (Y); 12.2 Press (Y) into (F) as illustrated. 12.3 Repeat same procedure for all slats. 12.2 12.3 B34403265900...
-
Page 20: Helpful Hints
Exceeding this maximum weight may result in product instability, causing possible injury and damage to the product. DHP for replacement parts. Please keep casters in lock condition under normal use to prevent unintentional movement which may lead to instability and tipping. - Page 21 WARNINGS: For safety reasons and to prevent injuries: years and older. maximum weight limit indicated. Exceeding this maximum weight may result in product instability, causing possible injury and damage to the product. DHP for replacement parts. End Cap T393100 B34403265900...
- Page 22 | www.pinterest.com/dhpfurniture para tener acceso a promociones de DHP. producto o simplemente ordenar otras partes, dirijase a: Gracias por comprar un producto DHP. Esperamos que este le proporcione muchos cs@dhpfurniture.com 1-800-267-1739 / Lunes - Viernes / 9:00 am - 5:00 pm (hora del este)
- Page 23 Lea antes de comenzar a ensamblar (C) Apoyabrazos - T930760 (B) Panel frontal/trasero - T930770 (E) Barandal delantero/trasero - T926920 (T) Soporte derecho - T393060 (S) Soporte izquierdo - T393050 (sin embargo es recomendable contar con ayuda adicional). Tiempo estimado de ensamble es 1.5 horas.
- Page 24 Instrucciones Limite de Peso : 400 Lb / 181 Kg Divan 225 Lb / 102 Kg Cama Inferior Paso 1 Step 12 12.1 Inserte los extremos de las TABLILLAS DE MADERA (O) dentro de (Y); Por favor use el paquete de componentes: T4032359-00 Una (Z) con (C) usando los PERNOS 4.
-
Page 25: Garantie
DHP. cs@dhpfurniture.com 1-800-267-1739 / Lundi - Vendredi / 9:00 am - 5:00 pm (Heure de l'Est) DHP / 410E, First Street South, Wright City MO 63390, USA Attention: Consumer Service. Remarque: concours. B34403265900-10125-M... -
Page 26: Avant De Commencer L'assemblage
Avant de commencer l'assemblage (C) Accoudoir - T930760 0770 (F) Entretoise Centrale T926290 (K) Entretoise T926830 plancher et le produit. (T) Support Droite - T393060 2 (cependant il vaut (S) Support Gauche - T393050 est de 1.5 heures. (Z) Pied - T926840 (X) Capuchon simple - un orificio - T926370 (Y) Capuchon double - doble orificio - T926380 (O) Lattes de bois - T926360... -
Page 27: Conseils Utiles
6.2 Presser (X) dans (E). UTILISEZ PAS de produits abrasif ou chimies. Avertissement Note: Les instructions suivantes illustreront comment assembler le lit inferieur de T4019257B-00 1 et ECROUS 3. 1 et ECROUS 3. des dommages au produit. large. contactant DHP. B34403265900...
Need help?
Do you have a question about the Sophia 4032659 and is the answer not in the manual?
Questions and answers