Advertisement
Quick Links
X.P. - 12/16/2014
© 2014 Dorel Home Products All Rights Reserved
Thank you for purchasing from DHP!
DO NOT RETURN TO THE STORE !
If parts are missing or damaged, we will gladly ship your
replacement parts free of charge.
Call 0844 3300948
Date of Purchase
IMPORTANT - READ CAREFULLY - RETAIN FOR FUTURE REFERENCE
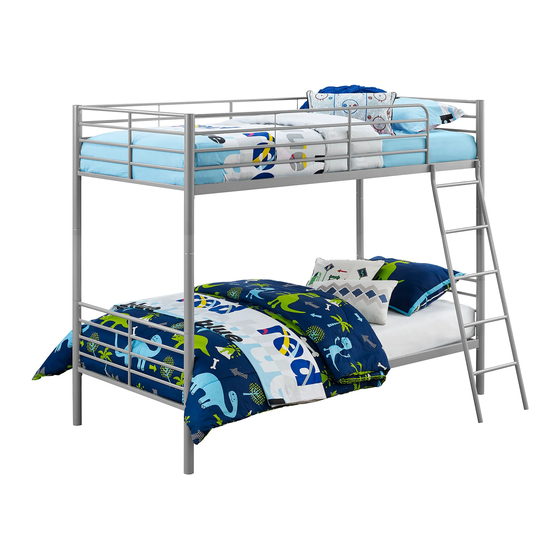
4035159UK
Convertible
Single Metal Bunk Bed
Lot Number
B344035159UK00 - 10125 - M
Silver
1
Advertisement

Related Manuals for DHP 4035159UK


Summary of Contents for DHP 4035159UK
- Page 1 4035159UK Convertible Single Metal Bunk Bed Silver Thank you for purchasing from DHP! DO NOT RETURN TO THE STORE ! If parts are missing or damaged, we will gladly ship your replacement parts free of charge. Call 0844 3300948 Date of Purchase...
-
Page 2: Warranty Information
● Call our Customer Care phone number if you need assistance. DHP warrants this product to be free from defects in material and workmanship and ● Work in a spacious area, preferably on a carpet, near where the unit will be used. - Page 3 Parts Replacement Parts, Call 0844 3300948 All in 1 big box! There are inner boxe(s) that include components Upper Post Upper Post Lower Post Lower Post Upper Post UK920960 required to complete this assembly. UK920970 UK920980 UK920990 UK921000 Before you throw the package, please use the Check Box to identify the parts and ensure that you have all the parts needed for the assembly.
- Page 4 Parts Replacement Parts, Call 0844 3300948 All in 1 big box! There are inner boxe(s) that include components Slat Spacer Connector Post Bolt Hole Plug required to complete this assembly. UK921520 UK900140 UK300000 UK392850 X 48 X 46 X 14 Before you throw the package, please use the Check Box to identify the parts and ensure that you have all the parts needed for the assembly.
- Page 6 Step 6 If you are assembling a bunk bed, then please ignore this step and continue with Step 7. if you wish to use this item as 2 single beds, then to avoid any finger entrapments, please 6.1 Use the BOLTS 3 to cover the bolt holes above the bed foundation.
- Page 7 Step 7 Please follow the Step 7 - Step 10 to assemble the second bed: Attach (D) & (D1) to (I) with BOLTS 3 as shown. If you intend to use this item as 2 single beds, then please insert (Y1) to (D) & (D1) as shown.
- Page 8 Step 8 Attach (J) to (D) & (D1) with BOLTS 4 as shown. B344035159UK00...
- Page 9 Step 9 Refer to the Step 3 - Step 5 to assemble (O), (Y), (Q) & (X) to the bed. B344035159UK00...
- Page 10 Step 10 If you are assembling a bunk bed, then please ignore this step and continue with Step 12. if you wish to use this item as 2 single beds, then to avoid any finger entrapments, please use 4 X (S) to cover the bolt holes above the bed foundation.
- Page 11 Step 11 To assemble the unit as a bunk bed, you need to follow the Step 1 - Step 5, Step 7 - Step 9 without insert (Y1) to the Posts. If you are transfering 2 beds to a bunk bed, you have to take out the illustrated 8 X (Y1) from the Posts before next step.
- Page 12 Step 12 Attach (F) to (A) with BOLTS 3, then fix (F) to (H) with BOLTS 1. B344035159UK00...
- Page 13 Step 13 Attach (E) to (A) & (B) with BOLTS 3, then fix (E) to (G) with BOLTS 1. B344035159UK00...
- Page 14 Step 14 Insert (K) to (D) & (D1) then fix them with BOLTS 3. B344035159UK00...
- Page 15 Step 15 Put the upper bed on the top of (K); Fix the Posts to (K) with BOLTS 3. B344035159UK00...
- Page 16 Step 16 Attach (Z) to (H) with BOLTS 2. B344035159UK00...
- Page 17 Step 17 17.1 17.1 Place (W) around (G), inside the fifth slat from each end. Mark the 4 holes to be drilled; 17.2 Drill with 6mm (1/4") drill bit to a depth of 40mm. Plug holes with RAWLPLUGS 6; 17.3 Attach (W) with SCREWS 5. 17.2 17.3 B344035159UK00...
-
Page 18: Helpful Hints
● Move your new furniture carefully, with two people lifting and carrying the unit to it's new location. ● Your DHP furniture can be disassembled and reassembled to move. ● Some parts have been pre-assembled for this item. They are illustred on this page and available for replacement. - Page 19 WARNINGS for Bunk Bed ● Periodically check and ensure that the guardrail, ladder, and other components are in their proper position, free from damage, and that all assembly fastenings should always be tightend properly. ● The bunk bed should not be used if any structural part is broken or missing. ●...
Need help?
Do you have a question about the 4035159UK and is the answer not in the manual?
Questions and answers