Table of Contents
Advertisement
Available languages
Available languages
Quick Links
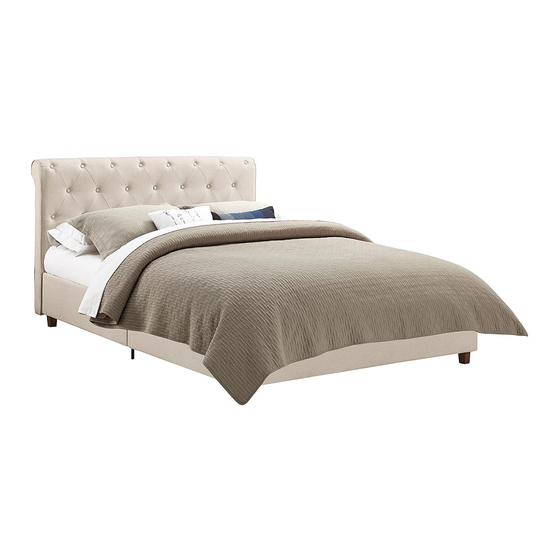
Weight Limit: 500 Lb / 227 Kg
N.C.- 5/10/2016
Carmela Upholstered Bed
Thank you for purchasing from DHP!
DO NOT RETURN TO THE STORE !
If parts are missing or damaged, we will gladly ship your
replacement parts free of charge.
Visit www.dhpfurniture.com/eng/support-home
or call Toll-Free 1-800-267-1739
Date of Purchase
THIS INSTRUCTION BOOKLET CONTAINS IMPORTANT SAFETY
INFORMATION. PLEASE READ AND KEEP FOR FUTURE REFERENCE.
4037349
Queen
Tan Linen
Lot Number
B34403734901-10125-M
1
Advertisement
Table of Contents

Related Manuals for DHP Carmela 4037349


Summary of Contents for DHP Carmela 4037349
- Page 1 Carmela Upholstered Bed Queen Tan Linen Weight Limit: 500 Lb / 227 Kg Thank you for purchasing from DHP! DO NOT RETURN TO THE STORE ! If parts are missing or damaged, we will gladly ship your replacement parts free of charge.
-
Page 2: Warranty Information
Warranty Information Read Before Beginning Assembly DHP warrants this product to be free from defects in material and workmanship and Call our toll free number if you need assistance. agrees to remedy any such defect. This warranty covers one year from the date of Work in a spacious area, preferably on a carpet, near where the unit will be used. - Page 3 B34403734901...
- Page 4 Parts Replacement Parts, visit www.dhpfurniture.com/eng/support-home All in 1 big box! There are inner box(es) that include components required to complete this assembly. Headboard Footboard Sideboard 01 Sideboard 02 Side Rail Before you throw the package, please use the T927510 T927120 T927520 T927100 T927110...
-
Page 5: Hardware Pack
Hardware Pack Hardware Pack #: T4028319-01 1/4" X 3/4" X 44 1/4" X 1 3/8" 1/4" X 1 9/16" X 28 1/4" X 1 3/4" 5/16" X 2 1/4" 1/4" 5/16" Hardware Note: Please do not completely tighten all the hardware, until the entire assembly is completed, unless otherwise indicated in the step-by-step instructions. - Page 6 Step 1 Join panels (C) and (D) and secure them with (F) and (H) with BOLTS 3. Repeat same action for remaining parts (C), (D), (F) and (H). B34403734901...
- Page 7 Step 2 Attach (G) x 2 to previous subassembly (C/D) with BOLTS 3. Repeat the same action for the other subassembly (C/D). NOTE: 8 Holes on part (G) should be facing upward. B34403734901...
- Page 8 Step 3 3.1 Attach (T) to (C) with BOLTS 1. 3.2 Attach (S) to (D) with BOLTS 1. Repeat the same action for the other subassembly (C/D). B34403734901...
- Page 9 Step 4 Screw BOLTS 1 into (A) and (B), do not completely tighten the bolts on this step. NOTE: Leave half of the thread exposed B34403734901...
- Page 10 Step 5 Hang subassembly (C/D) from STEP 3 on (A) and (B) as illustrated, do not completely tighten the BOLTS 1 until the STEP 10 is completed. B34403734901...
- Page 11 Step 6 Push NUT 6 into the hole on the leg Z, then attach (Z) to (N) with BOLT 5 and NUT 6. Repeat this step for all remaining legs (Z). B34403734901...
- Page 12 Step 7 7.1 Attach subassembly from previous step (N/Z) x 4 to (A), (B), (C) and (D) with BOLTS 1; 7.2 Attach (L) x 2 to (H) with BOLTS 2. B34403734901...
- Page 13 Step 8 Insert (I) x 2 and (J) into (M) x 2, then fix the parts with BOLTS 1. B34403734901...
- Page 14 Step 9 Attach both ends (I) to (A) and (B) with BOLTS 1. B34403734901...
- Page 15 Step 10 Attach (K) to (F) and (J) with BOLTS 4 and NUTS 9, then properly tighten all Bolts. B34403734901...
- Page 16 Step 11 11.1 Insert (O1) into (X); 11.2 Then press (X) into the holes on (F) & (G); 11.3 Repeat the same procedure for the opposite side as shown. B34403734901...
- Page 17 Step 12 Insert both (O1) into (Y), then press (Y) into (I) and (J) as shown. B34403734901...
-
Page 18: Helpful Hints
Helpful Hints Helpful Hints Weight Limit: 500 Lb / 227 Kg people lifting and carrying the unit to it's new location. reassembled to move. item. They are illustred on this page and available for replacement. WARNINGS: For safety reasons and to prevent injuries: This bed is intended for use by children aged 4 years and older. - Page 19 | www.pinterest.com/dhpfurniture para tener acceso a promociones de DHP. producto o simplemente ordenar otras partes, dirijase a: Gracias por comprar un producto DHP. Esperamos que este le proporcione muchos cs@dhpfurniture.com 1-800-267-1739 / Lunes - Viernes / 9:00 am - 5:00 pm (hora del este)
- Page 20 Lea antes de comenzar a ensamblar Partes Piezas de reemplazo, visite www.dhpfurniture.com/spa/support-home Todo se incluye en 1 caja grande! (sin embargo es recomendable contar con ayuda adicional). Tiempo estimado de Hay 1 caja(s) interna(s) que incluyen los componentes necesarios para ensamble es 1.5 horas.
- Page 21 Mueva sus muebles nuevos con cuidado, se requiere de dos personas para Paso 2 Una (G) x 2 al previo sub-ensamble (C/D) usando los PERNOS 3. Repita este Sus muebles DHP se pueden desmontar y volver a ensamblar en caso de paso para el otro sub-ensamble (C/D). mudanza.
-
Page 22: Garantie
DHP. cs@dhpfurniture.com 1-800-267-1739 / Lundi - Vendredi / 9:00 am - 5:00 pm (Heure de l'Est) DHP / 410E, First Street South, Wright City MO 63390, USA Attention: Consumer Service. Remarque: concours. B34403734901-10125-M... -
Page 23: Avant De Commencer L'assemblage
Avant de commencer l'assemblage www.dhpfurniture/fre/support-home plancher et le produit. 2 (cependant il vaut l'assemblage. est de 1.5 heures. lors de l'assemblage. Support Gauche: T393080 Pied de Lit: T927520 Support Droite: T393090 Capuchon simple: T926370 Capuchon double: T926380 Pied: T926650 7130 commercial. -
Page 24: Conseils Utiles
Instructions Limite de Poids: 500 Lb / 227 Kg Conseils utiles Attacher les panneaux (C) et (D) et les fixer avec (F) et (H) avec les BOULONS 3. personnes pour soulever et transporter le mobilier vers son nouvel emplacement. Attacher (G) X 2 (C/D) avec les BOULONS 3.
Need help?
Do you have a question about the Carmela 4037349 and is the answer not in the manual?
Questions and answers