Table of Contents
Advertisement
Available languages
Available languages
Quick Links
Item #1001411378
Model #HB-7779-02
USE AND CARE GUIDE
WIRELESS 4-CHANNEL DOORBELL
AND ALERT KIT
Questions, problems, missing parts?
Before returning to the store, call Hampton Bay Customer Service
8 a.m. - 5 p.m., CST, Monday - Friday
1-844-760-3644
HAMPTONBAY.COM
Illustrations may vary from actual unit.
THANK YOU
We appreciate the trust and confidence you have placed in Hampton Bay through the purchase of this wireless
4-channel doorbell and alert kit. We strive to continually create quality products designed to enhance your home.
Visit us online to see our full line of products available for your home improvement needs. Thank you for choosing
Hampton Bay!
Advertisement
Chapters
Table of Contents

Related Manuals for HAMPTON BAY HB-7779-02


Summary of Contents for HAMPTON BAY HB-7779-02
- Page 1 Illustrations may vary from actual unit. THANK YOU We appreciate the trust and confidence you have placed in Hampton Bay through the purchase of this wireless 4-channel doorbell and alert kit. We strive to continually create quality products designed to enhance your home.
-
Page 2: Table Of Contents
Table of Contents Table of Contents ........2 Tools Required ........3 Safety Information ........2 Hardware Included .........3 Warranty ............2 Package Contents ........4 3-Year Limited Warranty ......2 Installation ..........4 Pre-Installation ..........3 Operation ...........8 Planning Installation ......3 Care and Cleaning ........12 Specifications ........3 Troubleshooting ........12 Safety Information PRECAUTIONS... -
Page 3: Pre-Installation
Pre-Installation PLANNING INSTALLATION Before installing the wireless 4-channel doorbell and alert kit, ensure that all parts are present. Compare parts with the Hardware Included and Package Contents sections. If any part is missing or damaged, do not attempt to assemble, install, or operate this wireless 4-channel doorbell and alert kit. Estimated installation time: 15 minutes SPECIFICATIONS Doorbell... -
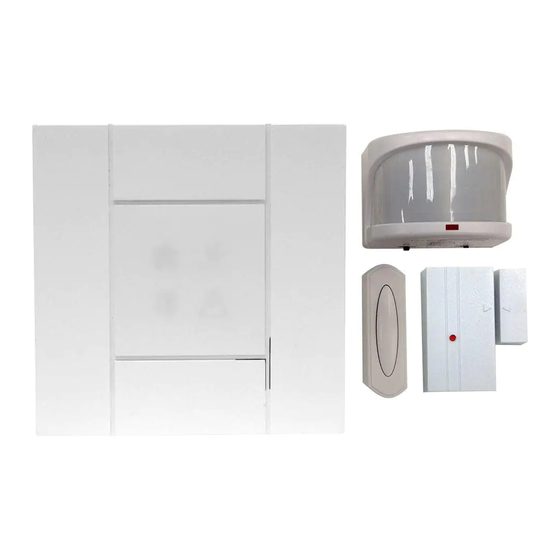
Page 4: Package Contents
Pre-Installation (continued) PACKAGE CONTENTS Part Description Quantity Doorbell Push button Motion sensor alert Door alert Magnet Spacer Installation Installing the batteries into the NOTE: The term “transmitter” refers to any device that doorbell transmits a signal. In the following steps, the term will refer to a push button, motion sensor alert, or door alert. - Page 5 Installation (continued) Removing the battery tab from the push button □ Remove the back of the push button (B) by pushing in the tab on the bottom with a small screwdriver (not included). □ Remove the orange battery tab from the push button (B).
- Page 6 Installation (continued) Testing the motion sensor alert NOTE: Do not permanently mount the motion sensor until and doorbell the motion sensor and doorbell are working properly. RANGE In most cases, testing of the motion sensor requires two people; one person to activate the motion sensor (C) and TEST 1 5 (MINS) SYNC...
- Page 7 Installation (continued) Mounting the push button Use either screws (BB) or double-sided tape (FF) to mount the push button (B). □ To mount with screws (BB), remove the back of the push button (B) by pushing in the tab on the bottom with a small screwdriver. Place the push button (B) back on the door jamb and mark the two screw holes.
-
Page 8: Operation
Installation (continued) □ Mounting the door alert When attaching the door alert (D) with double- sided tape (FF), remove paper from both sides of the double-sided tape (FF) and apply to a clean surface. Use either the small screws (BB) or double-sided tape (FF) to mount the door alert (D): □... - Page 9 Operation (continued) Understanding the doorbell icons NOTE: Remove the static film from the doorbell face prior to use. The icons on the doorbell (A) glow depending on which transmitter activates the doorbell (A). □ □ The HOUSE icon – When the push button (B) The RUNNING MAN icon –...
- Page 10 Operation (continued) Setting the wireless push button The wireless push button (B) has two options for tune selection: Play the selected “FRONT” door musical tune or play the “REAR” door designated tune (Ding). □ Remove the single jumper inside the push button (B) to play the selected musical tune.
- Page 11 Operation (continued) Setting the motion sensor’s □ Adjust the “RANGE” control to increase (MAX) range or decrease (MIN) the sensitivity. The “RANGE” control increases and decreases the sensitivity of the motion sensor (C) as well as increases and decreases the distance the motion RANGE sensor (C) will detect movement.
-
Page 12: Care And Cleaning
Operation (continued) Adding a transmitter Up to two transmitters can be programmed for each channel. Only one transmitter may be synced at a time. Repeat these steps for each transmitter. □ Select the doorbell (A) icon to add a transmitter. □... - Page 13 Troubleshooting (continued) Problem Possible Cause Solution □ □ The batteries The doorbell or transmit- Metal reduces transmission range. Use 1/4 in. to 1/2 seem okay, but ter is mounted on metal in. (6 to 13 mm) wood shims to move the doorbell or the doorbell does or near metal studs.
- Page 14 Questions, problems, missing parts? Before returning to the store, call Hampton Bay Customer Service 8 a.m. - 5 p.m., CST, Monday - Friday 1-844-760-3644 HAMPTONBAY.COM Retain this manual for future use. 208189-02A...
- Page 15 Las ilustraciones pueden ser diferentes de la unidad comprada. GRACIAS Agradecemos la confianza que han depositado en Hampton Bay al comprar este timbre inalámbrico de 4-canales y juego de alerta. Procuramos crear continuamente productos de calidad diseñados para mejorar su hogar. Visítenos en internet para ver nuestra línea completa de productos disponibles que necesita para el mejoramiento de su hogar.
-
Page 16: Contenido
Contenido Contenido ..........16 Herramientas Requeridas ....17 Información de seguridad ......16 Ferretería Incluida ........17 Garantía ...........16 Contenido del Paquete ......18 3 años de garantía limitada ....16 Instalación ..........18 Antes de la instalación ......17 Operación ..........22 Planificación de la Instalación .....17 Cuidado y limpieza ........26 Especificaciones ........17 Análisis de averías ........26 Información de seguridad... -
Page 17: Antes De La Instalación
Antes de la instalación PLANIFICACIÓN DE LA INSTALACIÓN Antes de instalar el timbre inalámbrico de 4-canales y juego de alerta, asegúrese de tener todas las piezas. Compare las piezas con las indicadas en las secciones Ferretería incluida y contenidos del paquete. Si alguna pieza falta o está... -
Page 18: Contenido Del Paquete
Antes de la instalación (continuación) CONTENIDO DEL PAQUETE Pieza Descripción Cantidad Timbre Pulsador Alerta del detector de movimiento Alerta de la puerta Imán Espaciador Instalación Instalación de las pilas en el NOTA: El término “transmisor” se refiere a cualquier timbre dispositivo que transmite una señal. - Page 19 Instalación (continuación) Retiro de la lengüeta de la pila del pulsador □ Con un destornillador pequeño (no se incluye), presione la pestaña en la parte inferior del botón pulsador (B) para retirar la parte posterior. □ Retire la pestaña naranja de la batería del botón pulsador (B).
- Page 20 Instalación (continuación) Prueba de la alerta del detector NOTA: No instale de forma permanente el detector de de movimiento y del timbre movimiento hasta que el detector de movimiento y el RANGE timbre funcionen correctamente. En la mayoría de los casos, la prueba del detector de movimiento requiere de dos personas;...
- Page 21 Instalación (continuación) □ Al colocar el botón pulsador (B) con cinta doble Montaje del pulsador faz (FF), retire el papel de ambos lados de la cinta doble faz (FF) y aplique en una superficie limpia. Use tornillos (BB) o cinta doble faz (FF) para montar el botón pulsador (B).
-
Page 22: Operación
Instalación (continuación) Montaje de la alerta de □ Cuando sujete la alerta (D) de la puerta con la la puerta cinta engomada por los dos lados (FF), retire el papel de ambos lados de la cinta engomada Use sea los tornillos pequeños (BB) o la cinta por los dos lados (FF) y aplíquela a una engomada por los dos lados (FF) para montar la superficie limpia. - Page 23 Operación (continuación) Comprensión de los iconos del timbre NOTA: Retire la película estática del frente del timbre antes de usarlo. Los iconos en el timbre (A) se encienden dependiendo del transmisor que acciona el timbre (A). □ □ El icono “CASA” – Cuando el pulsador (B) El icono “HOMBRE CORRIENDO”...
- Page 24 Operación (continuación) Configuración del pulsador inalámbrico El pulsador inalámbrico (B) tiene dos opciones para la selección del tono: Reproduzca el tono musical de la puerta “PRINCIPAL” seleccionado o el tono designado para la puerta “DE ATRÁS” (din). □ Retire un puente simple que está adentro del Retire el puente para Añada el puente para pulsador (B) para reproducir el tono musical...
- Page 25 Operación (continuación) Configuración del alcance del □ Regule el control del ALCANCE para aumentar detector de movimiento (MÁX) o disminuir (MÍN) la sensibilidad. El control “ALCANCE” aumenta o disminuye la sensibilidad del detector de movimiento (C) así como aumenta o disminuye la distancia hasta la que el RANGE detector de movimiento (C) es capaz de detectar.
-
Page 26: Cuidado Y Limpieza
Operación (continuación) Adición de un transmisor Hasta dos transmisores pueden ser programados para cada canal. Solamente se puede sincronizar un transmisor por vez. Repita estos pasos para cada transmisor. □ Seleccione un icono del timbre (A) para añadir un transmisor. □... - Page 27 Análisis de averías (continuación) Problema Causa Probable Solución □ □ Las pilas parecen El timbre o el transmisor El metal reduce el alcance de transmisión. Utilice estar bien, pero está montado sobre me- cuñas de madera de 1/4 pulg. a 1/2 pulg. (de 6 a 13 el timbre no tal o cerca de espárragos mm) para mover el timbre o el transmisor lejos de la...
- Page 28 ¿Tiene preguntas, problemas o piezas faltantes? Antes de la devolución al almacén llame al Servicio al Cliente de Hampton Bay de 8 a.m.-5 p.m., Hora del Central, de lunes a viernes. 1-844-760-3644 HAMPTONBAY.COM Guarde este manual para uso futuro. 208189-02A...
Need help?
Do you have a question about the HB-7779-02 and is the answer not in the manual?
Questions and answers