Table of Contents
Advertisement
Quick Links
Advertisement
Table of Contents

Subscribe to Our Youtube Channel
Related Manuals for HazeBase classic 2


Summary of Contents for HazeBase classic 2
- Page 1 Instruction manual...
- Page 2 Classic² / Highpower² Scope of delivery 1 Classic² or Highpower² 1 5l empty canister 1 tank cap with quick coupling 1 fluid hose with quick coupling and grommet 1 Power cord with TrueOne plug 1 Tank holder 1 Wide jet nozzle (only with Highpower²) 1 Noise-reducing nozzle (only for Highpower²) 1 Operating instructions Please check the completeness of the delivery...
-
Page 3: Table Of Contents
Classic² / Highpower² Content 1. Introduction 2. Safety instructions 3. Designation of the parts 4. Preparation 4.1 Selection of the site 4.2 Changing the canister 4.3 Ducting adapter 4.4 Interchangeable nozzle (Highpower² only) 5. Fog fluids 6. Working with the Classic²/Highpower² 6.1 Control panel of the Classic²/Highpower²... -
Page 4: Introduction
Classic² / Highpower² 1. Introduction The Classic² and Highpower² are powerful fog machines with classic accumulating evaporators. The large storage volume allows large amounts of fog to be generated. Likewise, the smallest fog clouds can be generated. The Highpower² also has an alternating nozzle system. Here, a choice can be made between a wide-jet nozzle and a noise-reducing nozzle. -
Page 5: Safety Instructions
Classic² / Highpower² 2. Safety instructions Very hot steam escapes from the mist outlet. Caution: Danger of burns! During the fogging process, very hot fluid droplets may occasionally escape from the fog outlet opening. Therefore, there must be no persons or heat-sensitive objects within a distance of 1.5 m from the fog outlet opening. -
Page 6: Designation Of The Parts
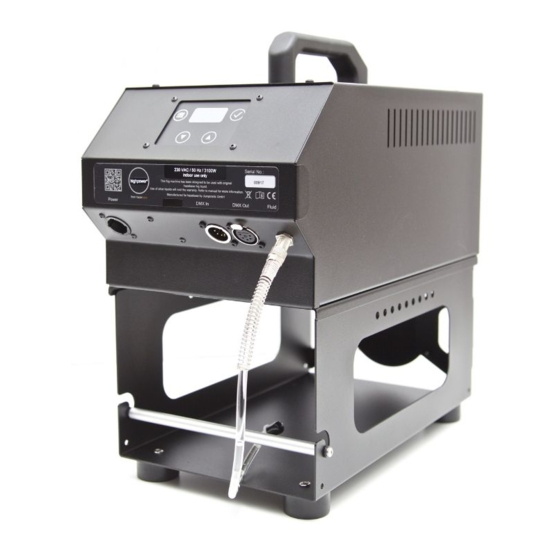
Classic² / Highpower² 3. Designation of the parts Front view Rearview... -
Page 7: Preparation
Classic² / Highpower² 4. Preparation 4.1 Selection of the site The location where the Classic²/Highpower² is operated must be Have good ventilation, with cold and fog-free air ● Be dry ● Be vibration and shock free ● Consist of a non-flammable footprint ●... -
Page 8: Interchangeable Nozzle (Highpower² Only)
Classic² / Highpower² 4.4 Interchangeable nozzle (Highpower² only) The Highpower² has an interchangeable nozzle system. ATTENTION! Please change the nozzle only when the heating element is cold, danger of burns! To do this, unscrew the nozzle from the front using a 14 mm nut with extension and ratchet. -
Page 9: Fog Fluids
Classic² / Highpower² 5. Fog fluids Four different fluids are available for the Classic²/Highpower² base*X is a very long-lasting fluid ● base*L is a long-lasting fluid ● base*M is a normal lasting fluid ● base*Q is a very fast dissolving fluid ●... -
Page 10: Control Panel Of The Classic²/Highpower²
Classic² / Highpower² 6.1 Control panel of the Classic²/Highpower² The Classic²/Highpower² is operated via the four keys (menu, minus, plus, confirmation) and the OLED display. The menu fields are located in the corners of the display, and the value field, which displays the value of the selected menu field, is located in the center. -
Page 11: Operation Via Dmx512/Rdm
Classic² / Highpower² 6.3 Operation via DMX512/RDM When operating via DMX512, the XLR input (2) must first be set to DMX (see chapter Options). As shown, "DMX" appears in the upper right menu field. The DMX address can be changed with the plus and minus keys and must then be saved with the confirmation key. -
Page 12: Operation Via Cable Remote Control (Option)
Classic² / Highpower² In the Modbus submenu the menu fields are replaced. At the top left the address of the device can be set. At the bottom left the baud rate of the communication is set and at the bottom right the data width, parity and stop bits. The setting is done analog to the main menu. -
Page 13: Operation Via Radio Remote Control (Option)
Classic² / Highpower² 6.6 Operation via radio remote control (option) When operating via the radio remote control, the XLR input (2) must first be set to Remote (see chapter Options). After the radio remote control been plugged Classic²/Highpower² automatically detects that a radio remote control has been plugged in. -
Page 14: Operation Via The Internal Timer
Classic² / Highpower² To exit the submenu, the menu item "exit" must be selected and confirmed with the confirmation key. 6.7 Operation via the internal timer To set and activate the internal timer, you must first switch to the Timer submenu. Here, too, the menu fields are changed accordingly. -
Page 15: Setting The Pump Characteristics
Classic² / Highpower² 7.1 Setting the pump characteristics After activating the submenus, the menu fields in the corners are changed. The menu item "Char." now appears at the bottom left and the menu item "Input" at the bottom right. In the menu item "Char." you can choose between the pump characteristics "full power", "max. -
Page 16: Setting The Communication Protocol Of The Xlr Sockets
Classic² / Highpower² Non stop The pump is regulated down to continuous fog mode. 7.2 Setting the communication protocol of the XLR sockets In the menu item "Input" the communication protocol of the XLR sockets can be selected. The following protocols can be selected here: DMX/RDM ●... -
Page 17: Care And Maintenance
Classic² / Highpower² 8. Care and maintenance Avoid running the Classic²/Highpower² without fluid. The pump will otherwise run dry. Avoid overheating the device due to direct sunlight or direct spotlight. The permissible ambient temperature can be found in the technical data. Make sure that the ventilation slots of the machine are not clogged with dust deposits. -
Page 18: Troubleshooting
Classic² / Highpower² 9. Troubleshooting The Classic²/Highpower² does not mist Check external control Check power source Check fluid quantity Check connection at fluid tank for tightness Check suction strainer in tank for contamination Check fluid hose and connector for tightness The Classic²/Highpower²... -
Page 19: Technical Data
Classic² / Highpower² 10. Technical data 10.1 Highpower² Device type Vaporizer Fog Machine Power 230V~, 50 Hz, 3100 W (PowerCON TRUE1) Heating time approx. 8 min Fluid consumption up to 300 ml/min (full power mode, wide jet nozzle), up to 70 ml/min with continuous fog Tank capacity 5 liters Operation... -
Page 20: Classic² - 230V
Classic² / Highpower² 10.2 Classic² - 230V Device type Vaporizer Fog Machine Power 230V~, 50 Hz, 1600 W (PowerCON TRUE1) Heating time approx. 12 min Fluid consumption up to 200 ml/min (full power mode), up to 35 ml/min with continuous mist Tank capacity 5 liters Operation... -
Page 21: Classic² - 115V
Classic² / Highpower² 10.3 Classic² - 115V Device type Vaporizer Fog Machine Power 115V~, 60 Hz, 1700 W (PowerCON TRUE1) Heating time approx. 12 min Fluid consumption up to 240 ml/min (full power mode), up to 40 ml/min with continuous mist Tank capacity 5 liters Operation... -
Page 22: Warranty Conditions
Furthermore, the warranty claim expires if other than the original hazebase fog fluid was used. If the devices are sent to us without prior removal or emptying... - Page 23 Classic² / Highpower² If a damage or defect cannot be remedied by us, or if the remedy is refused or unreasonably delayed within months from date purchase/delivery, at the request of the end user either a. replacement delivered free of charge or b.
-
Page 24: A1. Appendix
Classic² / Highpower² A1. Appendix... - Page 25 Classic² / Highpower²...
Need help?
Do you have a question about the classic 2 and is the answer not in the manual?
Questions and answers