Indesit K6G21/R Installation And Use Manual
Hide thumbs
Also See for K6G21/R:
- Operating instructions manual (53 pages) ,
- Operating instructions manual (85 pages)

Related Manuals for Indesit K6G21/R


Summary of Contents for Indesit K6G21/R
- Page 1 Cucina K6G21/R Installazione e uso K6G21S/R Cooker Installation and use Konyhabútor Beépítés és használat...
- Page 2 Cucina con forno gas e grill gas Istruzioni per l'installazione e l'uso Cooker with gas oven and gas grill Instructions for installation and use Ïëèòà ñ ãàçîâîé äóõîâêîé è ãàçîâûì ãðèëåì Èíñòðóêöèè ïî óñòàíîâêå è ýêñïëóàòàöèè...
- Page 3 Avvertenze Per garantire l’efficienza e la sicurezza di questo elettrodomestico: • rivolgetevi esclusivamente a centri di assistenza tecnica autorizzati • richiedete sempre l’utilizzo di parti di ricambio originali 1 Queste istruzioni sono valide solo per i paesi di destinazio- 14 Questo apparecchio dovrà essere destinato solo all’uso per il ne i cui simboli figurano sul libretto e sulla targa matricola quale è...
-
Page 4: Istruzioni Per L'installazione
Istruzioni per l’installazione Le istruzioni che seguono sono rivolte all’installatore qualifi- pio l’apertura di una finestra o una aerazione più efficace cato affinchè compia le operazioni di installazione regolazione aumentando la potenza di spirazione meccanica se essa e manutenzione tecnica nel modo più corretto e secondo le esiste. - Page 5 solamente tramite tubo metallico flessibile conforme alla st’ultimo dovrà mantenere una distanza minima dal piano UNI-CIG 9891. di 700 mm (millimetri). I mobili adiacenti alla cappa do- vranno mantenere una distanza minima dal piano di 420 Allaccio con tubo flessibile in acciaio inossidabile a mm.
- Page 6 c) Regolazione minimi dei bruciatori del piano: N.B.: nel caso dei gas liquidi, la vite di regolazione • portare il rubinetto sulla posizione di minimo; dovrà essere avvitata a fondo. • togliere la manopola ed agire sulla vite di regolazione po- sta all’interno o di fianco all’astina del rubinetto fino ad ottenere una piccola fiamma regolare.
-
Page 7: Caratteristiche Tecniche
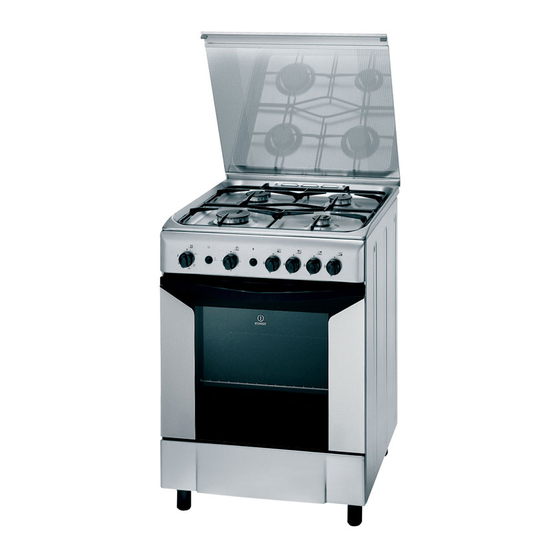
Caratteristiche dei bruciatori ed ugelli Tabella 1 Gas liquido Gas naturale Bruciatore Diametro Potenza termica By-pass Ugello Portata* Ugello Portata* (mm) kW (p.c.s.*) 1/100 1/100 1/100 Nomin. Ridot. (mm) (mm) (mm) Rapido 3,00 (Grande) (R) Semi Rapido 1,90 (Medio) (S) Ausiliario 1,00 (Piccolo) (A) - Page 8 La cucina con forno gas e grill gas A Piano di contenimento eventuali trabocchi K Griglia ripiano del forno B Bruciatore a gas L Accensione elettronica dei bruciatori del piano C Dispositivo di accensione istantanea elettronica M Manopola del forno e del grill D Griglia del piano di lavoro N Manopole di comando dei bruciatori a gas del piano E Cruscotto...
- Page 9 Le diverse funzioni presenti nella cucina Attenzione: Utilizzare il primo ripiano dal basso solamen- La selezione delle varie funzioni presenti nella cucina avviene te nel caso di cotture con girarrosto (ove presente). Per le agendo sui dispositivi ed organi di comando posti sul cruscotto altre cotture non utilizzate mai il primo ripiano dal basso e della stessa.
- Page 10 Consigli pratici per l’uso dei bruciatori Al fine di ottenere il massimo rendimento è utile ricordare quanto segue: • utilizzare recipienti adeguati a ciascun bruciatore (vedere ta- bella) alfine di evitare che le fiamme fuoriescano dal fondo dei recipienti. • utilizzare solamente recipienti a fondo piatto.
-
Page 11: Consigli Pratici Per La Cottura
Consigli pratici per la cottura Il forno mette a vostra disposizione una vasta gamma di Buona cottura esterna, ma interno colloso possibilità che consentono di cuocere ogni cibo nella ma- niera migliore. Con il tempo potrete sfruttare al meglio que- Usate meno liquido, riducete la temperatura, sto versatile apparecchio di cottura, pertanto le note ripor- aumentate il tempo di cottura. - Page 12 Manutenzione rubinetti gas Con il tempo può verificarsi il caso di un rubinetto che si blocchi o presenti difficoltà nella rotazione, pertanto sarà necessario provvedere alla sostituzione del rubinetto stes- N.B.: Questa operazione deve essere effettuata da un tecnico autorizzato dal costruttore. Consigli pratici per la cottura al forno Cibo da cucinare Peso...
-
Page 13: Important Safety Warnings
Important safety warnings To maintain the EFFICIENCY and SAFETY of this appliance, we recommend: • call only the Service Centers authorized by the manufacturer • always use original Spare Parts 1 These instructions are only for those countries whose expressly designed. Any other use (e.g. heating rooms) is symbols appear in the booklet and on the matriculation considered to be improper and consequently dangerous. -
Page 14: Installation
Installation The following instructions should be read by a qualified technician subject to heat produced by external sources (ovens, fire- to ensure that the appliance is installed, regulated and technically places, stoves, etc. ) which are able to increase the tempera- serviced correctly in compliance with current regulations. - Page 15 Tight control Important: when installation has been completed, check the pipe fitting for leaks with a soapy solution. Never use a flame. HOOD HOOD Once the connection has been made, ensure that the flexible Min. Min. metal tube does not touch any moving parts and is not crushed. Connecting the supply cable to the mains Install a normalised plug corresponding to the load indicated on the data plate.
- Page 16 quickly from high to low. d) Regulating the primary air of the burners: The primary air of the burners requires no regulation. Adapting to different types of gas In order to adapt the oven to a different type of gas with respect to the gas for which it was manufactured (indi- cated on the label), follow these simple steps: a) Replacing the oven burner nozzle...
-
Page 17: Technical Characteristics
Burner and nozzle characteristics Table 1 Liquid Gas Natural Gas Burner Diameter Thermal Power By-Pass Nozzle Flow* Nozzle Flow* Nozzle Flow* (mm) kW (p.c.s.*) 1/100 1/100 1/100 1/100 Nominal Reduced (mm) (mm) (mm) (mm) Fast 3,00 (Large)(R) Semi Fast 1,90 (Medium)(S) Auxiliary 1,00... - Page 18 The cooker with gas oven and gas grill A Tray for Catching Overflows K Oven Rack B Gas Burner L Electronic Lighting for Hob Burners C Instantaneous Electronic Lighting Device Oven and Grill Control Knob D Top Grate N Control Knobs for Gas Burners on Hob E Control Panel O Button for Oven and Rotisserie Light (only on a few...
- Page 19 The different functions and uses of the oven The various functions included in the cooker are selected by The oven and grill knob (M) operating the control devices located on the cooker control panel. This knob is used to select the different functions of the oven and choose the right cooking temperature for the food to be Control Knobs for the Gas Burners on the Hob prepared in the oven among the temperatures shown on the...
- Page 20 Oven and grill electronic lighting device (L) (only on a few Practical Advice on Using the Burners models) To use the burners as efficiently as possible, some basic Some models are equipped with electronic lighting device on guidelines should be followed: oven and grill.
-
Page 21: Cooking Advice
Cooking advice The oven offers a wide range of alternatives which allow The pastry sticks to the pan you to cook any type of food in the best possible way. With time you will learn to make the best use of this ver- Grease the pan well and sprinkle it with a dusting of satile cooking appliance and the following directions are flour. - Page 22 Gas tap maintenance The taps may jam in time or they may become difficult to turn. If so, the tap itself must be replaced. N.B.: This operation must be performed by a technician authorised by the manufacturer. Food to be cooked Cooking position Temperature Pre-heating time...
- Page 23 · · · · · · · ¡...
- Page 25 HOOD HOOD Min. Min.
- Page 26 · · · · · ·...
- Page 28 Òàáëèöà 1 Ñæèæåííûé ãàç Ïðèðîäíûé ãàç Ãîðåëêà Äèàìåòð Òåïëîòâîðíàÿ Áàéïàñ Ôîðñóíêà Ðàñõîä* Ôîðñóíêà Ðàñõîä* Ôîðñóíêà Ðàñõîä* (ìì) ñïîñîáíîñòü êÂò 1/100 1/100 ã/÷àñ 1/100 ë/÷àñ 1/100 ã/÷àñ (p.c.s.*) Íîìèí. Ñîêðàù. (ìì) (ìì) (ìì) (ìì) Áûñòðàÿ 3,00 (Áîëüøàÿ)(R) Ïîëóáûñòðàÿ (Ñ 1,90 ðåäíÿÿ)(S) Âñïîìîãàòåëüíàÿ...
- Page 30 · · · • • •...
- Page 31 Ãîðåëêà Äèàìåòð äíà ïîñóäû (cì) Áûñòðàÿ (R) 24 - 26 Ïîëóáûñòðàÿ (S) 16 - 20 Äîïîëíèòåëüíàÿ (A) 10 - 14...
- Page 32 Åñëè ïîâåðõíîñòü ïèðîãà ñëèøêîì òåìíàÿ Ïîìåñòèòå ôîðìó ñ ïèðîãîì íà áîëåå íèçêèé óðîâåíü, óìåíüøèòå òåìïåðàòóðó è óâåëè÷üòå âðåìÿ ïðèãîòîâëåíèÿ. Åñëè ïèðîã õîðîøî ïðîïå÷åí ñíàðóæè, à âíóòðè ñûðîé Ñîêðàòèòå êîëè÷åñòâî æèäêîñòè ïðè çàìåøèâàíèè òåñòà, óìåíüøèòå òåìïåðàòóðó è óâåëè÷üòå âðåìÿ ïðèãîòîâëåíèÿ. Åñëè ïèðîã ñëèøêîì ñóõîé Â...
- Page 33 ·...
- Page 34 Áëþ ä î Âå ñ òå ì ï å ðàò÷ðà Âðå ìÿ ä î ï îä à÷ è Âðå ìÿ ï ð èãî - (êã) (ìèí ) òîâ ëå íè ÿ (ìèí ) Ì àêàðî ííû å èç ä å ë èÿ (ï àñòà) ë...
-
Page 35: Biztonsági Utasítások
Biztonsági utasítások ásának érdek · kizárólag a jótállási jegyen felsorolt szervizeinkhez forduljon! · ragaszkodjon eredeti alkatrészek beszereléséhez! 1. Ez a használati útmutató csak azokra az 12. Ne takarja le a nyílásokat és rés országokra érvényes, amelyek szimbóluma a készülék típuscímkéjén megtalálható. ására szolgálnak! 2. -
Page 36: Üzembe Helyezés
27.Figyelem: soha ne tegyen forr 28.Ez a használati útmutató 1 osztályú (különálló) készülékekre vagy 2 osztályú, 1 alosztályú (két bútor között álló) készülékekre vonatkozik. Üzembe helyezés A készülék üzembe helyezését a jótállási jegyen feltüntetett szakszervizzel végeztesse! A beszerelés költségei a vásárlót terhelik. özött megnövelt rést kell alkalmazni. - Page 37 Gáz csatlakoztatás A lábak felszerelése (csak néhány típusnál) A lábak tart Ha nem, ak á Fontos: ó sszú élettartamát! A csatlakoztatást az ér ° C-kal a szoba 8 mm folyékony gáznál; í · ° C-ot. · é · c) A páraelszívót az arra vonatkozó használati útmutató ·...
- Page 38 beállítása Csak olyan csövet és tömítést használjon, amelyek · Forgassa a csapot minimum pozícióra! megfelelnek az ér · Távolítsa el a gombot és állítsa be a szabályzó csavart, amíg a láng kicsi, de állandó! Megjegyzés: Folyékony gáz esetén a szabályzó csavart teljesen be kell csavarni.
- Page 39 Fontos lgálatná Megjegyzés Abban az esetben, ha a használt gáz nyomása eltér (vagy · válto maximum pozícióról a minimumra forgatja, és ha az ajtót gyorsan kinyitja á és becsukja! A gázgrill átállítása más gázfajtára · E ábra F ábra E ábra F ábra...
- Page 40 K6 G21S/R K6 G21/R Gyártó: INDESIT A forgalombahozó igazolja, hogy a fenti típusú készülékek Azonosító jel:K6G21/R és megfelelnek a követelményeknek. 73/23/CEE, 1973. 02. 19 (Alacsony feszültség) és Névleges feszültség: 220-240 V/50-60 Hz vonatkozó módosításai 89/336/CEE, 1989. 05. 03 (Elektromágneses kompatibilitás) és vonatkozó...
- Page 41 A Zsírfelfogó tepsi Égésbiztosító Elektromos gyújtó Edénytartó rács Kapcsoló tábla Állítható lábacska vagy láb...
-
Page 42: A Készülék Használata
A készülék használata • Min-tól Max- ig) kiválasztására szolgál. F” nyílás k maximum Max pozícióig! bólumok jelentése: • “ ”= kikapcsolt állapot (a gomb akkor van ezen pozíción, ha szimbólum egy vonalban áll a kapcsolótáblán található jelzéssel), = maximum, = minimum. A pozíciók, beállításához fordítsa el a gombot az óramutató... - Page 43 Fontos megjegyzés: · ázatot), hogy a láng ne érjen túl az (L) (típustól edény alján! · Mindig sima aljú edényeket használjon! · A forráspont elérésekor állítsa a gombot minimum pozícióra! nyomja meg a ÆAz edény átmérõje (cm) Égõ Max” pozícióra! Gyors égõ...
- Page 44 Sütési tanácsok A sütemények kívül jól megsülnek, de belül ragadósak maradnak Használjon kevesebb folyadékot, csökkentse hõmérsékletet, és növelje a sütési idõt! asztalatai és ízlése szerint eltérhetnek. Sütemények sütése A sütemény hozzáragad a tepsihez Zsírozza jól be a tepsit és szórja meg liszttel vagy használjon sütõpapírt! °...
- Page 45 A csapok bezsírozása lyezett szakember végezheti. A sütõ aljától Sütési idõ (perc) Az étel fajtája Súly Hõmérséklet Elõmelegíté si idõ (perc) (kg) számított (°C) magassági szint Tészták Lasagne 75-80 Cannelloni 75-80 Sült tészta 75-80 Húsok Borjú 85-90 Csirke 110-115 Pulyka 95-100 Kacsa 120-125...
- Page 46 ionale. 3 Înaint · · · ulterioare. rict necesar, prelungitoare. · · · ate la îndemâ 7 Înainte de a conect maxime într-un interval scurt de timp, survenind eventuale daune ale aparatului sau ale mobilelor adiacente. · pe aceste adaptoare. l pentru depozitarea anumitor vase în cazul materialelor inflamabile.
- Page 47 Trebuie respe instalare improprie În partea din spate a apara Montarea picioarelor (prezente doar la anumite modele) Sunt fur Instalarea aragazului C în raport cu temperatura camerei. a) Mobilele situate în apropie Fig. A Fig. B...
- Page 48 Conectarea unui furtun flexibil din inox cu filet conform normelor în vigoare HOOD HOOD Min. Min. Controlul furtunului Important: pot strivi sau obtura. Fig. C Fig. D Conectarea la sursa de gaz omânia la data C în raport cu cea a camerei.
- Page 49 b) Reglarea minimelor : · · · · N.B : În cazul în care util max la min Adaptarea grill-ului pe gaz la diferite tipuri de gaz Adaptarea la diferite tipuri de gaz Înlocui Pentru adaptarea aparatului la diverse tipuri de gaz, ·...
- Page 50 Diametru Putere Termicã By-pass Ajutaj Debit Ajutaj Debit arzãtorului (mm) KW (pcs*) 1/100 1/100 (mm) 1/100 (mm) (mm) Normala Redusa Rapid (Mare)R Semi Rapid (Medium) Auxiliar (Mic)(A) Cuptor Grill Nominalã (mbar) 28-30 Presiune Minimã (mbar) furnizatã Maximã (mbar) K6G21S/R K6G21/R...
-
Page 51: Caracteristici Tehnice
CARACTERISTICI TEHNICE Cuptorul: Volum cuptor:58 lt Dimensiuni interne ale sertarului pentru depozitare : Lungime : 46 cm Adâncime : 42 cm Selector cuptor/grill Picioare reglabile (prezent doar la anumite modele) (prezent doar la anumite Ceas modele) - Page 52 e gaz • Max). F” • maxim minim Max). •). ului. Important: în cazul une • • • M” Important: re pentru aproximativ 3 secunde Important:...
- Page 53 Butonul pentru iluminarea cuptorului (O) Este indicat prin simbolul Pentru Max. ; deci, rotind în sens invers Pentru a aprinde a În scop c) La atinger Rotisorul Arzãtor ø Diametru recipienti (cm) Rapid (R) 24 – 26 Semi Rapid (S) 16 –...
- Page 54 Bunã coacere exterioarã însã interiorul este crud Folosiþi mai puþin lichid, reduceþi temperatura, mãriþi timpul de coacere. Dulciurile nu se dezlipesc de pe tavã Ungeþi bine tava ºi adãugaþi ºi un strat de fãinã. 60ºC. Nu deschidet C –175 ºC). Daca Dulciuri prea uscate Data viitoare fixaþi o temperaturã...
- Page 55 Ungerea robinetelor Alimente de gãtit Greutate Poziþie coacere Temperaturã Timp de Timp de (Kg) niveluri începând preîncãlzire coacere (°C) de jos (minute) (minute) Fãinoase Lasagne (Foi de aluat 75-80 umplute dispuse în straturi) Cannelloni 75-80 (macaroane groase umplute) Tagliatelle (tãiþei) 75-80 Carne Viþel...
- Page 57 · · · · · · · ¡...
- Page 59 HOOD HOOD Min. Min.
- Page 60 · · · · · ·...
- Page 61 Òàáëèöà 1 Âòå÷í åí ãàç Ïðèðîäåí ãàç Òîïëèí í à ìîùí îñò Ðàçõîä* Áàéïàñ Äþçà Äþçà Äèàìåòúð kW (p.c.s.*) Ðàçõîä* 1/100 1/100 1/100 Ãîðåëêà (â mm) Íîìèí àëí à Ðåäóö. **** (mm) (mm) (mm) Áúðç (ã îëÿì) (R) 3,00 Ïîëóáúðç (ñðåäåí ) 1,90 Ïîìîùåí...
- Page 63 • • • • • •...
- Page 64 Äèàìåòúð íà ñúäîâåòå Ãîðåëêè (cm) Áúðçà (R) 24 - 26 Ñðåäíà (S) 16 - 20 Ïîìîùíà (A) 10 - 14...
- Page 65 Àêî ñëàäêèøúò å äîáðå èçïå÷åí îòâúòðå, à ñóðîâ îòâúí. Ñëåäâàùèÿò ïúò èçïîëçâàéòå ïî-ìàëêî òå÷íîñò, íàìàëåòå òåìïåðàòóðàòà è óâåëè÷åòå âðåìåòî íà ïå÷åíå. Ñëàäêèøúò íå ñå îòäåëÿ îò ôîðìàòà Íàìàæåòå ôîðìàòà ñ ìàñëî è ïîðúñåòå ñ áðàøíî Àêî ñëàäêèøúò ñå èçñóøè Ñëåäâàùèÿò ïúò ïå÷åòå íà òåìïåðàòóðà ñ îêîëî 10°C ïî-âèñîêà...
- Page 66 ßñòèÿ çà ãîòâåí å Òåãëî Íèâî í à Òåìïåðàòóðà Âðåìå çà Âðåìå çà ïå÷åí å ïîäãðÿâàí å ïå÷åí å (Kg) (° C) îòäîëó (ìèí óòè) (ìèí óòè) Ïàñòà (ìàêàðîí åí è ÿñòèÿ) Ëàçàí ÿ 75-80 Êàí åëîí è 75-80 Òàëÿòåëå 75-80 Ìåñî...
- Page 68 Aristide Merloni, 47 60044 Fabriano (AN) Italy tel. +39 0732 6611 www.indesit.com...
Need help?
Do you have a question about the K6G21/R and is the answer not in the manual?
Questions and answers