Table of Contents
Advertisement
Quick Links
Advertisement
Table of Contents

Related Manuals for Zanussi ZZP35901XK


Summary of Contents for Zanussi ZZP35901XK
- Page 1 User Manual GETTING STARTED? EASY. ZZP35901XK EN User Manual Oven...
-
Page 2: Safety Information
VISIT OUR WEBSITE TO: Get usage advice, brochures, trouble shooter, service and repair information: www.zanussi.com/support SAFETY INFORMATION Before the installation and use of the appliance, carefully read the supplied instructions. The manufacturer is not responsible for any injuries or damage that are the result of incorrect installation or usage. -
Page 3: Safety Instructions
Disconnect the appliance from the power supply before • carrying out any maintenance. If the mains power supply cable is damaged, it must be • replaced by the manufacturer, its Authorised Service Centre or similarly qualified persons to avoid an electrical hazard. The means for disconnection must be incorporated in the fixed •... - Page 4 • This appliance is supplied without a main plug Built in depth of the 540 mm and a main cable. appliance Depth with open door 1007 mm Cable types applicable for installation or re- placement for Europe: Ventilation opening 560x20 mm minimum size.
-
Page 5: Pyrolytic Cleaning
• Do not let sparks or open flames to come in • If you use an oven spray, follow the safety contact with the appliance when you open the instructions on its packaging. door. PYROLYTIC CLEANING • Do not put flammable products or items that are wet with flammable products in, near or on the WARNING! Risk of Injury / Fires / appliance. -
Page 6: Installation
• Concerning the lamp(s) inside this product and DISPOSAL spare part lamps sold separately: These lamps WARNING! Risk of injury or are intended to withstand extreme physical suffocation. conditions in household appliances, such as temperature, vibration, humidity, or are intended •... -
Page 7: Product Description
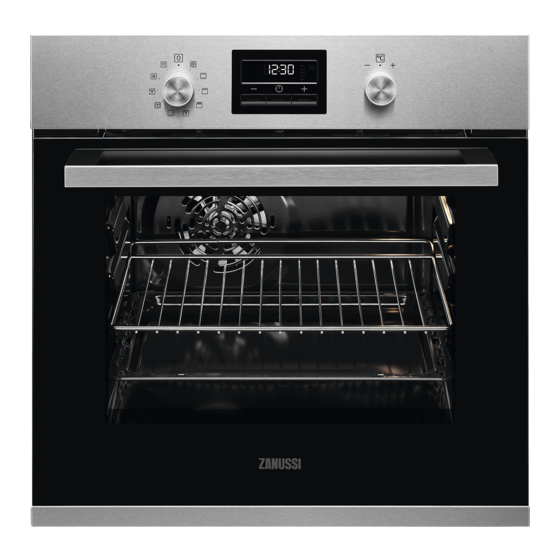
SECURING THE OVEN TO THE CABINET PRODUCT DESCRIPTION GENERAL OVERVIEW Control panel Knob for the heating functions Display Control knob (for the temperature) Air vents for the cooling fan Heating element Lamp Shelf positions ACCESSORIES For roasting and grilling. • Wire shelf Use the trivet only with the Grill- / For cookware, cake tins, roasts. -
Page 8: Before First Use
DISPLAY A. Timer / Temperature B. Heat-up and residual heat indicator C. Food Sensor (selected models only) D. Door lock (selected models only) E. Hours / minutes F. Demo Mode (selected models only) G. Clock functions BEFORE FIRST USE Set the time before you use the oven. WARNING! Refer to Safety chapters. -
Page 9: Heating Functions
HEATING FUNCTIONS Heating function Application Heating function Application This function is designed to The oven is off. save energy during cook- ing. When you use this Moist Fan function, the temperature in Off position Baking the cavity may differ from the set temperature. - Page 10 Clock function Application To set the length of cooking. Use only when a heating function is set. Duration To set the oven turn-off time. Use only when a heating function is set. End Time Combination of functions: Duration, End Time. Time Delay To set a countdown time.
- Page 11 HOW TO SET FUNCTION: END TIME Step 1 Set a heating function. Step 2 - press repeatedly. - starts to flash. Step 3 - press to set the hour. - press to confirm. Step 4 - press to set the minutes. - press to confirm.
-
Page 12: Using The Accessories
Step 4 When the set time ends the signal sounds for 2 min. 00:00, - flash. Press any button to stop the signal. HOW TO SET FUNCTION: COUNT UP TIMER - press and hold to reset the Count Up Timer. The timer starts to count up again. USING THE ACCESSORIES INSERTING ACCESSORIES WARNING! Refer to Safety chapters. -
Page 13: Additional Functions
Make sure the supports of the wire shelf point Make sure the supports of the wire shelf point down. ADDITIONAL FUNCTIONS HOW TO USE: CHILD LOCK When the function is on the oven cannot be turned on accidentally. (°C) Step 1 Ensure the knob for the heating functions is in the off position. - Page 14 Count the shelf positions from the bottom of the To prevent too much smoke in the oven during oven floor. roasting, add some water into the deep pan. To prevent the smoke condensation, add water each Your oven may bake or roast differently to the oven time after it dries up.
-
Page 15: Information For Test Institutes
(°C) (min) Soufflè, 6 pieces ceramic ramekins on wire 30 - 40 shelf Sponge flan base flan base tin on wire shelf 20 - 30 Victoria sandwich baking dish on wire shelf 35 - 45 Poached fish, 0.3 baking tray or dripping 35 - 45 Whole fish, 0.2 kg baking tray or dripping... -
Page 16: Care And Cleaning
(°C) (min) Small Conven- Baking 20 - 30 cakes, tional tray 20 per Cooking tray Apple Conven- Wire 80 - 120 pie, 2 tional shelf tins Ø20 Cooking Sponge Conven- Wire 35 - 45 cake, tional shelf cake Cooking mould Ø26 cm Short Conven-... - Page 17 NOTES ON CLEANING Clean the front of the oven with a soft cloth with warm water and a mild detergent. Use a cleaning solution to clean metal surfaces. Clean stains with a mild detergent. Cleaning Agents Clean the cavity after each use. Fat accumulation or other residue may cause fire. Moisture can condense in the oven or on the door glass panels.
-
Page 18: Cleaning Reminder
When the cleaning ends: Turn off the oven and wait Clean the cavity with a soft Remove the residue from the bot- until it is cold. cloth. tom of the cavity. CLEANING REMINDER - press at the same time to turn off the The oven reminds you when to clean the oven with: reminder. - Page 19 90° Step 7 Clean the glass panels with water and soap. Dry the glass panels carefully. Do not clean the glass panels in the dishwasher. Step 8 After cleaning, install the glass panels and the oven door. Make sure that you put the glass panels (A, B and C) back in the correct sequence.
-
Page 20: Troubleshooting
Back lamp Step 1 Turn the glass cover to remove it. Step 2 Clean the glass cover. Step 3 Replace the lamp with a suitable 300 °C heat-resistant lamp. Step 4 Install the glass cover. TROUBLESHOOTING WARNING! Refer to Safety chapters. Components WHAT TO DO IF... -
Page 21: Energy Efficiency
......... ENERGY EFFICIENCY PRODUCT INFORMATION SHEET ACCORDING TO UK ECODESIGN AND ENERGY LABELLING REGULATIONS Supplier's name Zanussi Model identification ZZP35901XK 944064937 Energy Efficiency Index 81.8 Energy efficiency class Energy consumption with a standard load, conventional 0.85 kWh/cycle mode Energy consumption with a standard load, fan-forced mode 0.63 kWh/cycle... -
Page 22: Environmental Concerns
Moist Fan Baking When you use this function the lamp automatically turns off after 30 sec. Function designed to save energy during cooking. ENVIRONMENTAL CONCERNS with the symbol with the household waste. Recycle materials with the symbol . Put the Return the product to your local recycling facility or packaging in relevant containers to recycle it. - Page 24 WWW.ZANUSSI.COM/SHOP...
Need help?
Do you have a question about the ZZP35901XK and is the answer not in the manual?
Questions and answers