Table of Contents
Advertisement
Advertisement
Table of Contents

Related Manuals for thomann Millenium MPS-1000


Summary of Contents for thomann Millenium MPS-1000
- Page 1 MPS-1000 e-drum module user manual...
- Page 2 Musikhaus Thomann Thomann GmbH Hans-Thomann-Straße 1 96138 Burgebrach Germany Telephone: +49 (0) 9546 9223-0 E-mail: info@thomann.de Internet: www.thomann.de 24.09.2021, ID: 511732 (V2)
-
Page 3: Table Of Contents
Table of contents Table of contents General information......................4 1.1 Further information......................4 1.2 Notational conventions....................4 1.3 Symbols and signal words................... 5 Safety instructions......................... 6 Features............................7 Installation and starting up....................8 Connections and controls....................10 Operating..........................14 6.1 ‘KIT’ menu........................14 6.2 ‘EDIT’... -
Page 4: General Information
1.1 Further information On our website (www.thomann.de) you will find lots of further information and details on the following points: Download This manual is also available as PDF file for you to download. -
Page 5: Symbols And Signal Words
General information Instructions The individual steps of an instruction are numbered consecutively. The result of a step is indented and highlighted by an arrow. Example: Switch on the device. Press [Auto]. ð Automatic operation is started. Switch off the device. Cross-references References to other locations in this manual are identified by an arrow and the speci‐... -
Page 6: Safety Instructions
Safety instructions Safety instructions Intended use Drum modules are intended to be used for converting digital trigger signals from drum pads to various percussion sounds. Use the unit only as described in this manual. Any other use or use under other operating conditions is considered to be improper and may result in personal injury or property damage. -
Page 7: Features
Features Features Complete e-drum set in the look of acoustic drum sets Wooden shell with a Finish Grey Line Drum pads with double-layer mesh heads fully playable cymbal pads dual zone pads Crash and ride pads with choke function 820 sounds 70 songs 40 drum kits 40 user kits... -
Page 8: Installation And Starting Up
Installation and starting up Installation and starting up Rack setup, connecting pads and Rack setup and assembly of the pads and pedals are described in detail in the pedals enclosed set assembly guide. Finally check that all cables between the pads and the drum module have been properly connected. - Page 9 Installation and starting up Connecting headphones Connect your stereo headphones to the [HEADPHONE] output on the front panel of the drum module. MPS-1000...
-
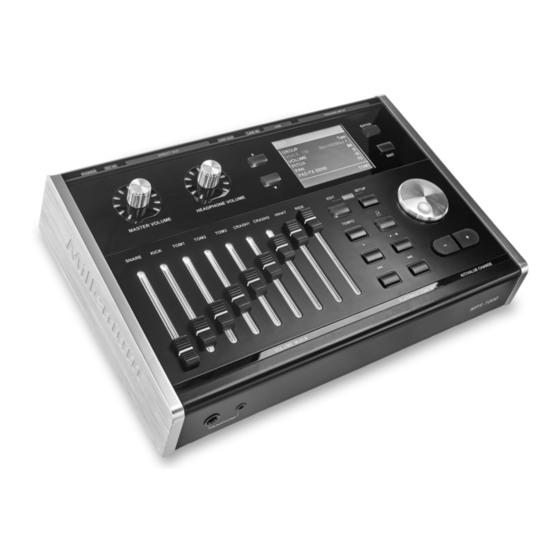
Page 10: Connections And Controls
Connections and controls Connections and controls Control panel [MASTER VOLUME] Rotary control for adjusting the Line out volume [HEADPHONE VOLUME] Rotary control for adjusting the headphones output volume Buttons to scroll forward and backward through the open menu Backlit display [ENTER] Enter button to confirm a selection or change [EXIT]... - Page 11 Connections and controls Button to turn the metronome on and off Button to start recording Button for starting and stopping the playback of songs and for ending a recording, in the ‘EDIT’ and ‘SETUP’ - ‘ADVANCE’ menu for previewing the currently set sound Button to jump to the previous song, in ‘EDIT’...
- Page 12 Connections and controls Front and rear panel [HEADPHONE] Headphone output, designed as a 3.5 mm or 6.35 mm jack socket (stereo) [TRIGGER INPUT] - [CONNECTOR] Socket for the D-Sub multi-trigger plug (25-pin) [TRIGGER INPUT] - [CRASH2] Connection for Crash2 cymbal pad [TRIGGER INPUT] - [EXT] Connection for external trigger, display as ‘EXT’...
- Page 13 Connections and controls [DC IN] Connection socket for the power adapter [POWER] Main switch to turn the device on and off Cable holder for securing the power cable to protect against unintentional disconnection MPS-1000...
-
Page 14: Operating
Operating Operating The labelling of the display is described in English in these instructions. To change the language, proceed as described under Ä Chapter 6.3 ‘ ‘SETUP’ menu’ on page 19. Powering on Check all cable connections for correct fit before turning on Before switching on, turn both volume controls of the drum module down to minimum. - Page 15 Operating Changing pad volume Pad volume Use the faders in the [VOLUME MIXER] zone to adjust the volume of each indi‐ vidual pad. The volume set with the faders is not saved for the respective drum kit. Changing the tempo Press [TEMPO].
-
Page 16: Edit' Menu
Operating Use [EXIT], to stop the recording. Use the rotary control or [–] | [+] to specify a memory location. Existing data will be overwritten. Confirm with [ENTER] or cancel saving with [EXIT]. Playing songs to select a song. ð The standard values for tempo and time signature are read out and trans‐ ferred to the metronome. - Page 17 Operating Press [–] | [+] simultaneously to restore the value set before the change. Some parameters have submenus. In this case, is displayed to the right of the value. Press [ENTER] to switch to the submenu. ð Details on the respective parameter are displayed. Press [EXIT] to exit the menu.
- Page 18 Operating FX PRESET FX LEVEL FX TIME None None None Room Bright Reverb volume Reverb time Room standard Reverb volume Reverb time Room Damp Reverb volume Reverb time Hall Bright Reverb volume Reverb time Hall Standard Reverb volume Reverb time Hall Damp Reverb volume Reverb time...
-
Page 19: Setup' Menu
Operating 6.3 ‘SETUP’ menu Various device settings can be customised in the Setup menu. The parameters set ö here affect the entire drum module and cannot be changed by changing the drum kit. Main menu Parameter Values Scroll bar Press [SETUP] to enter the menu. to select the desired parameter. - Page 20 Operating Parameter Function ‘RepeatOne’ A single song is played in a loop ‘RepeatAll’ All songs are played in a loop ‘METRONOME’ ‘SWITCH’ Switching the metronome on and off ( ‘On’ / ‘Off’ ) ‘VOLUME’ Metronome volume ‘TEMPO’ Number of beats per minute ‘SOUND’...
- Page 21 Operating 6.3.1 ‘ADVANCE’ submenu In the ‘ADVANCE’ submenu, further physical settings for the drum pads can be made. ö The respective parameters are displayed depending on the trigger. With double trigger mesh pads, the parameters can be set separately for head and rim, with the other pads only for head and rim together.
- Page 22 Operating Parameter Function ‘XTALK’ Press [ENTER] to enter the crosstalk setting menu. Hit the selected pad until no other pads can be heard or until ‘OK’ is shown in the lower left corner of the display. This also automatically eliminates the crosstalk from other pads.
- Page 23 Operating Parameter Function The range between ‘Hi-Hat open’ and ‘Hi-Hat closed’ is called ‘HalfOpen’ . For increasing the range ‘HalfOpen’ , increase the ‘Open Point’ and decrease the ‘Close Point’ . ‘OPEN POINT’ Setting the position where the Hi-Hat is open. The value is dis‐ played as a percentage within the touch range of the hi-hat pedal.
- Page 24 Operating 6.3.3 ‘EQUALIZER’ submenu Press [ENTER] to enter the EQ settings menu. ö Main menu Selected equalizer On / off switch Frequency ranges The highs and lows are shelf-regulated (affects all frequencies above / below the value), the mids are bell-regulated (affects a frequency range around the value). Treble ä...
- Page 25 Operating ö Main menu Parameter. Use the rotary control or [–] | [+] to switch to ‘ASSIGN’ Volume control for the 8 direct-out channels. Change the respective volume with the rotary control or with [–] | [+]. ö Main menu Parameter.
- Page 26 Operating Format the USB storage medium each time before copying WAV files to the medium. Note the following requirements for user samples: USB storage Format FAT16 / FAT32 medium max. number of dis‐ 50 files / folder played entries WAV file Format PCM, mono or stereo channels, *.wav Sampling rate...
- Page 27 Operating ‘ERASE’ When a file is deleted, the entry number is also removed. The files are not renum‐ bered. In this example, the file ‘002 002Example’ is deleted; the file ‘003 003Example’ now directly follows the file ‘001 001Example’ . If the deleted sample was assigned to a drum kit, then ‘---’...
-
Page 28: Connecting The Device Via Bluetooth
Operating ‘FREE SPACE’ The display shows how much memory space in MB is still free on the drum module for storing user samples. Due to the limitations of the memory page size, the message that there is not enough memory capacity may appear, even if there is actually still free memory space displayed. -
Page 29: Technical Specifications
Technical specifications Technical specifications Input connections Voltage supply Socket for plug-in power supply USB port USB MIDI B Trigger 2 × 6.35 mm jack socket 1 × D sub connector, 25-pin Line in 1 × 3.5 mm jack socket Output connections Headphones 1 ×... - Page 30 Technical specifications Further information Incl. rack Seat included Incl. bass drum pedal Incl. headphones Mesh head pads Stereo pads e-drum module...
-
Page 31: Plug And Connection Assignment
Plug and connection assignment Plug and connection assignment Introduction This chapter will help you select the right cables and plugs to connect your valuable equipment in such a way that a perfect sound experience is ensured. Please note these advices, because especially in ‘Sound & Light’ caution is indicated: Even if a plug fits into the socket, an incorrect connection may result in a destroyed power amp, a short circuit or ‘just’... -
Page 32: Cleaning
Cleaning Cleaning Device components Clean the device components that are accessible from the outside regularly. The cleaning frequency depends on the operating environment: damp, smoky or particu‐ larly dirty environments can cause greater accumulation of dirt on the device compo‐ nents. -
Page 33: Protecting The Environment
Protecting the environment Protecting the environment Disposal of the packaging material For the transport and protective packaging, environmentally friendly materials have been chosen that can be supplied to normal recycling. Ensure that plastic bags, packaging, etc. are properly disposed of. Do not just dispose of these materials with your normal household waste, but make sure that they are collected for recycling. -
Page 34: Appendix
Appendix Appendix 11.1 Kit list Name Name Name Studio Drum'n'Bass Session Standard Drum'n'Bass2 Fiesta House Chiptune Rock Jazz2 Trance Jazz Pop2 Loop BrushJazz VintageRock Trap Metal 80's Acoustic Techno Jungle Rockability Dubstep Hip-Hop Jazz3 Jungle2 Ballad Metal2 Vintage d.o.c.2 Rock2 Ethnic radio 90's... -
Page 35: Song List
Appendix 11.2 Song list Name Name Name WalkWithTree Bossa Techno Soul Tango OutofMyHeart Latin Dancing MellowTone Moskau CryintheRain theLight Heart NightTrain Take Fable Arriba Angel theStorm Batteries Bridge Beowulf Revealite Mario Forever Breathe Someband Acid BlueEyes CasinoNight Arcane HeyMan RollerCoaster toBeLoved Firerain BeHappy... -
Page 36: Voice List
Appendix 11.3 Voice list Name Name Name KICK Trap 04 Morschlag2 Rock Trap 05 Morschlag3 Jazz Pop 01 Morschlag1 Indie 01 Pop 02 Morschlag5 Indie 02 Pop 03 Ballerfiako Metal Pop 04 Rave309 Funk 01 Jungle Funk 02 Latin SOLI606 8Bit 01 Session SOLI808... - Page 37 Appendix Name Name Name SNARE RnB 03 Latin R 01 Rock RnB 04 Latin R 02 Rock R RnB R 01 Session Rock X RnB R 02 Session R Jazz 01 RnB X 01 Session X Jazz R 01 RnB X 02 Vintage Jazz X Techno 01...
- Page 38 Appendix Name Name Name POPV RS TR66RIM Jazz2 R POPV SS Soli909RIM Jazz3 ROCKV2 HipHop Jazz3 R ROCKV2 RS HipHop Rim Jazz4 ROCKV2 SS FunkV Jazz4 R ROCKV3 FunkV Rim Indie1 ROCKV3 RS FunkV2 Indie2 ROCKV3 SS FunkV2 Rim Indie3 ROCKBRI FunkV3 Indie4...
- Page 39 Appendix Name Name Name House4 02 Pop3 R Fiesta1 R House1 03 Pop4 Fiesta2 House2 03 Pop4 R Fiesta2 R House3 03 Brush1 Fiesta3 House4 03 Brush2 Fiesta3 R RnB1 Brush3 Fiesta4 RnB2 Brush4 Fiesta4 R RnB3 Latin1 Brush8 RnB4 Latin2 Brush10 Techno1...
- Page 40 Appendix Name Name Name 12MetaFilter 80_TOM2 Solidry12 Rim 14MetaFilter 80_TOM3 Solidry14 Rim 16MetaFilter 80_TOM4 Solidry16 Rim Rim10MetaFil 80er1 InzoTomHigh Rim12MetaFil 80er2 InzoTomLow Rim14MetaFi 80er3 InzoTomFloor RIDE Rim16MetaFi 80er4 10SoliNathan NOV808TOM1 Rock 12SoliNathan NOV808TOM2 Rock B 14SoliNathan NOV808TOM3 Rock E 16SoliNathan NOV808TOM4 Jazz Rim10SoliNat...
- Page 41 Appendix Name Name Name Brush Pst2TNy JazzSplash 02 Brush B Pst2TNy B Indie1 01 Brush E Pst2TNy E1 Indie2 01 Session Pst2TNy E2 Indie1 02 Vintage Heavy Indie2 02 Vintage B Heavy B Funk1 Jungle Heavy E Funk2 Jungle B HeavyBr 8Bit1 Fiesta...
- Page 42 Appendix Name Name Name Splash8E CrashSF16 Metal P China12Mal CrashSF16 E Funk O 01 China14Mal CrashSF16Br Funk C 01 China16Mal CrashSF16Hand Funk P 01 China20Sti CrashSF16Mute Funk O 02 China30 CrashSF17 Funk C 02 Crash14 E CrashSF17 E Funk P 02 Crash14 CrashSF17 B 8Bit O...
- Page 43 Appendix Name Name Name Trap C 03 CCMHH P SakataHH P Pop O CCMHH Half Y808HH O Pop C CCMHH Sp Y808HH C Pop P BalHH O Signature O Pop Half BalHH C Signature C Pop Sp BalHH P Signature P Brush O BalHH Half Signature Half...
- Page 44 Appendix Name Name Name TranceFX02 808 claves Tanggu5 TranceFX03 808 shaker Tanggu6 TranceFX04 SakataAgogo DavulGum1 TranceFX05 Elec9Clap DavulGum2 TrapFX01 626_TAM DavulStik1 TrapFX02 707_TAMB DavulStik2 EShaker ABcowbell DavulFingr ECowbell C78_Guiro BendirDum1 DubFX01 808congalo BendirDum2 DubFX02 808congame BendirTek1 DubFX03 Y30ZAP2 BendirTek2 DubFX04 X10_ZAP DarbukaGum DubFX05...
-
Page 45: Midi Note List
Appendix 11.4 MIDI note list TRIGGER MIDI note TRIGGER MIDI note SNARE Head CRASH2 X-Stick Edge HIHAT Open KICK Head Closed TOM1 Head Half Open HIHAT PEDAL Chick TOM2 Head Splash RIDE TOM3 Head Bell Edge CRASH1 Head Edge MPS-1000... - Page 46 Notes e-drum module...
- Page 48 Musikhaus Thomann · Hans-Thomann-Straße 1 · 96138 Burgebrach · Germany · www.thomann.de...
Need help?
Do you have a question about the Millenium MPS-1000 and is the answer not in the manual?
Questions and answers