Advertisement
Quick Links
Advertisement

Related Manuals for Ripley MILLER VIS500


Summary of Contents for Ripley MILLER VIS500
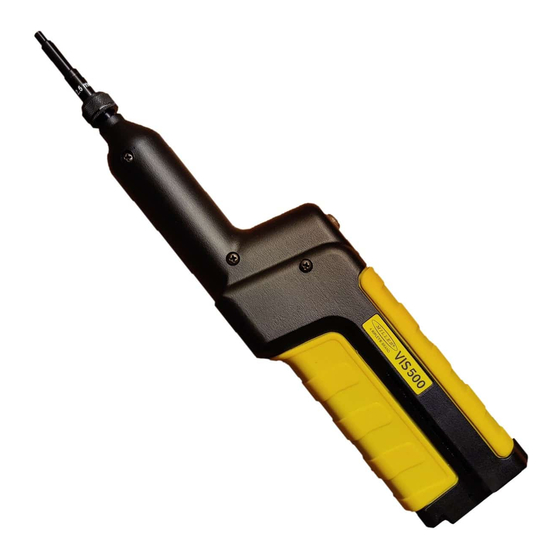
- Page 1 VIS500 Wireless Fiber Inspection Scope User Guide VIS500 User Guide Page 1...
-
Page 2: Table Of Contents
Contents Introduction Device Overview Endface Cleaning and Inspection Procedure Connecting on IOS Connecting on Android Connecting on Windows PCs/Tablets Integration with Desktop InSpec Integration with Mobile InSpec Certifications and Contact Information VIS500 User Guide Page 2... -
Page 3: Device Overview
Introduction The VIS500 Fiber Inspection Scope is a low cost, Auto Focus Wireless Inspection scope for verrifying compliance with the IEC 61300-3-35 Specification. This document will serve as an overview of the major features and functions of the device as well as instructions for use with the Windows, and mobile InSpec applications. If you are looking for a standalone inspection system take a look at the VIS300C inspection system. - Page 4 Charging Status LED The Charging LED will display battery information when unplugged, or charging status when plugged in. When unplugged a solid green light will be displayed when the device is above 30 percent battery. Below it will display a red light and when critical begin blinking.
-
Page 5: Endface Cleaning And Inspection Procedure
Endface Cleaning and Inspection Procedure Intro Nearly 95% of all fiber optic system failures can be attributed to dirt on the fiber endface. Such situations are often entirely avoidable if proper cleaning procedures are followed. The International Electro technical Commission (IEC) has created a standard of fiber endface cleanliness, as well as a thorough fiber cleaning procedure used to achieve that standard. - Page 6 The appropriate, IEC-specified cleaning and inspecting procedure tasks the technician with examining the fiber endface with an inspection scope and performing the necessary cleaning actions. If a connector endface is particularly dirty, three dry cleanings must be performed, followed by two wet/dry cleanings. Connectors still contaminated with unmovable debris after the full procedure has been attempted may need to be replaced.
- Page 7 Connecting to the VIS500 on IOS To connect the VIS500 on IOS first go to the settings app and press “Wifi” as shown in the screenshots below. Next wait until a SSID Showing “VIS500” followed by the 4 digit start to your serial number. Once that appears click it and wait for the check mark to appear next to the ssid.
- Page 8 Connecting to the VIS500 on Android To connect the VIS500 on Android first go to the settings app and press “Network and internet” then “Wifi as shown in the screenshots below. Next wait until a SSID Showing “VIS500” followed by the 4 digit start to your serial number. Once that appears click it it to finish connecting.
- Page 9 Connecting to the VIS500 on Windows To connect the VIS500 on Windows first go to the bottom right of yoru screen and press the Wifi or networking button. Next wait until a ssid with VIS500 and the first four digits of your serial number is shown. then click it and wait for windows to finish connecting to the device.
-
Page 10: Integration With Desktop Inspec
Integration with Desktop InSpec InSpec is a free software package from Ripley offering complete inspection, saving, and reporting of pertinent fiber endface images for fiber optic installations. This software is available for download at Ripley-tools.com/download. Connection To connect the VIS500 to the windows inspec software first connect the wifi as shown for your specific platform above. - Page 11 Once you have an image you want to save, weather it is analyzed or just a live image pressing the “Save” button will open the popup below. First you need to enter a name for the fiber, next you need to assign a location for the fiber.
- Page 12 “Reset to Defaults” to return to this arrangement of information. Enter all info as needed and click Save to have the information appear on reports. The Ripley Miller logo will appear on reports. Click Browse to choose a different logo to place on the report, if desired.
- Page 13 OPM readings you took on a Ripley power meter. if you want to rename any reading or inspection press them then press “Edit” or double click them to open the edit popup. once you have edited the name / comment simply press save again.
-
Page 14: Integration With Mobile Inspec
Integration with Mobile InSpec Connection To connect the VIS500 to the windows inspec software first connect the wifi as shown for your specific platform above. once you are connected to the device on wifi open the mobile app and it will automatically connect to the VIS500. - Page 15 Analyzing and saving a fiber with the InSpec Software Once connected to the VIS500 and streaming you can see your selected IEC-Spec in the top right. To select a new one click the Settings cog in the top right then change “IEC_Spec” to your preffered spec.
- Page 16 Setting Report Settings Next before generating reports you may want to enter information such as the customer/contact name, site ID/location or your Scope/Power meter serial numbers for tracking. To edit this information return to the home page by pressing back from the inspection page. Next go to the “Reports” page then press the settings cog in the top right.
- Page 17 Generating a Closeout Report Once you have set your report settings returning to the reports page allows you to generate your reports! first quickly review your saved images and readings to verify you have all pertinent data and it is all labeled correctly. to rename readings simply select either the reading or inspection and press “Edit Selected”.
- Page 18 Certifications,Accessories, and Contact Info Warranty The VIS500 comes with a 2 year warranty for any manufacturer defects or damage due to reasonable use. To start the RMA process simply email or call technical support! Inspection Scope Accessories Inspection Tip Adapters Part Number Description AC 034B...
-
Page 19: Certifications And Contact Information
• Consult the dealer or an experienced radio/TV technician for help. Contact Support ontact us with any questions pertaining to this or any other Ripley product. Call Us: Email Us: (603) 524-8350 tech.support@odm.ripley-tools.com Visit Us Online: www.ripley-tools.com...
Need help?
Do you have a question about the MILLER VIS500 and is the answer not in the manual?
Questions and answers