Advertisement
Quick Links
sauder.com
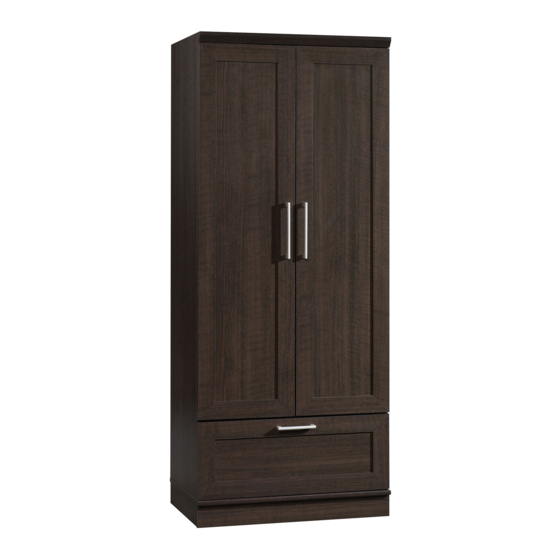
Wardrobe/Storage Cabinet
HomePlus Collection | Model 411312
Need help? Visit Sauder.com to view video assembly tips or chat with a live rep.
Prefer the phone? Call 1-800-523-3987.
Share your journey!
Store behind
closed doors.
NOTE: THIS INSTRUCTION
BOOKLET CONTAINS IMPORTANT
SAFETY INFORMATION.
PLEASE READ AND KEEP FOR
FUTURE REFERENCE.
English pg 1-21
Français pg 22-24
Español pg 25-28
Lot # 524681
12/21/18
Purchased: __________________
Be sure to give us a ring before
making any returns. 1-800-523-3987
Advertisement

Related Manuals for Sauder 411312


Summary of Contents for Sauder 411312
- Page 1 HomePlus Collection | Model 411312 NOTE: THIS INSTRUCTION BOOKLET CONTAINS IMPORTANT SAFETY INFORMATION. Need help? Visit Sauder.com to view video assembly tips or chat with a live rep. PLEASE READ AND KEEP FOR FUTURE REFERENCE. Prefer the phone? Call 1-800-523-3987.
- Page 2 SHELF (1) TOP MOLDING (1) BOTTOM (1) DOOR (2) LARGE BALLAST (2) ADJUSTABLE SHELF (1) SMALL BALLAST (2) RIGHT DRAWER SIDE (1) FRONT SKIRT (1) LEFT DRAWER SIDE (1) SIDE SKIRT (2) D175 DRAWER BACK (1) Page 2 411312 www.sauder.com/services...
- Page 3 While not all parts are labeled, some of the parts will have a label or an inked letter on the edge to help distinguish similar parts from each other. Use this part identifi cation to help identify similar parts. D175 D983 www.sauder.com/services 411312 Page 3...
- Page 4 BRACKET - 1 PROPEL HINGE - 6 PULL - 1 DOOR STOP - 1 LARGE PULL - 2 NUT - 4 RUBBER NAIL - 52 FURNITURE TIPPING RESTRAINT KIT - 1 METAL PIN - 4 SLEEVE - 4 Page 4 411312 www.sauder.com/services...
- Page 5 30S BLACK 1-9/16" FLAT HEAD SCREW - 5 BLACK 1/2" FLAT HEAD SCREW - 12 BLACK 9/16" WAFER HEAD SCREW - 4 BLACK 7/8" MACHINE SCREW - 6 BLACK 3" PAN HEAD SCREW - 2 113S BLACK 1-15/16" FLAT HEAD SCREW - 4 www.sauder.com/services 411312 Page 5...
- Page 6 fl oor. Scan this QR code or go to this address: http://qr.sauder.com/?ID=2400 To begin assembly, push a SAUDER TWIST-LOCK® å to watch a video on how to assemble your unit. FASTENER (7F) into the large holes in the TOP (C2) and SHELF (F).
- Page 7 Use two BLACK 9/16" LARGE HEAD SCREWS (1S). BLACK 9/16" LARGE HEAD SCREW (2 used for the ROD HANGERS) Long fi nished edge Roller end Long fi nished edge Roller end GOLD 5/16" FLAT HEAD SCREW (4 used for the RAILS) www.sauder.com/services 411312 Page 7...
- Page 8 Step Step 3 Open the FURNITURE TIPPING RESTRAINT KIT (97) å How to use the SAUDER TWIST-LOCK ® FASTENER and fasten the SAFETY STRAP to the TOP (C2). Use 1. Insert the dowel end of the FASTENER into the the provided BLACK 9/16" LARGE HEAD SCREW.
- Page 9 Fasten the RIGHT END (A2) to the TOP (C2) and SHELF (F). å Tighten four TWIST-LOCK® FASTENERS. Fasten the TOP MOLDING (P) to the TOP (C2). Tighten two å TWIST-LOCK® FASTENERS. Wide edge Long fi nished edge www.sauder.com/services 411312 Page 9...
- Page 10 å four BLACK 1-15/16" FLAT HEAD SCREWS (113S). Rounded edge S u r f a c i t h r e h o l e 113S BLACK 1-15/16" FLAT HEAD SCREW (4 used in this step) Page 10 411312 www.sauder.com/services...
- Page 11 å SKIRTS (J and K). Use a hammer to drive a PROPEL NUT (14M) into å the holes in the FEET (31E and 32E). Now, turn an ADJUSTABLE GLIDE (18E) into each PROPEL NUT. (4 used) www.sauder.com/services 411312 Page 11...
- Page 12 Fasten the SKIRTS (J and K) to the BOTTOM (D3). Use å four BLACK 9/16" WAFER HEAD SCREWS (33S) through the FEET and into the BOTTOM. BLACK 9/16" WAFER HEAD SCREW (4 used in this step) Page 12 411312 www.sauder.com/services...
- Page 13 Insert the ADJUSTABLE SHELF (I) between the ENDS (A2 and B2) to allow for proper space between the ENDS. Then, remove it before fastening the BACK (E). BLACK 3" PAN HEAD SCREW (2 used for the BALLASTS) www.sauder.com/services 411312 Page 13...
- Page 14 Step Step 9 Fasten three HINGES (13H) to each DOOR (H). Use twelve å BLACK 1/2" FLAT HEAD SCREWS (11S). BLACK 1/2" FLAT HEAD SCREW (12 used in this step) Page 14 411312 www.sauder.com/services...
- Page 15 Fasten a LARGE PULL (97K) to the DOOR (H). Use two å BLACK 7/8" MACHINE SCREWS (37S). Repeat this step for the other door. å Mounting screw Hinge BLACK 7/8" MACHINE SCREW (4 used in this step) www.sauder.com/services 411312 Page 15...
- Page 16 To adjust the DOORS in or out (depth), loosen the mounting screw å one turn and move the DOORS in or out, as needed. Tighten the mounting screw after making adjustments. Mounting screw (depth) Adjusting screw (horizontal) (vertical adjustment) Page 16 411312 www.sauder.com/services...
- Page 17 Turn a CAM SCREW (8F) into the DRAWER FRONT (L). å Push a HIDDEN CAM (1F) into the DRAWER BRACE (M65). å Arrow Arrow Hole The arrow in the HIDDEN CAM must point toward the hole in the edge of the board. www.sauder.com/services 411312 Page 17...
- Page 18 Fasten the DRAWER BACK (D175) to the DRAWER å Fasten the DRAWER BRACE (M65) to the DRAWER å SIDES (D50 and D51) and DRAWER BRACE (M65). FRONT (L). Tighten one HIDDEN CAM. Use fi ve BLACK 1-9/16" FLAT HEAD SCREWS (30S). Page 18 411312 www.sauder.com/services...
- Page 19 Fasten the PULL (34K) to the DRAWER FRONT (L). Use two å BLACK 7/8" MACHINE SCREWS (37S). Roller end BLACK 7/8" MACHINE SCREW (2 used for the PULL) Roller end GOLD 5/16" FLAT HEAD SCREW (4 used for the SLIDES) www.sauder.com/services 411312 Page 19...
- Page 20 , th dr aw ve r r re • Ne -o ve eli m at a no t of tip bu t Us e ce , re du -o ve of tip (4 used) Page 20 411312 www.sauder.com/services...
- Page 21 , th r re • Ne -o ve eli m at a of tip no t bu t Us e ce , re du -o ve of tip www.sauder.com/services 411312 Page 21...
- Page 22 , th r re • Ne -o ve eli m at a of tip no t Us e bu t ce , re du -o ve of tip 35 lbs. Page 22 411312 www.sauder.com/services...
- Page 23 Modèle 411312 Armoire/Meuble de Rangement Utilisez les instructions d’ a ssemblage en français avec les NOUS SOMMES LA POUR VOUS AIDER! schémas étape par étape du manuel d’instruction en anglais. Nous faisons de notre mieux pour nous assurer que votre meuble Chaque étape en français correspond à...
- Page 24 éviter d'endommager l'élément ou le sol. PATIN RÉGLABLE (18E) dans chaque TOURILLON. Pour commencer l'assemblage, enfoncer une FIXATION TWIST-LOCK® SAUDER (7F) dans les gros trous du ÉTAPE 7 DESSUS (C2) et de la TABLETTE (F). Fixer les PLINTHES (J et K) au DESSOUS (D3). Utiliser quatre VIS TÊTE MINCE 14 mm NOIRES (33S) à...
- Page 25 CÔTÉS DE TIROIR (M). Utiliser quatre VIS TÊTE PLATE 8 mm DORÉES (3S) à travers les trous nº 2 et nº 4. Fixer la POIGNÉE (34K) au DEVANT DE TIROIR (L). Utiliser deux VIS NOIRES À MÉTAUX 22 mm (37S). www.sauder.com/services 411312 Page 25...
- Page 26 Si 32E PATA ....................2 PANEL SUPERIOR ..............1 necesita ponerse en EXCÉNTRICO ESCONDIDO ........... 1 contacto con Sauder en FONDO .................... 1 BIELA DE EXCÉNTRICO ............ 1 cuanto a esta unidad, D50 LADO DERECHO DE CAJÓN ........1 SUJETADOR TWIST-LOCK®...
- Page 27 PATAS (31E y 32E). Ahora, gire un DESLIZAMIENTO AJUSTABLE (18E) dentro de cada TUERCA DE HÉLICE. Para comenzar el ensamblaje, empuje un SUJETADOR TWIST-LOCK® SAUDER (7F) dentro de los agujeros grandes del PANEL SUPERIOR (C2) y del ESTANTE (F). PASO 7 Fije los FALDONES (J y K) al FONDO (D3).
- Page 28 CABEZA PERDIDA de 8 mm (3S) a través de los agujeros No. 2 y No. 4. Fije el TIRADOR (34K) a la CARA DE CAJÓN (L). Utilice dos TORNILLOS NEGROS PARA METAL de 22 mm (37S). Page 28 411312 www.sauder.com/services...
- Page 29 TOUJOURS décharger les tablettes et les tiroirs, en commençant par les surface supérieures, avant de déplacer le meuble. NE JAMAIS pousser ou tirer un meuble sur de la moquette. Demander à une autre personne de le soulever correctement pour le déplacer et/ou le repositionner. www.sauder.com/services 411312 Page 29...
- Page 30 SIEMPRE descargue los estantes y cajones, empezando con las superfi cies superiores, antes de moverlo. NUNCA empuje ni tire de los muebles sobre una alfombra. Obtenga que un amigo le ayude a levantarlo correctamente para moverlo y/o reposicionarlo. Page 30 411312 www.sauder.com/services...
- Page 31 à compter de la date d'achat la première fois et qui sont signalés à Sauder dans les limites de couverture de la contre tout défaut de matériaux ou de fabrication des composantes de mobilier Sauder.
- Page 32 Dear Valued Customer: So, how did it go? Thanks so much for choosing Sauder® furniture. I hope the Set a world record for speed? purchase and assembly process was a positive experience Feeling good about yourself? and you feel good about the furniture you just built. If you Nice.
Need help?
Do you have a question about the 411312 and is the answer not in the manual?
Questions and answers