Table of Contents
Advertisement
Available languages
Available languages
Owner's Manual / Manual del Propietario
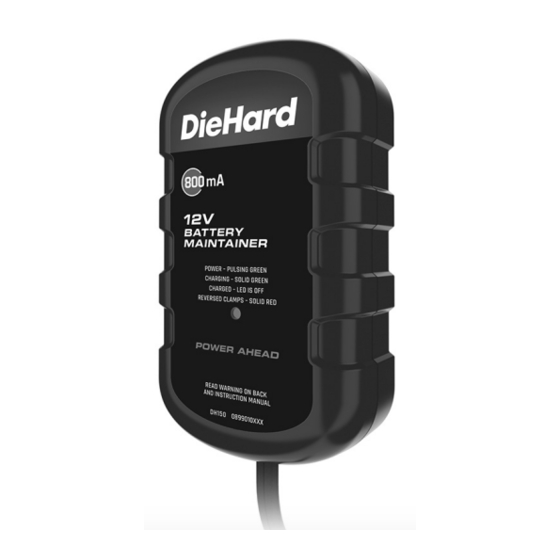
Automatic Battery Maintainer
Mantenedor de baterías automático
AC Input: 120V AC, 60 Hz, 0.3A
DC Output: 12V DC, 0.8A
CAUTION:
Read and follow all safety
rules and operating instructions
before every use of this product.
SAVE THESE INSTRUCTIONS.
Model
DH150
de seguridad e instrucciones de uso
antes de cada uso de este producto.
GUARDE ESTAS INSTRUCCIONES.
Lea y siga todas las reglas
ATENCIÓN:
0099002183-00
Advertisement
Table of Contents

Subscribe to Our Youtube Channel
Related Manuals for DieHard DH150


Summary of Contents for DieHard DH150
- Page 1 Owner’s Manual / Manual del Propietario Automatic Battery Maintainer Mantenedor de baterías automático AC Input: 120V AC, 60 Hz, 0.3A DC Output: 12V DC, 0.8A Model DH150 CAUTION: ATENCIÓN: Read and follow all safety Lea y siga todas las reglas rules and operating instructions de seguridad e instrucciones de uso before every use of this product.
- Page 2 WITH PROOF OF SALE, a defective product will receive free warranty service. The DieHard brand name is used under license. Direct all claims for warranty service to: Schumacher Electric Corporation, 1-800-621-5485, www.batterychargers.com This warranty gives you specific legal rights, and you may also have other rights which vary from state to state.
- Page 3 Schumacher Electric Corporation, Mount Prospect, IL 60056 DieHard y el logotipo de DieHard son marcas registradas de KCD IP, LLC y / o Transform SR Brands LLC y se utilizan bajo licencia de Schumacher Electric Corporation.
-
Page 4: Important Safety Instructions
1. IMPORTANT SAFETY INSTRUCTIONS 1.1 SAVE THESE INSTRUCTIONS – This manual contains important safety and operating instructions. 1.2 Keep out of reach of children. 1.3 Do not expose the charger to rain or snow. 1.4 Use of an attachment not recommended or sold by the battery charger manufacturer may result in a risk of fire, electric shock or injury to persons. -
Page 5: Personal Safety Precautions
2. PERSONAL SAFETY PRECAUTIONS 2.1 Consider having someone close enough by to come to your aid when you work near a lead-acid battery. 2.2 Have plenty of fresh water and soap nearby in case battery acid contacts skin, clothing, or eyes. 2.3 Wear complete eye protection and clothing protection. -
Page 6: Charger Location
3.4 Add distilled water in each cell until battery acid reaches level specified by battery manufacturer. Do not overfill. For a battery without removable cell caps, such as valve regulated lead acid batteries, carefully follow manufacturer’s recharging instructions. 3.5 Study all battery manufacturer’s specific precautions while charging and recommended rates of charge. -
Page 7: Follow These Steps When Battery Is Outside Vehicle
6.5 For negative-grounded vehicle, connect POSITIVE (RED) clip from battery charger to POSITIVE (POS, P, +) ungrounded post of battery. Connect NEGATIVE (BLACK) clip to vehicle chassis or engine block away from battery. Do not connect clip to carburetor, fuel lines, or sheet-metal body parts. -
Page 8: Grounding And Ac Power Cord Connections
8. GROUNDING AND AC POWER CORD CONNECTIONS 8.1 This battery charger is for use on a nominal 120 volt circuit. The unit must be plugged into an outlet that is properly installed and grounded in accordance with all local codes and ordinances. The plug pins must fit the receptacle (outlet). - Page 9 11. OPERATING INSTRUCTIONS IMPORTANT: Do not start the vehicle with the charger connected to the AC outlet, or it may damage the charger and your vehicle. NOTE: This charger is equipped with an auto-start feature. Current is supplied to the battery clamps before a battery is connected, and the clamps may spark if touched together.
- Page 10 7. When charging is complete, disconnect the charger from the AC power, disconnect the negative clamp, and finally the positive clamp. 8. A marine (boat) battery must be removed and charged on shore. BATTERY CHARGING TIMES BATTERY SIZE/RATING CHARGE TIME 6-12 Ah 5-10 h SMALL BATTERIES...
-
Page 11: Maintenance And Care
12. MAINTENANCE AND CARE A minimal amount of care can keep your battery charger working properly for years. • Clean the clamps each time you are finished charging. Wipe off any battery fluid that may have come in contact with the clamps, to prevent corrosion. •... -
Page 12: Instrucciones Importantes De Seguridad
1. INSTRUCCIONES IMPORTANTES DE SEGURIDAD GUARDE ESTAS INSTRUCCIONES – Este manual contiene instrucciones operativas y de seguridad de importancia. Este cargador no está destinado para ser usado por niños. No exponga el cargador a la lluvia o a la nieve. El uso de un accesorio no recomendado o suministrado por el fabricante del cargador de batería puede provocar riesgo de incendio, descarga eléctrica o lesiones a personas. -
Page 13: Precauciones De Seguridad Personal
Para reducir el riesgo de explosión de una batería, siga estas instrucciones y aquellas publicadas por el fabricante de la batería y por el fabricante de cualquier equipo que intente utilizar en la proximidad de la batería. Revise las pautas de precaución en estos productos y en el motor. 2. -
Page 14: Preparación Para La Carga
3. PREPARACIÓN PARA LA CARGA Si resulta necesario extraer la batería del vehículo para cargarla, siempre retire el terminal con descarga a tierra en primer lugar. Asegúrese de que todos los accesorios en el vehículo se encuentren apagados para evitar la formación de arcos eléctricos. - Page 15 6. SIGA ESTOS PASOS CUANDO LA BATERÍA ESTÉ COLOCADA EN EL VEHÍCULO ADVERTENCIA: UNA CHISPA PROVOCADA CERCA DE LA BATERÍA PUEDE CAUSAR LA EXPLOSIÓN DE LA BATERÍA. PARA REDUCIR EL RIESGO DE PROVOCAR CHISPAS CERCA DE LA BATERÍA: Ubique los cables de CA y CC adecuadamente para reducir el riesgo de daños por la cubierta, la puerta y las piezas móviles o calientes del motor.
- Page 16 Sujete al menos un cable aislado de batería de 24 pulgadas (61 cm) de largo con calibre 6 según el Calibre americano de cables (AWG, por sus siglas en inglés) al borne NEGATIVO (NEG, N, -) de la batería. Conecte el gancho POSITIVO (ROJO) del cargador al borne POSITIVO (POS, P, +) de la batería.
-
Page 17: Instrucciones De Montaje
9. INSTRUCCIONES DE MONTAJE Desenrede todos los cordones y extienda los cables antes de usar el cargador de baterías. 10. INDICADOR LED LED verde pulsante: El cargador está conectado a la red eléctrica. LED verde sólido: El cargador está cargando la batería. El LED está... - Page 18 CARGA DE LA BATERÍA FUERA DEL VEHÍCULO 1. Coloque la batería un área bien ventilada. 2. Limpie las terminales de la batería. 3. Conecte las pinzas de la batería al cable de conexión rápida. 4. Conectar la batería según las instrucciones que indicadas en las secciones 6 y 7. 5.
-
Page 19: Mantenimiento Y Cuidado
MODO DE CARGA AUTOMÁTICA Cuando se realiza una carga automática, el cargador cambia del maintain mode [modo de mantenimiento] automáticamente después que la batería se cargue. FINALIZACIÓN DE LA CARGA Cuando el LED verde se apaga, el cargador ha cambiado al modo de mantenimiento. MODO DE MANTENIMIENTO (MONITOREO A MODO DE FLOTE) Cuando el LED verde se apaga, el cargador ha iniciado el modo de mantenimiento. -
Page 20: Localización Y Solución De Problemas
13. LOCALIZACIÓN Y SOLUCIÓN DE PROBLEMAS PROBLEMA POSIBLE CAUSA SOLUCIÓN El LED verde no parpadea Tomacorriente de C.A. Controle la posible lentamente cuando el fuera de funcionamiento. presencia de fusibles cargador está conectado abiertos o disyuntores que correctamente. suministren energía al tomacorriente de CA.
Need help?
Do you have a question about the DH150 and is the answer not in the manual?
Questions and answers