
Related Manuals for Inseego Skyus 500V


Summary of Contents for Inseego Skyus 500V
- Page 1 User Guide Skyus 500 Inseego 9605 Scranton Road Suite 300 San Diego, CA 92121 (858) 812-3400 inseego.com...
- Page 2 Table of Contents User Guide Skyus 500 (Ninkasi) Product Overview ........................... 3 UI Reference............................ 6 Using, Testing, Troubleshooting ....................48 Regulatory Information ......................... 78 Rev 1 Page 2 of 78 inseego.com...
-
Page 3: Product Overview
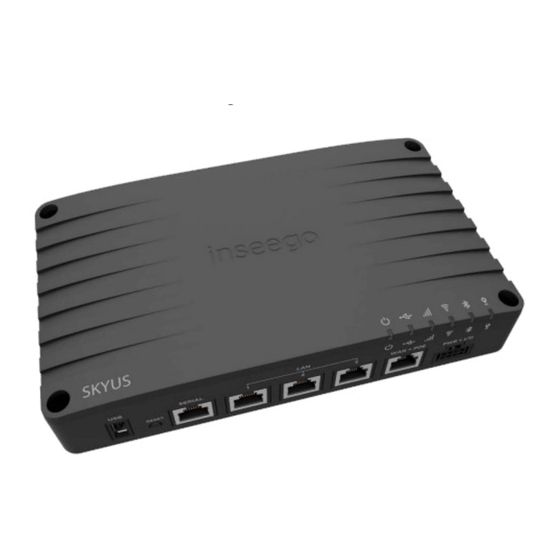
1. Product Overview User Guide Skyus 500 (Ninkasi) Marketing Name: Skyus 500V Model Name: SKR5MD8800 Base SKU: SK500V Front View Back View Rev 1 Page 3 of 78 inseego.com... - Page 4 Right Side View User Guide Skyus 500 (Ninkasi) Rev 1 Page 4 of 78 inseego.com...
- Page 5 Fast Blink Wi-Fi Traffic Blue Solid Wi-Fi as WAN Mode Active Fast Blink Traffic passing over Wi-Fi as WAN Bluetooth* Solid GPS Error White Slow Blink Searching/Acquiring Yellow Solid GPS Active For future release Rev 1 Page 5 of 78 inseego.com...
-
Page 6: Ui Reference
You can connect up to 128 client devices to your Skyus 500 via Wi-Fi. NOTE: This many client devices may affect throughput and stability. Connecting via Wi-Fi To wirelessly connect a Wi-Fi-capable device to your Skyus 500 for the first time: Rev 1 Page 6 of 78 inseego.com... - Page 7 Wi-Fi panel of the Home screen. Connecting via Ethernet To connect a wired device to your Skyus 500, plug the end of an Ethernet cable into one of the three LAN ports. Rev 1 Page 7 of 78 inseego.com...
- Page 8 User Guide Skyus 500 (Ninkasi) A User Guide for your Skyus 500 is available online. To download the complete User Guide, go to www.inseego.com/support-documentation. For additional information and technical support, email Technical Support at technicalsupportus@inseego.com or call Customer Support (Toll Free) at 1-877-698-6481.
- Page 9 The next time you sign in to the Skyus 500 Web Interface, use the new Admin password. If you cannot remember the password, click I forgot the Admin password. After you correctly answer the security question you set up, the current password is displayed. Rev 1 Page 9 of 78 inseego.com...
- Page 10 Wi-Fi devices. If you experience interference, try lowering the Bandwidth setting to reduce the interference. NOTE: Leave the Channel set to Automatic unless you need to choose a particular channel for your environment. Select Save Changes to store new settings. Rev 1 Page 10 of 78 inseego.com...
- Page 11 Wi-Fi Primary network name (SSID) on their list of available networks. If not selected, the network name will need to be manually entered for devices to connect to the network. Select Save Changes to store new settings. Rev 1 Page 11 of 78 inseego.com...
- Page 12 Wi-Fi Guest network name (SSID) on their list of available networks. If not selected, the network name will need to be manually entered for devices to connect to the network. Select Save Changes to store new settings. Rev 1 Page 12 of 78 inseego.com...
- Page 13 Edit: Change the SSID, security setting, or password for an access point. NOTE: The SSID and • password must match the access point. Only change these fields to match changes in the actual access point information. Rev 1 Page 13 of 78 inseego.com...
- Page 14 User Guide Skyus 500 (Ninkasi) Delete: Delete an access point from the list. • Rev 1 Page 14 of 78 inseego.com...
- Page 15 Instead, they are identified by their name and MAC address. To unblock a blocked device, click the Unblock button and select Save Changes. The device is removed from the Blocked list and appears in the Connected list above. Rev 1 Page 15 of 78 inseego.com...
- Page 16 User Guide Skyus 500 (Ninkasi) Rev 1 Page 16 of 78 inseego.com...
- Page 17 This tab lists all currently connected devices and any applied schedules. (Unspecified indicates that no schedule is applied to a device, and Internet access is unrestricted.) To apply a schedule to a device, select a schedule from the drop-down list. Select Save Changes. Rev 1 Page 17 of 78 inseego.com...
- Page 18 Select Save Schedule to close the dialog box and return to the Schedules page. The new schedule is now listed. Use the View, Edit, and Delete buttons to view, edit, or delete (unapplied schedules only) listed schedules. Use the Devices tab to apply schedules to devices. Rev 1 Page 18 of 78 inseego.com...
- Page 19 Number Format: Choose the format for decimal numbers displayed in the Web UI and remote servers (using a period or comma as the decimal point). Select your display choices from the drop-down menus and click Save Changes to update settings. Rev 1 Page 19 of 78 inseego.com...
- Page 20 This section displays details about the last software update. System Update History This section displays details of the last updates that have been downloaded and installed to this device. If this section is blank, no updates have been installed. Rev 1 Page 20 of 78 inseego.com...
- Page 21 Restore Factory Defaults: This button resets all settings to their factory default values. CAUTION: This initiates a restart and may change the current Wi-Fi settings, breaking all existing connections to this router and disconnecting you from the Web UI. Rev 1 Page 21 of 78 inseego.com...
- Page 22 User Guide Skyus 500 (Ninkasi) Restart Router Restart: This button turns your router off and on again. Rev 1 Page 22 of 78 inseego.com...
- Page 23 A list of devices with their MAC Address, Current IP Address, and a field to enter a Reserved IP Address appears. Click Save Changes to activate and save new settings. Rev 1 Page 23 of 78 inseego.com...
- Page 24 CAUTION: Changing the external modem APN may cause a loss of data connectivity and disconnect you from the Web UI. Click Save APN Changes. The router will reboot for changes to take effect. Rev 1 Page 24 of 78 inseego.com...
- Page 25 DNS 1 IP address: Enter the IP address for the primary DNS. This address is required to use the Manual DNS feature. DNS 2 IP address: Enter the IP address for the secondary (backup) DNS. This address is optional and may be left blank if desired. Click Save Changes. Rev 1 Page 25 of 78 inseego.com...
- Page 26 Add New Rule. New rules are added to the bottom of the list. Use Up and Down to reposition rules on the list. NOTE: For Src. IP and Dest. IP, enter a specific IP address or the keyword any. Rev 1 Page 26 of 78 inseego.com...
- Page 27 When blocking devices, the following information applies: Devices blocked with Connected Devices > Block are blocked from the Wi-Fi network, • even if the MAC Filter is ON and the device is enabled for the MAC Filter. Rev 1 Page 27 of 78 inseego.com...
- Page 28 If the MAC Filter is ON, and a device is enabled for the MAC Filter, then the device will be • able to connect. However, it can still be blocked using Connected Devices > Block or by disabling the MAC Filter. Rev 1 Page 28 of 78 inseego.com...
- Page 29 Delete: Check this box to delete a custom application. NOTE: Click on the Port Filtering • tab again to remove deleted custom applications from view on the screen. Click Save Changes to save any changes made to the custom applications. Rev 1 Page 29 of 78 inseego.com...
- Page 30 IP address of the target device. To find the IP address of a device, go to the Connected Devices page. Port Type: Select Range or Translate from the drop-down list. • Rev 1 Page 30 of 78 inseego.com...
- Page 31 Delete: Check this box to delete a custom application. NOTE: Click on the Port • Forwarding tab again to remove deleted custom applications from view on the screen. Click Save Changes to save any changes made to the custom applications. Rev 1 Page 31 of 78 inseego.com...
- Page 32 NOTE: A smaller value may create false positive results, while a larger value may delay detection of issues. WAN recovery retries — The number of successful checks a failed connection requires • before it is considered active again. Rev 1 Page 32 of 78 inseego.com...
- Page 33 Altitude: Altitude for the last location fix. Accuracy: A measure of the accuracy of the horizontal position obtained by the GPS receiver. Direction: Direction of North relative to the direction the device is traveling. Rev 1 Page 33 of 78 inseego.com...
- Page 34 Skyus 500 and obtain GPS data. Unless there is a good reason to do so, you should not change the port number. Acceptable port values are between 1024 and 65535. Click Save Changes to update settings. Rev 1 Page 34 of 78 inseego.com...
- Page 35 Network protocol — Select the protocol to use for routing packets to your remote serve • from the drop-down (TCP or UDP). NMEA/TAIP Reporting The Skyus 500 is capable of routing NMEA or TAIP sentences to the remote server. Rev 1 Page 35 of 78 inseego.com...
- Page 36 Click Save Changes to implement your settings or Cancel to cancel. You return to the Remote page. The new remote server is now listed. Use the View, Edit, and Delete buttons to view, edit, or delete listed remote servers. Rev 1 Page 36 of 78 inseego.com...
- Page 37 Set Output (visible for OUTPUT): Select Active Low (ON) or OFF from the drop-down. External Pins This section displays settings for dedicated Input and Output pins. Dedicated Input Pin Value: The state specified by the pin: Low or High. Rev 1 Page 37 of 78 inseego.com...
- Page 38 NOTE: To reset the pulse count to zero, reset the device to the factory default settings. Dedicated Output Pin Value: The state specified by the pin: Low or High. Set Output: The output specified by the pin: Active Low or OFF. Rev 1 Page 38 of 78 inseego.com...
- Page 39 Skyus 500. Pre-shared key — Enter a password used to authenticate the remote end of the tunnel • (usually matches the local password). Add New VPN Tunnel: Step 2 out of 5 Local Network Rev 1 Page 39 of 78 inseego.com...
- Page 40 Phase 1 on the previous page is configured to support Hash SHA2 512, SHA2 384, and SHA2 256, then at least one of those selections must be selected in Phase 2 on the this page in order for there to be a common Hash. Rev 1 Page 40 of 78 inseego.com...
- Page 41 DPD Delay: The number of seconds between DPD packets. DPD Timeout: The number of seconds the router will allow an IPsec session to be idle before beginning to send DPD packets to the peer machine. Rev 1 Page 41 of 78 inseego.com...
- Page 42 Server Password: The password that was used to register your Skyus 500. NOTE: Editing this field can affect your ability to utilize IoT Connect services. Traffic Type: This static value is provided to show that the router is communicating via Inseego's protocol.
- Page 43 Model Number: The model number for this device. • Model Version: For the 4G modem component, this is the version of the firmware • (software) currently installed. System Version: The version of currently installed software. • Rev 1 Page 43 of 78 inseego.com...
- Page 44 Signal Strength: The strength of the LTE signal, measured in dBm. Higher absolute • values indicate a stronger signal, for example: -80 dBm is a stronger signal than -90 dBm. NOTE: LTE signal strength is typically lower than 3G signal strength. Rev 1 Page 44 of 78 inseego.com...
- Page 45 IPv6 Subnet Mask: The network mask associated with the IPv6 address. • IPv6 Gateway: The gateway IP address associated with the IPv6 address. • IPv6 DNS: The Domain Name Server currently used by this device. • Rev 1 Page 45 of 78 inseego.com...
- Page 46 Signal Strength: The received signal strength indicator (RSSI) value. • Mode: The mode setting of the Wi-Fi network connection. • Channel: The channel setting of the Wi-Fi network connection. • IP Address: The IP address assigned to the router. • Rev 1 Page 46 of 78 inseego.com...
- Page 47 Ethernet Clients: The number of clients connected by Ethernet. • GHz Clients: The number of clients connected at 2.4 GHz band. • 5 GHz Clients: The number of clients connected at 5 GHz band. • Rev 1 Page 47 of 78 inseego.com...
-
Page 48: Using, Testing, Troubleshooting
Using, Testing, and Troubleshooting the Device Flashing Device Release Builds are posted below \\nvtlsdsfile02\engineering\software\EngReleases\firmware\IPQ4019 1. Select ***.secure file from appropriate Release folder Eg: IPQ4019_Linux_1.26_to_1.27_Real.secure 2. Access Sideload page from WebUI http://192.168.0.1/cgi-bin/luci/vzw/sideload 3. Select *.secure file to upload Rev 1 Page 48 of 78 inseego.com... - Page 49 User Guide Skyus 500 (Ninkasi) 4. Update Progress Screen should be displayed once installation process starts 5. After successful installation and reboot, following screen should be presented Rev 1 Page 49 of 78 inseego.com...
- Page 50 If not, enter passwd and change root password Once root password is changed, device can be connected over SSH to access Linux File System Sideload Load <FW_filename>.secure from http://192.168.1.1/cgi-bin/luci/vzw/sideload Specific instructions can be found in WebUI spec Rev 1 Page 50 of 78 inseego.com...
- Page 51 | grep -e firewall -e multiwan mwan_info cat /tmp/multiwan_info MODEM dmesg WIFI and WIFI STATION logread from console debuglogs from WebUI How to get storelogs.sh SSH to device /bin/insg/storelogs.sh --> Logs will be written to /opt/deviceos/tmp Rev 1 Page 51 of 78 inseego.com...
- Page 52 Running CLI commands 1. SSH to device 2. /bin/insg/cumclient_cli --> This will generate list of cumclient commands that can be run WiFi Station Document on how it works posted here IpSec document posted here Rev 1 Page 52 of 78 inseego.com...
- Page 53 For eg: WiFi maintains its own settings at wireless Possible use case: If a device on field has issues, we can retrieve problematic device’s configuration file, apply to our device for easy debugging. Rev 1 Page 53 of 78 inseego.com...
- Page 54 User Guide Skyus 500 (Ninkasi) How to Retrieve Device’s Configuration Snapshot 1. Login to IOTC (inseego.cumulocity.com) 2. From Device Management’s All devices, pick your device Eg: ID-990000123456789 3. Select Configuration 4. Navigate down the screen and to find “Get new snapshot from device”...
- Page 55 User Guide Skyus 500 (Ninkasi) 7. IOTC’s Shell should also post Successful Status Rev 1 Page 55 of 78 inseego.com...
- Page 56 User Guide Skyus 500 (Ninkasi) How to upload Configuration Snapshot 1. Login to IOTC (inseego.cumulocity.com) 2. From Device Management Tab, click on “Configuration repository” 3. Click on “Add configuration snapshot” Rev 1 Page 56 of 78 inseego.com...
- Page 57 Skyus 500 (Ninkasi) 4. Enter easily identifiable Name, select downloaded Configuration Snapshot and click “Add configuration snapshot” 5. Successful upload popup should be displayed 6. Uploaded Configuration Snapshot file will be displayed Configuration repository list Rev 1 Page 57 of 78 inseego.com...
- Page 58 User Guide Skyus 500 (Ninkasi) How to apply Configuration snapshot to device 1. Login to IOTC (inseego.cumulocity.com) 2. From Device Management’s All devices, pick your device Eg: ID-990000123456789 3. Select Configuration 4. Select appropriate Configuration snapshot file from drop down list 5.
- Page 59 NetMotion Diagnostics Client Info and FAQs on NetMotion’s Diagnostic Client can be found here Installing NetMotion’s Diagnostics Client 1. Download Client for WINDOWS from https://netmotionsoftware.sharefile.com/d-se16dddf8e2a4ee0a 2. Follow screenshots below to ensure correct installation Rev 1 Page 59 of 78 inseego.com...
- Page 60 User Guide Skyus 500 (Ninkasi) Rev 1 Page 60 of 78 inseego.com...
- Page 61 User Guide Skyus 500 (Ninkasi) Rev 1 Page 61 of 78 inseego.com...
- Page 62 User Guide Skyus 500 (Ninkasi) UNCHECKED 3. Ensure “Require trusted server certificate” is Rev 1 Page 62 of 78 inseego.com...
- Page 63 User Guide Skyus 500 (Ninkasi) Rev 1 Page 63 of 78 inseego.com...
- Page 64 (se screenshot etcroot.PNG) h. double click on it i. now under Enable GPS, BT Rev 1 Page 64 of 78 inseego.com...
- Page 65 FGeneral~2FSW~2FTRD~2FDraft~2FIoTC~2FWI- 00038_Revision_1.0.docx?threadId=19:4e3c7fa012ad4647bc4638b08bcff03e@thread.skype &baseUrl=https:~2F~2Finseego.sharepoint.com~2Fsites~2FSkyusPortfolio&fileId=EA909891- 8FA2-47A2-9633-5816F72BF792&ctx=files&viewerAction=view NOTE: Not all of them are relevant, Registering Single and Multiple Devices and Device removal * cumulocity.com o Building owner who maintains the server and the framework * inseego.cumulocity.com Rev 1 Page 65 of 78 inseego.com...
- Page 66 Property manager who adds, removes and manages subtenants * firmwaretest.cumulocity.com o Renter who is a sub-tenant of inseego So, Inseego is the primary tenant at inseego.cumulocity.com, from there we can add, remove and track our sub-tenants. firmwaretest.cumulocity.com is a sub-tenant for testing what our customers will see.
- Page 67 * Verify that clientauth.xml is deleted from /data/rsa/rsacredential (Skyus100 – 2.9X Firmware) * Verify that rsacredential is deleted from /data/rsa/rsacredential (Skyus100 – 2.1XX Firmware) * Verify that rsacredential is deleted from /mnt/factory/rsa (Skyus500 – 1.2X Firmware) Rev 1 Page 67 of 78 inseego.com...
- Page 68 (*) Disable = No traffic is routed out or received from the remote server Test Case: Send a request to device and ensure that there is absolute no traffic, packet size must remain at 0 Rev 1 Page 68 of 78 inseego.com...
- Page 69 1 hour, RSA ON, No sensors -> Filter on port 183 on Cumulocity server -> Total Data Usage o 1 hour, RSA ON – LDE, No sensors o 1 hour, RSA OFF • Repeat test 1 & 2 with one of each sensor type (if supported) Rev 1 Page 69 of 78 inseego.com...
- Page 70 General Registration 1. Login to IOTC (firmwaretest.cumulocity.com) 2. Select “Registration” from left Pane 3. Click on “Register device” 4. Select “General Registration” 5. Enter IMEI info on Device ID field and select “Next” Rev 1 Page 70 of 78 inseego.com...
- Page 71 User Guide Skyus 500 (Ninkasi) 6. Success Registration message should show up 7. Registered Device must now show up in Registration page Rev 1 Page 71 of 78 inseego.com...
- Page 72 9. Select ACCEPT Button beside Device IMEI registered on Device Registration page on IOTC 10. Now Device should be registered and start reporting 11. WebUI should be populated with info from server Rev 1 Page 72 of 78 inseego.com...
- Page 73 2. Register device again using General Registration 3. From WebUI, select Reset credentials 4. Disable and Enable IoT Connect server reporting General Registration 1. Login to IOTC (firmwaretest.cumulocity.com) 2. Select “Registration” from left Pane 3. Click on “Register device” Rev 1 Page 73 of 78 inseego.com...
- Page 74 4. Select Bulk Registration 5. Click on “Select file to upload” and select updates test_bulkimport excel sheet test_bulkimport.xls needs to be edited with IMEI and password (Eg: test1234567) 6. Device should be successfully registered Rev 1 Page 74 of 78 inseego.com...
- Page 75 Skyus 500 (Ninkasi) 7. From WebUI, access Remote Management Page, ENABLE Iot Server reporting 8. Select “Change configuration” 9. Enter server info (Eg: firmwaretest.cumulocity.com) and password (Eg: test1234567) Password that was entered in test_bulkimport.xls Rev 1 Page 75 of 78 inseego.com...
- Page 76 User Guide Skyus 500 (Ninkasi) 10. Device should connect to IOTC and start reporting after successful connection 11. rsacredential file should be created after successful connection Rev 1 Page 76 of 78 inseego.com...
- Page 77 More info on Cumulocity and Agent is available here More info on Cumulocity and MQTT is available here rsacredential can be found at: /mnt/factory/rsa/rsacredential – Skyus500 /data/rsa/rsacredential – Skyus100 RSA logs can be found at: /opt/deviceos/data/rsa Rev 1 Page 77 of 78 inseego.com...
-
Page 78: Regulatory Information
4. Regulatory Information User Guide Skyus 500 (Ninkasi) Product: Skyus 500V Model: SKR5MD8800 Caution: Any changes or modifications not expressly approved by the party responsible for compliance could void the user’s authority to operate this equipment. NOTE: This equipment has been tested and found to comply with the limits for a Class B digital device, pursuant to part 15 of the FCC Rules.
Need help?
Do you have a question about the Skyus 500V and is the answer not in the manual?
Questions and answers