Table of Contents
Advertisement
Quick Links
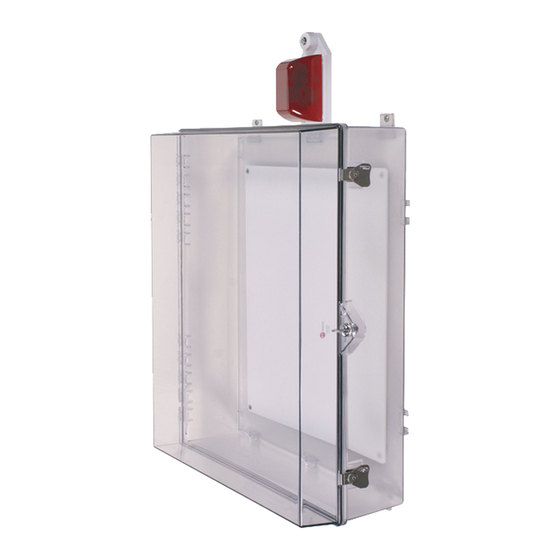
STI-7554, STI-7555 and STI-7555AED
PROTECTIVE CABINET
INSTRUCTION MANUAL
Features:
• Clear, protective polycarbonate cover with siren/strobe alarm.
• Design allows visibility at any angle.
• Complete with mounting hardware and gasket.
• Includes wire shelf, backing plate and siren/strobe alarm — AED models
• External mounting tabs or internal drill dimples.
• Cover includes a coated steel internal mounting plate with a baked on white
enamel finish.
• Siren/strobe alarm lens is red. Also available with amber, green, blue or white lens.
• Siren offers 32 user selectable tones.
• Alarm can be set for a piercing 100 dB or 85 dB.
• Independent strobe and siren timing of 15 seconds, 30 seconds, 60 seconds or
continuous.
• Powered by a 9 VDC battery or external 12-30 volts.
• Low battery indicator.
Safety Technology International, Inc.
"We rotect theThings that rotect You. "
Advertisement
Table of Contents

Related Manuals for STI STI-7554


Summary of Contents for STI STI-7554
- Page 1 STI-7554, STI-7555 and STI-7555AED PROTECTIVE CABINET INSTRUCTION MANUAL Features: • Clear, protective polycarbonate cover with siren/strobe alarm. • Design allows visibility at any angle. • Complete with mounting hardware and gasket. • Includes wire shelf, backing plate and siren/strobe alarm — AED models •...
-
Page 2: Table Of Contents
WARNINGS All units are recommended for indoor use. Unit must be tested periodically to verify the life of battery. STI recommends you change the 9 Volt battery twice a year. When purchasing a siren/strobe alarm, you will need to periodically test the connections to make sure audibles function at a sound level to alert staff. -
Page 3: Dimensions
DIMENSIONS 4.31 in. (109mm) 33.75 in. (857mm) 19.75 in. (502mm) 7.31 in. (186mm) 24.75 in. (629mm) FRONT R.H. SIDE SPECIFICATIONS OPERATING VOLTAGE Internal power 9 VDC battery (not included) Remote power 12-30 VDC OPERATING TEMPERATURE 32°F -120° POWER CONSUMPTION Stand by: 50µA Siren low volume: 85mA Siren high volume: 90mA Strobe: 25mA... -
Page 4: Installation Of Cabinet
INSTALLATION OF CABINET Note: Installation of cabinet should be before installation of alarm because the mounting bracket butts up to cabinet. 1. Insert the (4 or 6) mounting tabs fully 06298 MOUNTING TABS (6) PROVIDED into backbox mounting tab slots. Use 19013 SCREW #10 x 1 1/2 in. -
Page 5: Alarm Electronic Setup
STEP 2 - ELECTRONIC SETUP - SELECT ALARM TONE AND TIMING SEQUENCE SIREN ALARM TONE ALARM TIMING LED QTY 10 STROBE TIMING VOLUME BATTERY LOW BATTERY INDICATOR LED TERMINAL STRIP BATTERY CABLE WIRE ENTRY TAMPER SWITCH (REAR VIEW) NOTE: Select-Alert must be on a flat surface and lens must be installed or the tamper switch will trigger the alarm. -
Page 6: Alarm Terminal Strip Connections
STEP 5 - ELECTRONICS ASSEMBLY Wiring: After mounting circuit board assembly, connect wires. Refer to terminal strip connections (step 6). Lens installation: Slide lip of lens behind circuit board mounting plate. Rotate lens into position. Secure with tamperproof screw and special wrench. Unit will not operate properly if lens cover is not installed. -
Page 7: Assembly Parts List
1 07551WR Wire rack (Included with AED models only) 1 04876 Mounting plate 4 19002 #8-32 x 3/8 in. screw 1 6297550 Gasket 1 07503 Thumb lock - STI-7555 models 1 18050 Key lock STI-7554 models 2 18054 CH751 STEP 7 - O PERATION •... -
Page 8: Accessories & Replacement Parts
Optional AED label - 2 included (applied to sides of cabinet; must be factory installed) STI-SA5000-R Replacement Siren/Strobe Alarm 18054 Replacement key for cabinet lock on STI-7554 18075 Replacement key for Siren/Strobe Alarm 07550WR Wire shelf (included with AED models)
Need help?
Do you have a question about the STI-7554 and is the answer not in the manual?
Questions and answers