Table of Contents
Advertisement
LAUNCH
Professional 909 User Manual
Copyright Information
Copyright © 2019 by LAUNCH TECH CO., LTD. All rights reserved. No part of
this publication may be reproduced, stored in a retrieval system, or transmitted in
any form or by any means, electronic, mechanical, photocopying and recording
or otherwise, without the prior written permission of LAUNCH. The information
contained herein is designed only for the use of this unit. LAUNCH is not
responsible for any use of this information as applied to other units.
Statement: LAUNCH owns the complete intellectual property rights for the software
used by this product. For any reverse engineering or cracking actions against the
software, LAUNCH will block the use of this product and reserve the right to pursue
their legal liabilities.
Trademark Information
LAUNCH is a registered trademark of LAUNCH TECH CO., LTD. (also called
LAUNCH for short) in China and other countries. All other LAUNCH trademarks,
service marks, domain names, logos, and company names referred to in this
manual are either trademarks, registered trademarks, service marks, domain
names, logos, company names of or are otherwise the property of LAUNCH or
its affiliates. In countries where any of the LAUNCH trademarks, service marks,
domain names, logos and company names are not registered, LAUNCH claims
other rights associated with unregistered trademarks, service marks, domain
names, logos, and company names. Other products or company names referred
to in this manual may be trademarks of their respective owners. You may not use
any trademark, service mark, domain name, logo, or company name of LAUNCH
or any third party without permission from the owner of the applicable trademark,
service mark, domain name, logo, or company name. You may contact LAUNCH
by visiting the website at www.cnlaunch.com, or writing to LAUNCH TECH CO.,
LTD., Launch Industrial Park, North of Wuhe Avenue, Banxuegang, Bantian,
Longgang, Shenzhen, Guangdong, P.R.China, to request written permission to
use Materials on this manual for purposes or for all other questions relating to
this manual.
i
Advertisement
Table of Contents

Related Manuals for Launch Creader Professional 909


Summary of Contents for Launch Creader Professional 909
- Page 1 Statement: LAUNCH owns the complete intellectual property rights for the software used by this product. For any reverse engineering or cracking actions against the software, LAUNCH will block the use of this product and reserve the right to pursue their legal liabilities.
- Page 2 The right is reserved to make change at any time without notice. • Neither LAUNCH nor its affiliates shall be liable to the purchaser of this unit or third parties for damages, losses, costs or expenses incurred by purchaser...
- Page 3 LAUNCH Professional 909 User Manual • Use extreme caution when working around the ignition coil, distributor cap, ignition wires and spark plugs. These components create hazardous voltages when the engine is running. • Put the transmission in P (for A/T) or N (for M/T) and make sure the parking brake is engaged.
-
Page 4: Table Of Contents
LAUNCH Professional 909 User Manual Table of Contents 1. Introduction ....................1 2. General Information ..................3 2.1 On-Board Diagnostics (OBD) I ..............3 2.2 On-Board Diagnostics (OBD) II ..............3 2.3 Diagnostic Trouble Codes (DTCs) ..............5 2.4 Location of the Data Link Connector (DLC)........... 6 2.5 OBD II Terminology .................. - Page 5 LAUNCH Professional 909 User Manual 7.4 DLC(Data Link Connector) Location............48 7.5 Feedback ..................... 48 7.6 Firmware Fix ....................48 7.7 FAQ ......................48 7.8 Image......................48 8. Settings ......................49 8.1 Units of measurement ................. 49 8.2 Screen capture .................... 49 8.3 Automatic detection on connect..............
-
Page 6: Introduction
LAUNCH Professional 909 User Manual 1. Introduction Creader Professional 909 Diagnostic Tool is an evolutionary smart solution for passenger car diagnosis. It inherits from LAUNCH’s advanced diagnosing technology and is characterized by covering a wide range of vehicles, featuring powerful functions, and providing precise test result. - Page 7 LAUNCH Professional 909 User Manual A small number of 1994 and 1995 model year gasoline vehicles are OBD II compliant. To verify if a 1994 or 1995 vehicle is OBD II compliant, check the following: 1. Vehicle Emissions Control Information (VECI) Label. It is located under the hood or by the radiator of most vehicles.
-
Page 8: General Information
LAUNCH Professional 909 User Manual 2. General Information 2.1 On-Board Diagnostics (OBD) I Note: With the exception of some 1994 and 1995 vehicles, most vehicles from 1982 to 1995 are equipped with some type of first generation On-Board Diagnostics. Beginning in 1988, California’s Air Resources Board (CARB), and later the Environmental Protection Agency (EPA) required vehicle manufacturers to include a self-diagnostic program in their on-board computers. - Page 9 LAUNCH Professional 909 User Manual components. These components were causing an increase in emissions. • Because OBD I systems only detect failed components, the degraded components were not setting codes. • Some emissions problems related to degraded components only occur when the vehicle is being driven under a load.
-
Page 10: Diagnostic Trouble Codes (Dtcs)
LAUNCH Professional 909 User Manual 2.3 Diagnostic Trouble Codes (DTCs) OBD II Diagnostic Trouble Codes are codes that are stored by the on-board computer diagnostic system in response to a problem found in the vehicle. These codes identify a particular problem area and are intended to provide you with a guide as to where a fault might be occurring within a vehicle. -
Page 11: Location Of The Data Link Connector (Dlc)
LAUNCH Professional 909 User Manual P0201 - Injector circuit malfunction, Cylinder 1 2.4 Location of the Data Link Connector (DLC) The DLC (Data Link Connector or Diagnostic Link Connector) is typically a 16- pin connector where diagnostic code readers interface with the vehicle’s on- board computer. -
Page 12: Obd Ii Terminology
LAUNCH Professional 909 User Manual Data Link Connector is not located under dashboard, a label should be there telling location. For some Asian and European vehicles, the DLC is located behind the ashtray and the ashtray must be removed to access the connector. If the DLC cannot be found, refer to the vehicle’s service manual for the location. -
Page 13: Obd Ii Monitors
LAUNCH Professional 909 User Manual complete its diagnostic testing are met. The “Trip Drive Cycle” for a particular Monitor begins when the ignition key is turned “On.” It is successfully completed when all the “Enabling Criteria” for the Monitor to run and complete its diagnostic testing are met by the time the ignition key is turned “Off.”... -
Page 14: Continuous Monitors
LAUNCH Professional 909 User Manual limits. Currently, fifteen Monitors are supported by OBD II systems. Additional monitors may be added as a result of Government regulations as the OBD II system grows and matures. Not all vehicles support all fifteen Monitors. Additionally, some Monitors are supported by “spark ignition”... -
Page 15: Non-Continuous Monitors
LAUNCH Professional 909 User Manual This Monitor uses a Fuel System Correction program, called Fuel Trim, inside the on-board computer. Fuel Trim is a set of positive and negative values that represent adding or subtracting fuel from the engine. This program is used to correct for a lean (too much air/not enough fuel) or rich (too much fuel/not enough air) air-fuel mixture. - Page 16 LAUNCH Professional 909 User Manual signal to make corrections to the air/fuel mixture. If the exhaust gas has a large amount of oxygen (a lean air/fuel mixture), the oxygen sensor generates a “low” voltage signal. If the exhaust gas has very little oxygen (a rich mixture condition), the oxygen sensor generates a “high”...
- Page 17 LAUNCH Professional 909 User Manual a Pending Code. The computer does not command the MIL on at this time. If the fault is sensed again on the second trip, the computer commands the MIL “On,” and saves the code in its long-term memory.
- Page 18 LAUNCH Professional 909 User Manual temperatures must be kept below 2500°F. The EGR system recirculates small amounts of exhaust gas back into the intake manifold, where it is mixed with the incoming air/fuel mixture. This reduces combustion temperatures by up to 500°F.
- Page 19 LAUNCH Professional 909 User Manual • It supplies the catalytic converter with the oxygen it needs to oxidize the carbon monoxide and hydrocarbons left over from the combustion process during engine warmup. • The extra oxygen injected into the exhaust stream also helps the catalytic converter reach operating temperature more quickly during warm-up periods.
- Page 20 LAUNCH Professional 909 User Manual hydrocarbons to produce H2O and N2. The NOx Aftertreatment Monitor monitors the function of the NOx aftertreatment to ensure that tailpipe emissions remain within acceptable limits. The NOx Aftertreatment Monitor is supported by “compression ignition” vehicles only.
-
Page 21: Obd Ii Reference Table
LAUNCH Professional 909 User Manual exhaust gas concentration in order to burn off the trapped particles (oxidizing the particles to form CO2 and water). The computer monitors the efficiency of the filter in trapping particulate matter, as well as the ability of the filter to regenerate (self-clean). -
Page 22: Dtcs And Mil Status
LAUNCH Professional 909 User Manual Catalytic Converter Once per trip 3 trips Monitor Sensor Once per trip 3 trips Monitor Sensor Once per trip 3 trips Heater Monitor EGR Monitor Once per trip 3 trips EVAP system Once per trip... - Page 23 LAUNCH Professional 909 User Manual Note: The “Malfunction Indicator Lamp” (MIL) is the accepted term used to describe the lamp on the dashboard that lights to warn the driver that an emissions-related fault has been found. Some manufacturers may still call this lamp a “Check Engine”...
- Page 24 LAUNCH Professional 909 User Manual before the MIL is turned “Off.” These are trips where the engine load, RPM and temperature are similar to the conditions present when the fault was first found. Note: After the MIL has been turned off, DTCs and Freeze Frame data stay in the computer’s memory.
-
Page 25: Components And Controls
LAUNCH Professional 909 User Manual 3. Components and Controls 3.1 Controls Top & Front Views Rear View Name Descriptions DB-15 diagnostic To connect to vehicle's DLC (Data Link Connector) connector via diagnostic cable. • In Off mode, press it for about 5 seconds to turn the handset on. -
Page 26: Technical Specifications
LAUNCH Professional 909 User Manual Press to the home(Job menu) screen. HOME Move cursor up and down for selection. Move cursor left or right for selection; Or turn page up and down when more than one page is displayed. Exit the current program or return to the previous Return screen. -
Page 27: Accessories Checklist
LAUNCH Professional 909 User Manual 3.3 Accessories Checklist For detailed accessory items, please consult from the local agency. 1. Creader Professional 909 handset 2. OBD II diagnostic cable 3. DC 5V charging cable 4. User manual... -
Page 28: Initial Use
LAUNCH Professional 909 User Manual 4. Initial Use 4.1 Charging The Tool There are two charging methods available: Via Charging Cable: Plug one end of the included charging cable into the DC-IN port of the tool, and the other end to the external DC power. - Page 29 LAUNCH Professional 909 User Manual Figure 4-2 • If the network you chose is open, you can connect directly; • If the selected network is encrypted, you have to enter the right security key (network password). *Note: If you choose “Ignore” in WLAN setup, it will go into the date setting page. If the tool has been properly connected to the Internet, the system will automatically obtain the correct network date and time and navigate to step 6.
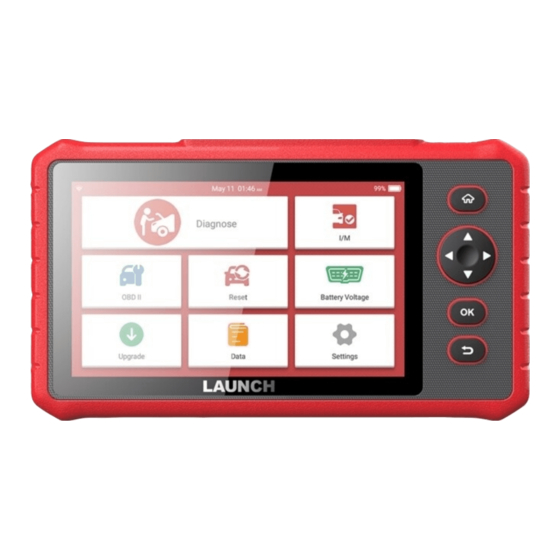
- Page 30 LAUNCH Professional 909 User Manual 4.3 Job Menu It mainly includes the following function modules. Figure 4-3 To configures the tool to operate as a professional diagnostic Diagnose tool. A quick access to the I/M Readiness function of OBD II Diagnosis.
- Page 31 LAUNCH Professional 909 User Manual Battery Measures the current voltage of the vehicle’s battery. Voltage To update vehicle diagnostic software and APK. Update *Note: This function requires a stable network connection. Includes Diagnostic report, Diagnostic record, Feedback and Data DTC library etc.
-
Page 32: Diagnose
LAUNCH Professional 909 User Manual 5. Diagnose 5.1 Connection 1. Turn the ignition off. 2. Locate vehicle’s DLC socket: Refer to Chapter 2.4 for DLC location. 3. Plug one end of the diagnostic cable into the DB-15 connector of the tool, and tighten the captive screws. - Page 33 LAUNCH Professional 909 User Manual *Note: To detect more and accurate VINs, a stable network connection is highly recommended for this function. *CAUTION: Don’t connect or disconnect any test equipment with ignition on or engine running. A. Once the system successfully obtains the VIN (Vehicle Identification Number) information of the currently identified vehicle, it will continue scanning the vehicle systems.
-
Page 34: Manual Diagnosis
LAUNCH Professional 909 User Manual 5.2.2 Manual Diagnosis If the tool can not obtain the VIN information, you can also perform vehicle diagnosis manually. In this mode, you need to execute the menu-driven command and then follow the on-screen instruction to proceed. - Page 35 LAUNCH Professional 909 User Manual Fig. 5-3 2). Select test item: Select the desired test item to proceed. Fig. 5-4 5.2.2.1 Health Report (Quick Test) This function varies from vehicle to vehicle. It enables you to quickly access all the electronic control units of the vehicle and generate a detailed report about vehicle health.
- Page 36 LAUNCH Professional 909 User Manual Fig. 5-5 In above figure, the tested system with fault code appears in red ( ) and the system with OK displays in black ( On-screen Buttons: : Tap to display the details of DTCs existing in the current system. Tap hide it.
- Page 37 LAUNCH Professional 909 User Manual an example) to jump to the test function page. Fig. 5-6 *Note: Different vehicle has different diagnostic menus. A. Version Information This function is used to read the version information of system mode, vehicle VIN, software and ECU.
- Page 38 LAUNCH Professional 909 User Manual On-screen Buttons: Help: Tap to view the help information. Code Search: Tap it to search for more information about the current DTC online. Report: To save the current data in text format. All diagnostic reports can be accessed from “Data”...
- Page 39 LAUNCH Professional 909 User Manual Select All: Tap it to select all items of the current page. To select certain data stream item, just check the box before the item name. Unselect: Tap it to deselect all data stream items.
-
Page 40: Obdii Diagnosis
LAUNCH Professional 909 User Manual Fig. 5-10 Combine: Tap it, a list of the data stream items will appear on the screen. Select the necessary items (Max. 4 items can be selected at the same time) and the screen will display the waveforms corresponding to these items immediately. - Page 41 LAUNCH Professional 909 User Manual illuminated Malfunction Indicator Lamp (MIL), check monitor status prior to emissions certification testing, verify repairs, and perform a number of other services that are emission-related. After the tool is properly connected to the vehicle’s DLC, tap “OBD II” on the Job menu.
- Page 42 LAUNCH Professional 909 User Manual performing this function, please be sure the vehicle’s ignition key is in the ON position with the engine off. *Notes: • When this function is used to erase DTCs from the vehicle’s on-board computer, “Freeze Frame” data is erased and “Permanent” DTCs ARE NOT erased.
- Page 43 LAUNCH Professional 909 User Manual This function can also be done by tapping [I/M Readiness] directly on the Job Menu. 4. Data Stream This option retrieves and displays live data and parameters from the vehicle’s ECU. 5. View Freeze Frame When an emission-related fault occurs, certain vehicle conditions are recorded by the on-board computer.
-
Page 44: History
LAUNCH Professional 909 User Manual newer OBD II-compliant vehicles. • CID (Calibration ID). These IDs uniquely identify the software version(s) for the vehicle’s control module(s). • CVN (Calibration Verification Number). CVNs are used to CVNs are used to determine if emission-related calibrations for the vehicle under test have been changed. -
Page 45: Resetting
LAUNCH Professional 909 User Manual 5.5 Resetting In addition to amazing & powerful diagnostic function, it also features Oil Reset Service, Electronic Parking Brake Reset, Steering Angle Calibration, ABS Bleeding, TPMS (Tire Pressure Monitor System) Reset, Gear Learning, IMMO Service, Injector Coding, Battery Maintenance System, Diesel Particulate Filter... - Page 46 LAUNCH Professional 909 User Manual conditions and climate. This function can be performed in the following cases: 1. If the service lamp is on, you must provide service for the car. After service, you need to reset the driving mileage or driving time so that the service lamp turns off and the system enables the new service cycle.
- Page 47 LAUNCH Professional 909 User Manual 5.5.5 Tire Pressure Monitor System Reset This function allows you to quickly look up the tire sensor IDs from the vehicle’s ECU, as well as to perform TPMS replacement and sensor test. 1. After the tire pressure MIL turns on and maintenance is performed, the tire pressure resetting function must be performed to reset tire pressure and turn off the tire pressure MIL.
- Page 48 LAUNCH Professional 909 User Manual To prevent the car being used by unauthorized keys, the anti-theft key matching function must be performed so that the immobilizer control system on the car identifies and authorizes remote control keys to normally use the car.
- Page 49 LAUNCH Professional 909 User Manual c) The fuel additive nozzle is removed or replaced. d) The catalytic oxidizer is removed or replaced. e) The DPF regeneration MIL is on and maintenance is performed. f) The DPF regeneration control module is replaced.
-
Page 50: Update
LAUNCH Professional 909 User Manual 6. Update If some new software or APK can be updated, a numeric indicator will display on the “Upgrade” module on the Job menu. In this case, you may use this option to keep it synchronized with the latest version. -
Page 51: Data
LAUNCH Professional 909 User Manual 7. Data Fig. 7-1 7.1 Diagnostic Report This module stores all diagnostic reports saved on the Read Trouble Code screen. All the diagnostic reports are sorted by Date and Make. If there are too many reports stored, tap (Search) to filter and quickly locate it. -
Page 52: Dtc Library
LAUNCH Professional 909 User Manual Tap “Diagnostic Record” to enter and select the desired data stream items and tap “OK” to jump to the playback page. Fig. 7-2 On-screen Buttons: Graph – Displays parameters in waveform graphs. Combine – Use to merge graphs for data comparison. Different items are coded in different colors. -
Page 53: Dlc(Data Link Connector) Location
LAUNCH Professional 909 User Manual Swipe the screen upwards/downwards to alter the value, then press [OK] button, the screen will display definition of the DTC. 7.4 DLC(Data Link Connector) Location This option helps you to find the location of the vehicle’s DLC. -
Page 54: Settings
LAUNCH Professional 909 User Manual 8. Settings 8.1 Units of measurement It is designed to set the measurement unit. Metric System and English System are available. 8.2 Screen capture This option allows you to capture the current screen. All screenshots created during vehicle diagnosis are saved in “Data”... -
Page 55: Date/Time
LAUNCH Professional 909 User Manual 8.7 Date/Time This option allows you to set the system date & time. *Note: Since all diagnostic reports are sorted by Make and Date. To differentiate between files, please configure the accurate system time. 8.8 Language The tool supports multiple languages. -
Page 56: Faq
LAUNCH Professional 909 User Manual 9. FAQ Here we list some frequently asked questions and answers related to this tool. System halts when reading data stream. What is the reason? It may be caused by a slackened connector. Please turn this tool off, firmly connect the connector, and switch it on again. - Page 57 LAUNCH Professional 909 User Manual What if the tool cannot be switched on even after a period of recharging? Please recharge it for at least 3 hours until the power LED lights up, then it can be switched on.
- Page 58 The exclusive remedy for any automotive meter found to be defective is repair or replacement, and LAUNCH shall not be liable for any consequential or incidental damages.
Need help?
Do you have a question about the Creader Professional 909 and is the answer not in the manual?
Questions and answers